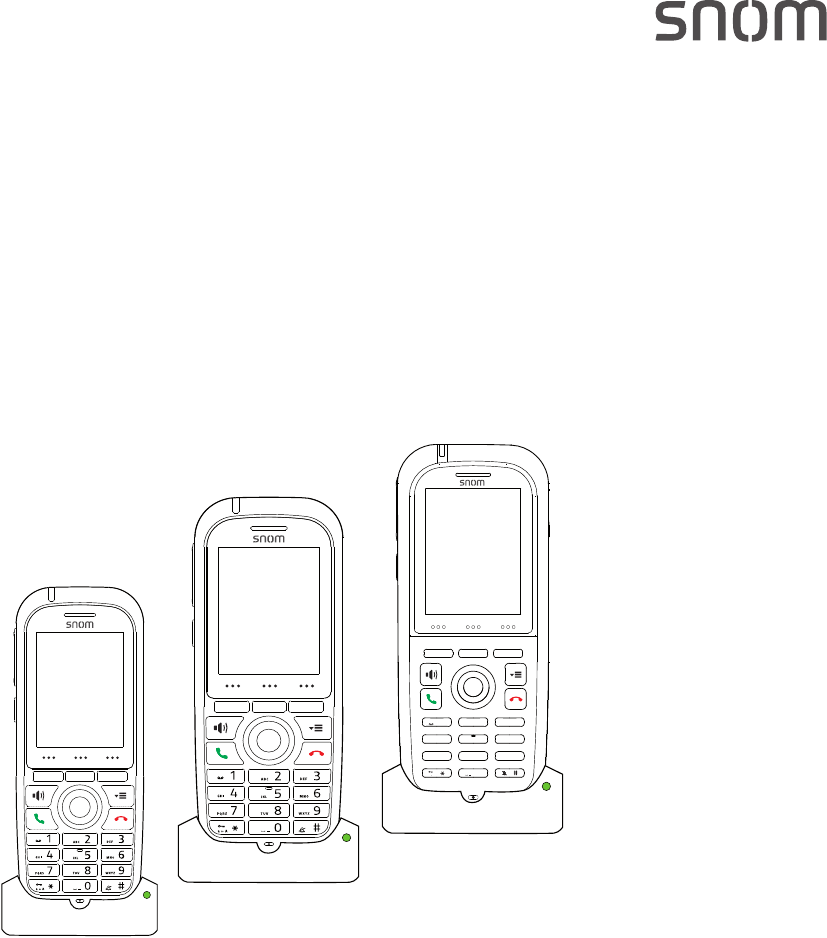
Handset M70/M80/M90
User Manual
v1.03
1
4
7 8
0
5
GHI
JKL
PQRS
a » A
TUV
6
MNO
2ABC
3
DEF
9
WXYZ
2
TABLE OF CONTENTS
Copyright, Trademarks, Legal Disclaimers ....................................................................5
Important information ......................................................................................................6
Intended use ............................................................................................................................ 6
Safety instructions .................................................................................................................6
Important Battery Information .............................................................................................8
Disposal ....................................................................................................................................9
Handset, Charger, and Power Supply ............................................................................9
Battery ............................................................................................................................... 10
Cleaning .................................................................................................................................. 10
Standards conformance ......................................................................................................11
Technical specifications ......................................................................................................11
Additional Important Information USA .............................................................................12
Regulatory Information Canada ......................................................................................... 18
Setting up the phone ...................................................................................................... 20
Setting up the hardware ...................................................................................................... 20
Delivery content ...............................................................................................................20
Charging the battery .......................................................................................................21
Registering the handset at the base station ...................................................................22
Turning the handset on and o .......................................................................................... 23
Getting to know your phone .......................................................................................... 24
M70 / M80 at a glance .........................................................................................................24
M90 at a glance .....................................................................................................................25
Handset back at a glance ....................................................................................................26
LED indications .....................................................................................................................26
Missed calls, message waiting (MWI), low battery ...................................................26
Speakerphone key LED ..................................................................................................27
Hard keys ...............................................................................................................................27
Context-sensitive function keys ...................................................................................28
Navigation and "OK" keys ............................................................................................... 28
Speakerphone key ..........................................................................................................28
Menu key ...........................................................................................................................29
Call keys ............................................................................................................................29
Star key .............................................................................................................................30
Alphanumeric keys .........................................................................................................31
Entering phone numbers (numeral mode) ...........................................................31
Letter modes ..............................................................................................................31
Volume key .......................................................................................................................33
3
Mute key ............................................................................................................................34
Emergency alarm button ...............................................................................................34
Idle screen layout .................................................................................................................35
Menus ......................................................................................................................................35
Contacts .................................................................................................................................. 36
Adding contacts ...............................................................................................................37
Editing contacts ...............................................................................................................39
Assigning speed dial key to contact ............................................................................40
Reassigning speed dial key to a dierent contact ....................................................41
Central directory ...................................................................................................................42
Finding a name ................................................................................................................42
Calling a number from the central directory .............................................................43
Call history (call lists) ..........................................................................................................43
Accessing the call history .............................................................................................. 44
Viewing the details of a call ..........................................................................................45
Calling a number from a call list ..................................................................................45
Connectivity ...........................................................................................................................45
Registering .......................................................................................................................45
Deregistering ...................................................................................................................45
Selecting the network ....................................................................................................46
Settings ...................................................................................................................................46
Audio settings ..................................................................................................................47
Ring volume ................................................................................................................48
Ring melody ................................................................................................................48
Vibrator ........................................................................................................................49
Time and date settings ...................................................................................................49
Power save .......................................................................................................................51
Security .............................................................................................................................51
Automatic keylock .....................................................................................................51
Unlocking the keypad ................................................................................................ 52
Change PIN .................................................................................................................. 52
Line ....................................................................................................................................53
Status ................................................................................................................................54
Base station information ..........................................................................................54
Handset information .................................................................................................54
Auto answer .....................................................................................................................54
Do not disturb (DND) .......................................................................................................55
Call forwarding ................................................................................................................56
Bluetooth ...........................................................................................................................57
Enabling and disabling Bluetooth ........................................................................... 57
4
Pairing .......................................................................................................................... 57
Managing paired headsets ....................................................................................... 58
Alarm clock settings ............................................................................................................59
Alarm .................................................................................................................................59
Setting the alarm .......................................................................................................59
Turning the alarm o ................................................................................................60
Recurring alarm ..............................................................................................................60
Setting the alarm .........................................................................................................60
Turning the alarm o ..................................................................................................61
Snooze time ......................................................................................................................61
Setting snooze time ...................................................................................................61
Using snooze time .....................................................................................................62
Using the handset .......................................................................................................... 63
Making calls ...........................................................................................................................63
Selecting an identity for the outgoing call .................................................................. 63
Using dierent dialing methods ...................................................................................64
Entering the number manually ...............................................................................64
Redialing ...................................................................................................................... 64
Calling a contact ......................................................................................................... 64
Speed dialing a contact ............................................................................................65
Calling a number from the Central Directory .......................................................65
Calling emergency alarm number ..........................................................................66
Calling a number from call history (all, missed, received, dialed calls) .........66
Accepting calls ......................................................................................................................67
Accepting a ringing call .................................................................................................. 67
Call waiting .......................................................................................................................67
Active calls .............................................................................................................................68
Hold .................................................................................................................................... 68
Swapping calls ...........................................................................................................69
Transferring calls ............................................................................................................ 69
Attended transfer ......................................................................................................69
Blind transfer (unattended transfer) ......................................................................70
Appendix 1 - Using the handset to set up the base ..................................................... 71
Finding the IP address of the base .................................................................................... 71
Finding RSSI and RFPI .........................................................................................................71
Testing the audio signal ......................................................................................................71

5
User Manual M70 / M80 / M90 Copyright, Trademarks, Disclaimers
Copyright, Trademarks, Legal Disclaimers
© 2019 Snom Technology GmbH
All Rights Reserved.
Snom, the names of Snom products, and Snom logos are trademarks owned by Snom Technology
GmbH. All other product names and names of enterprises are the property of their respective
owners.
Product specifications are subject to change without notice.
Snom Technology GmbH reserves the right to revise and change this document at any time, without
being obliged to announce such revisions or changes beforehand or after the fact.
Texts, images, and illustrations and their arrangement in this document are subject to the protection
of copyrights and other legal rights worldwide. Their use, reproduction, and transmittal to third
parties without express written permission may result in legal proceedings in the criminal courts as
well as civil courts.
When this document is made available on Snom’s web page, Snom Technology GmbH gives its
permission to download and print copies of its content for the intended purpose of using it as a
manual. No parts of this document may be altered, modified or used for commercial purposes without
the express written consent of Snom Technology GmbH.
Although due care has been taken in the compilation and presentation of the information in this
document, the data upon which it is based may have changed in the meantime. Snom therefore
disclaims all warranties and liability for the accurateness, completeness, and currentness of the
information published, except in the case of intention or gross negligence on the part of Snom or
where liability arises due to binding legal provisions.

6
User Manual M70 / M80 / M90 Safety, Disposal, Cleaning, Standards
Important information
Please read the instructions on safety and disposal and on how to set up and use the device before
using it and also give them to other users to read or inform those users of their contents. Save this
manual and do not give the device to third parties without it.
Intended use
This telephone is designed for use with a Snom M-series base. Any other use is considered
unintended use. Any modification or reconstruction not described in the user manual is considered
unintended use.
Safety instructions
Follow the instructions in this manual and other applicable documentation of the device.
• Use only the power converter (AC/DC adapter) delivered with the phone or a power supply
expressly recommended by Snom. Other power power supplies may damage or even destroy the
device, aect its behavior, or induce noise.
• Use only the rechargable battery delivered with the handset or a rechargable battery expressly
recommended by Snom.
• Avoid placing the device's cord where people may trip over them. Avoid placing the cord where it
may be exposed to mechanical pressure as this may damage it. If the power supply cord or the
plug is damaged, disconnect the device and contact qualified service personnel.
• Charger, power adapter, and cord are for indoor installation only. Not for outdoor installation!
• This device is for indoor use only! NOT FOR OUTDOOR USE!
• Do not install the device in rooms with high humidity (for example, in bathrooms, laundry rooms,
damp basements). Do not immerse the device in water and do not spill or pour liquids of any kind
onto or into the device.
• Do not install the device in surroundings at risk for explosions (paint shops, for example). Do not
use the device if you smell gas or other potentially explosive fumes.
• Do not use the device during thunderstorms. Lightning striking the power grid may cause
electric shocks and damage or destroy the device. We recommend using overvoltage and surge
protection.
• Warning: The handset contains a magnet, and its earpiece may attract small dangerous objects
such as needles or pins. Please ensure before each use that no such objects are present.
• The operational temperature for the handset is between -10 °C and + 55 °C (14 °F and 131 °F).
• The charging temperature is between +5 °C and +45 °C (41 °F and 113 °F).
• Medical devices might be adversely aected. Please consider the technical ramifications when
installing the devices in a doctor‘s oce, for example.
• FOR THE USA: Do not use near medical equipment or if you have a pacemaker.

7
User Manual M70 / M80 / M90 Safety, Disposal, Cleaning, Standards
• If you have an implanted pacemaker:
◦ Do not use if you have an implanted pacemaker unless the pacemaker manufacturer‘s
directions expressly permit the use of devices emitting pulsating radio frequency signals.
Always follow the manufacturer‘s directions!
◦ Recommended MINIMUM distance to the handset: 20 cm (7'').
◦ Do not carry the handset in a breast pocket.
◦ Hold the handset to the ear opposite the medical device to minimize the potential for
interference.Turn the handset o immediately if there is any reason to suspect that
interference is taking place.
◦ FOR THE USA: Do not use if you have a pacemaker.
• Other health risks
Do not hold the loudspeaker at the back of the handset against your ear when the phone is ringing
or when speakerphone is switched on. Danger of serious, irreversible damage to your hearing!
• If you are wearing a hearing aid
Please note that the handset may cause an annoying background noise.
Additional safety information
• Small children
Your device and its enhancements may contain small parts. Keep them out of the reach of small
children.
• Operating environment
Remember to follow any special regulations in force in any area, and always switch o your
device when its use is prohibited or when it may cause interference or danger. Use the device only
in its normal operating positions. Do not place credit cards or other magnetic storage media near
the device, because information stored on them may be erased.
• Medical devices
Operation of any equipment emitting radio frequency signals may interfere with the functionality
of inadequately shielded medical devices. Consult a physician or the manufacturer of the medical
device to determine if they are adequately shielded from external radio frequency (RF) energy or if
you have any other questions concerning this topic. Switch o your device in health care facilities
when signs posted in these areas instruct you to do so. Hospitals or health care facilities may be
using equipment that could be sensitive to external RF energy.
• Implanted medical devices
Manufacturers of medical devices recommend that a minimum distance should be maintained
between a wireless device and an implanted medical device, such as pacemakers or cardioverter
defibrillators, to avoid potential interference with the medical device. Persons who have such
devices should:
◦ Always keep the wireless device more than 20 centimeters (7.8 inches) from the medical
device when the wireless device is turned on.
◦ Not carry the wireless device in a breast pocket.
◦ Hold the wireless device to the ear opposite the medical device to minimize the potential for
interference.
◦ Turn the wireless device o immediately if there is any reason to suspect that interference is
taking place.

8
User Manual M70 / M80 / M90 Safety, Disposal, Cleaning, Standards
◦ Read and follow the directions of the medical device‘s manufacturer.
If you have any questions about using your wireless device with an implanted medical device,
consult your health care provider.
SELV (Safety Extra Low Voltage) compliance
Safety status of Input/Output connections comply with SELV requirements.
Potentially explosive environments
Switch o your device when in any area with a potentially explosive atmosphere and obey all signs
and instructions. Sparks in such areas could cause an explosion or fire resulting in bodily injury or
even death. Switch o the device at refuelling points such as near gas pumps at service stations.
Observe restrictions on the use of radio equipment in fuel depots, storage, and distribution areas;
chemical plants; or where blasting operations are in progress. Areas with a potentially explosive
atmosphere are often but not always clearly marked. They include below deck on boats, chemical
transfer or storage facilities, vehicles using liquefied petroleum gas, and areas where the air contains
chemicals or particles such as grain dust or metal powders.
Sensitive Electronic Equipment
The current state of research concludes that operational DECT phones normally do not adversely
aect electronic equipment. Nevertheless, you should take some precautions if you want to operate
DECT phones in the immediate vicinity of such equipment like sensitive laboratory equipment. Always
keep a minimum distance of 10 cm (3.94“) to the equipment even when the phone is in standby.
Electrical Surges
We recommend the installment of an AC surge arrester in the AC outlet to which this device is
connected to avoid damage to the equipmen t caused by local strikes of lightening or other electrical
surges.
Important Battery Information
This product uses a rechargeable Lithium-Ion battery 3.7V, 1100 mAh. Only use the battery that came
with the handset or the replacement battery, Snom PN 00003932.
Do not use any other type of battery since this may lead to leakage, fire, explosion, or other dangerous
situations. Never disassemble, alter, or short-circuit batteries or use them for purposes other than
the intended one. Charge battery only within the handset placed in the charger that came with the
product.
Charging and Discharging, Storage
• The full performance of a new battery is achieved only after two or three complete charge and
discharge cycles.

9
User Manual M70 / M80 / M90 Safety, Disposal, Cleaning, Standards
• The battery can be charged and discharged hundreds of times, but it will eventually wear out. Use
only Snom Technology GmbH approved batteries.
• If left unused, a fully charged battery will lose its charge over time. If the battery is completely
discharged, it may take a few minutes before the charging indicator appears on the display.
• Use the battery only for its intended purpose. Do not short-circuit the battery. Short-circuiting
the terminals may damage the battery or the connecting object. Do not use a damaged charger or
battery. Using a damaged battery may cause it to explode.
• Do not place or store the battery, inside or outside the handset, in the immediate vicinity of open
fire or other heat sources.
• Leaving the battery in hot or cold places will reduce its capacity and lifetime. Charge batteries
within an ambient temperature range of 5° C to 40° C (41° F to 104° F). A device with a hot or cold
battery may not work temporarily, even when the battery is fully charged.
• Avoid overcharging. Repeated overcharging can lead to deterioration in battery performance.
Never attempt charging the battery with reversed polarity as this may cause the gas pressure
inside the battery to rise and lead to leakages.
• Remove battery if storing phone for more than 1 month.
• Store battery/batteries in a cool, dry place without corrosive gases. Temperature range for
storage up to 3 months: -20° C to 35° C (-4° F to 95° F). Storage up to 6 months: Charge battery/
batteries to 30% to 70% of capacity and store at +5° C and +25° C (41° F to 77° F), relative
humidity 50%.
• Battery Disposal. Defective or exhausted batteries should never be disposed of as municipal
waste. Return old batteries to the battery supplier, a licensed battery dealer or a designated
collection facility. Do not incinerate batteries.
Disposal
Handset, Charger, and Power Supply
This product is subject to European Directive 2012/19/EC and may not be disposed
of with general household garbage. If you do not know where you may dispose
of the device at the end of its lifespan, contact your municipality, your local waste
management provider, or your seller..
If you do not know where you may dispose of the device at the end of its lifespan,
contact your municipality, your local waste management provider, or your seller.
For countries outside the European Union
Disposal of electrical and electronic products in countries outside the European Union should be done
in line with local regulations. Please contact local authorities for further information.

10
User Manual M70 / M80 / M90 Safety, Disposal, Cleaning, Standards
Battery
The battery/batteries provided with this product is/are subject to European
Directive 2006/66/EC and may not be disposed of with general household garbage.
If you do not know where you may dispose of the battery/batteries at the end of its/
their lifespan, contact your municipality, your local waste management provider, or
your seller.
For countries outside the European Union
Disposal of batteries in countries outside the European Union should be done in line with local
regulations. Please contact local authorities for further information. In the US and Canada, you can
contact the consumer helpline 1-800-8-BATTERY.
Cleaning
To clean the device, use an anti-static cloth. Please avoid cleaning liquids as they might damage the
surface or internal electronics of the device.
11
User Manual M70 / M80 / M90 Safety, Disposal, Cleaning, Standards
Standards conformance
This device complies with the essential health, safety, and environmental requirements of all
relevant European directives. This phone is FCC certified and meets US and Canadian health,
safety, and environmental standards.
The declaration of conformity is available for download at www.snom.com/Conformity.
Unauthorized opening, changing, or modifying the device will cause the warranty to lapse and may
also result in the loss of CE conformity and and IC FCC certification. In case of malfunction contact
authorized service personnel, your seller, or Snom.
Technical specifications
Safety IEC 60950-1:2005
Frequency band
1880–1900MHz (EU), 1910–1930 MHz (LATAM), 1920–1930 MHz (US),
1920–1930MHz (Brazil)
Bluetooth Bluetooth LE interface (for positioning)
Battery type
Lithium-Ion 1100mAH, 3.7 V, 4.1 W (included in delivery)
Charger
5V DC 2000mA with non-detachable USB cable, USB type A (included in
delivery)
Power
SMPS power adapter Ten Pao S008ACM0500200, input 100-240 VAC,
output 5V DC 2000 mA, interchangeable EU and US clips (included in
delivery)
Talk time WB
Approx. 12 hours
Talk time NB
Approx. 17 hours
Standby time
Approx. 200 hours
Charging time
From empty to full 6 hours
Connector
3.5 mm standard phone jack for wired headsets
Ingress protection
M70: IP50 at LCD area.
M80: IP65 compliant
M90: IP65 compliant
Ruggedization
M70, M80: Ruggedized design
M90: Ruggedized design with antibacterial coating
Drop height (max.)
2m on concrete floor
Tumble test
1000 x 0.5m
Weight M70: 86g
M80: 95g
M90: 95g

12
User Manual M70 / M80 / M90 Safety, Disposal, Cleaning, Standards
Additional Important Information USA
FCC ID: T7HCT8631
Intended Use
This telephone is designed for use with a Snom M-series base. Any other use, modification or
reconstruction of the product is considered unintended use.
Important Safety Information
Follow all instructions and warnings in the user manual, and on the equipment to prevent accidents.
WARNING
Fire, electric shock, or other injury may result if you do not observe the following safety precautions:
• Do not use in or near a bathtub, sink, swimming pool, wet basement, or other water.
• Do not use this or any cordless telephone in the vicinity of a gas leak.
• Do not use in environments subject to explosion hazards, such as auto paint shops.
• Do not use near medical equipment or if you have a pacemaker.
• Unplug from wall outlet before cleaning.
• To prevent overheating, do not block slots and openings in the cabinet or the back or bottom of
equipment. Do not place equipment on beds, sofas, rugs, or other surfaces that generate fibers.
• To prevent overheating, do not place near or over a radiator or in a cabinet without
properventilation.
• To reduce the risk of fire, use only 26 AWG or larger UL-listed or CSA-certified telecommunication
line cord.
• Operate using the power source indicated on the marking label. If you are unsure about the type of
power supply to your home or business, consult your power company.
• Do not place objects on the power cord. Do not step on the power cord.
• To prevent exposure to dangerous voltage, do not push objects through cabinet slots.
• To reduce the risk of electric shock, do not disassemble equipment or open parts other than
specified access doors. Opening or removing parts may expose you to dangerous voltage or other
risks. Incorrect reassembly can cause electric shock when equipment is subsequently used.
• Do not overload wall outlets and extension cords.
• Unplug equipment and contact qualified service if any of the following has occurred:
◦ Power supply cord or plug has been damaged or frayed.
◦ Liquid has been spilled on or in the equipment.
◦ Equipment has been exposed to rain or water.
◦ Equipment does not work normally even when the operating instructions are followed. Adjust
only those controls referred to in the operating instructions. Improper adjustment of other
controls may result in damage and may require extensive work by an authorized service
center.

13
User Manual M70 / M80 / M90 Safety, Disposal, Cleaning, Standards
◦ Equipment has been dropped and damaged.
◦ Equipment has exhibited a distinct change in performance.
• Do not put the handset of the telephone next to your ear when the handset is not in normal talk
mode.
• Radio signals transmitted between the handset and base may cause interference with hearing
aids.
• WARNING: The handset contains magnets and the earpiece or mouthpiece may attract and hold
small dangerous objects such as pins. Please ensure no such objects are present before each
use.
• The cords contain lead, a chemical known to the State of California to cause birth defects or other
reproductive harm. Wash hands after handling.
Installation Guidelines
• Follow all warnings and instructions.
• Do not install equipment near a bath tub, sink, or shower.
• Operate the equipment using only the power source indicated on the marking label. If you are
unsure of the power supply to your home or business, consult with your power company.
• To avoid interference to nearby appliances, do not place base of the phone on or near a television,
VCR, or microwave oven.
• Do not expose the equipment to direct sunlight.
• Do not place equipment on an unstable cart, stand, or table.
• Adjust only those controls referred to in the operating instructions. Improper adjustment of other
controls may result in damage and may require extensive work to restore equipment to normal
operation.
• The equipment may get warm when batteries are being charged. To avoid damage, it is
recommended that the product not be placed on antique or veneered wood.
• The location of the base unit of the phone should be close to a phone jack, a personal computer,
and a continuous power outlet (an AC outlet that does not have a switch to interrupt power).
• Keep base and handset away from sources of electrical noise such as motors or fluorescent
lighting.
Cleaning
Do not clean with liquid or aerosol cleaners, household polish, chemicals, or cleaning agents. To avoid
static shock, do not clean with a dry cloth. Clean with only a damp (not wet) cloth.
NOTICE
To avoid damage to the equipment, observe the following precautions:
• Do not expose to water, rain, or moisture.
• Place securely on a stable surface.
• To avoid damage during an electrical storm, equipment should be plugged into a surge protector.

14
User Manual M70 / M80 / M90 Safety, Disposal, Cleaning, Standards
Battery Safety Precautions
The handsets contain a rechargeable Li-ion battery.
WARNING
Fire or injury may result if you do not observe the following safety precautions:
• Use only the rechargeable battery or batteries specified in the manual.
• Do not use other batteries or conventional alkaline batteries.
• To avoid explosion, do not dispose of battery in a fire.
• Review battery package insert for disposal instructions. Batteries must be disposed of properly
and may need to be recycled. Contact your local recycling center for proper disposal methods.
• Do not open or mutilate battery. Released electrolyte is corrosive and may damage eyes and skin
and may be toxic if swallowed.
• Battery may overheat and cause burns if placed into contact with conducting materials such as
rings, bracelets, and keys.
CAUTION
• Charge battery only in accordance with the instructions and limitations specified in the user
manual.
• Observe proper polarity orientation between battery and battery charger.
• Remove battery if storing phone for more than 30 days.
• Disconnect and remove batteries before shipment. Any batteries transported with the
equipment must be separately secured and cushioned with any exposed terminals covered
to prevent breakage, leakage, movement within packaging, or short circuits. Failure to follow
recommendations may be against U.S. Department of Transportation (DOT), International Civil
Aviation Administration (ICAO), International Air Transport Association (IATA), or International
Maritime Organization (IMO) regulations.
• Rechargeable battery must be recycled or disposed of properly. At the end of its useful life, under
various state and local laws it may be illegal to dispose of a battery into the municipal waste
stream. Check with your local solid waste ocials for details in your area for recycling options or
proper disposal.
• Please call 1-800-8-BATTERY for information on how to recycle the battery.
Cordless telephone privacy
Cordless telephones are radio devices. Communications between the handset and base of your
cordless telephone are accomplished by means of radio waves which are broadcast over the open
airways. Because of the inherent physical properties of radio waves, your communications can be
received by radio receiving devices other than your own cordless telephone unit. Consequently, any
communications using your cordless telephone may not be private.

15
User Manual M70 / M80 / M90 Safety, Disposal, Cleaning, Standards
Emergency calling service
(i.e., 911, 999, etc.) with VoIP typically functions the same as that of traditional phone service
companies. However, you are strongly advised to consult your VoIP provider to ensure that
emergency service via VoIP is available in your area. In addition, you will likely be asked to register
your physical address with your VoIP service provider to ensure that an emergency response team
is able to locate the origin of the emergency call. Also note that it may take several days for the
registration of your address to take eect.
In order to better ensure your safety, please be aware of certain circumstances in which emergency
calling service may be either unavailable or limited in comparison to traditional emergency calling
services.
• During an electrical power outage, an internet service outage, or a service disruption due to non-
payment, your emergency calling service may not function properly.
• If at any point in time your broadband phone or adapter fails, emergency calling service may not
function properly.
• The relocation of your base station to a physical address other than that provided upon signup, or
the use of a number outside your normal area code or exchange may cause incorrect emergency
calling information to be provided to your local emergency response center.
Please contact your VoIP service provider for more information.
Please be advised that emergency calling services generally do not recommend programming
emergency numbers into the phone's speed dial as this may lead to accidental dialing. If you dialed
an emergency number in error, do not terminate the call. Stay on the phone and explain to the
dispatcher that you dialed by accident and that you do not have an emergency.
FCC and other information
This equipment complies with Parts 68 of the FCC rules and the requirements adopted by the
Administrative Council for Terminal Attachments (ACTA).
This device complies with part 15 of the FCC rules. Operation is subject to the following two
conditions: (1) This device may not cause harmful interference, and (2) this device must accept
any interference received, including interference that may cause undesired operation. Privacy of
communications may not be ensured when using this phone.
These limits are designed to provide reasonable protection against harmful interference in a
residential installation. This equipment generates, uses and can radiate radio frequency energy and,
if not installed and used in accordance with the instructions, may cause harmful interference to radio
communications. However, there is no guarantee that interference will not occur in a particular
installation. If this equipment does cause harmful interference to radio or television reception, which
can be determined by turning the equipment o and on, the user is encouraged to try and correct the
interference by one or more of the following measures:
• Reorient or relocate the receiving antenna.
• Increase the separation between the equipment and receiver.
• Connect the equipment into an outlet or on a circuit dierent from that to which the receiver is
connected.
• Consult the dealer or an experienced radio/TV technician for help.

16
User Manual M70 / M80 / M90 Safety, Disposal, Cleaning, Standards
FCC RF exposure warning
To insure the safety of users, the FCC has established criteria for the amount of radio frequency
energy various products may produce depending on their intended usage. This product has been
tested and found to comply with the FCC’s exposure criteria. For body worn operation, the FCC RF
exposure guidelines were also met when used with the accessories supplied or designed for this
product. Use of other accessories may not ensure compliance with FCC RF exposure guidelines and
should be avoided.
Caution: To maintain compliance with the FCC’s RF exposure guidelines, the internal antennas used
for this mobile transmitter (Base unit) must provide a separation distance of at least 20 cm from all
persons. Base and Handset must not be co-located or operating in conjunction with any other antenna
or transmitter.
Caution: Any changes or modifications not expressly approved by the party responsible for
compliance could void the user’s authority to operate this device.
Hearing aid compatibility
This equipment is hearing aid compatible as defined by the FCC in 47 CFR Section 68.316.
Health and safety information FCC
Exposure to Radio Frequency (RF) Signals
Your wireless phone is a radio transmitter and receiver. It is designed and manufactured not to exceed
the emission limits for exposure to radio frequency (RF) energy set by the Federal Communications
Commission of the U.S.
Government. These limits are part of comprehensive guidelines and establish permitted levels of RF
energy for the general population. The guidelines are based on the safety standards previously set by
both U.S. and international standards bodies:
This product has been shown to be capable of compliance for localized specific absorption rate (SAR)
for uncontrolled environment/general population exposure limits specified in ANSI/IEEE Std. C95.1-
1992 and has been tested in accordance with the measurement procedures specified in FCC/OET
Bulletin 65 Supplement C (2001) and IEEE Std. 1528-2003 (December 2003).
RF exposure FCC
Tests for SAR are conducted using standard operating positions specified by the FCC with the phone
transmitting at its highest certified power level in all tested frequency bands. Although the SAR is
determined at the highest certified power level, the actual SAR level of the phone while operation can
be well below the maximum value. This is because the phone is designed to operate at multiple power
levels so as to use only the power required to reach the network. In general, the closer you are to a
wireless base station antenna, the lower the power output.
Before a phone model is available for sale to the public, it must be tested and certified to the FCC that
it does not exceed the limit established by the government-adopted requirement for safe exposure.
The tests are performed in positions and locations (e.g., at the ear and worn on the body) as required

17
User Manual M70 / M80 / M90 Safety, Disposal, Cleaning, Standards
by the FCC for each model. Body-worn measurements may dier among phone models, depending
upon available accessories and FCC requirements. The highest SAR value for this phone when tested
for use at the ear is 0.41 W/kg. While there may be dierences between the SAR levels of various
phones and at various positions, they all meet the government requirement for safe exposure.
For body worn operation, to maintain compliance with FCC RF exposure guidelines, use only
accessories that contain no metallic components and provide a separation distance of 15mm (0.6
inches) to the body. Use of other accessories may violate FCC RF exposure guidelines and should be
avoided.

18
User Manual M70 / M80 / M90 Safety, Disposal, Cleaning, Standards
Regulatory Information Canada
IC ID: 4979B-CT8631
Industry Canada
This Class B digital apparatus complies with Canadian requirements: CAN ICES-3 (B). This product
meets the applicable Industry Canada technical specifications.
Interference information
Operation is subject to the following two conditions: (1) this device may not cause harmful
interference, and (2) this device must accept any interference received, including interference that
may cause undesired operation.
Privacy of communications may not be ensured when using this equipment.
Exposure to Radio Frequency (RF) Signals
This product is a radio transmitter and receiver. It is designed and manufactured not to exceed this
emission limit for exposure to radio frequency (RF) energy set by the Ministry of Health (Canada),
Safety Code 6. These limits are part of comprehensive guidelines and established permitted levels of
RF energy for the general population. These guidelines are based on the safety standards previously
set by international standard bodies. These standards include a substantial safety margin designed to
assure the safety of all persons, regardless of age and health.
This device and its antenna must not be colocated or operating in conjunction with any other antenna
or transmitter.
This device has been shown to be capable of compliance for localized specific absorption rate (SAR)
for uncontrolled environmental / general public exposure limits specific in ANSI/IEEE C95.1-1992 and
had been tested in accordance with the measurement procedures specified in IEEE 1528-2003.
Industrie Canada
CET appareil numérique de la classe B est conforme á la norme NMB-003 du Canada. Le présent
matériel est conforme aux specifications techniques applicables d’Industrie Canada.
Renseignements sur le brouillage
L’exploitation est autorisée aux deux conditions suivantes: (1) l’appareil ne doit pas produire
debrouillage; (2) l’utilisateur de l’appareil doit accepter tout brouillage radioélectrique subi, même si
le brouillage est susceptible d’en compromettre le fonctionnement..
La confidentialité des communications ne peut pas être garantie avec cet équipement.
Exposure to Radio Frequency (RF) Signals
Ce produit est un émetteur et un récepteur radio. Il est conçu et fabriqué de manière à ne pas
dépasser la limite d'émission d'exposition à l'énergie de radiofréquence établie par Santé Canada
au Code de sécurité 6. Ces limites font partie de lignes directrices détaillées et des niveaux
autorisés d'énergie RF population générale. Ces directives sont basées sur les normes de sécurité
précédemment définies par les organismes de normalisation internationaux. Ces normes incluent
une marge de sécurité importante conçue pour assurer la sécurité de toutes les personnes,
indépendamment de leur âge et de leur santé.

19
User Manual M70 / M80 / M90 Safety, Disposal, Cleaning, Standards
Cet appareil et son antenne ne doivent pas être installés dans un même lieu ni fonctionner avec une
autre antenne ou un autre émetteur.
Il a été démontré que cet appareil était capable de respecter le taux d'absorption spécifique localisé
pour les limites d'exposition non contrôlées pour l'environnement / le grand public spécifiques de la
norme ANSI / IEEE C95.1-1992 et avait été testé conformément aux procédures de mesure spécifiées
dans la norme IEEE 1528. -2003.
20
User Manual M70 / M80 / M90 Setting up the Phone
Setting up the phone
Setting up the hardware
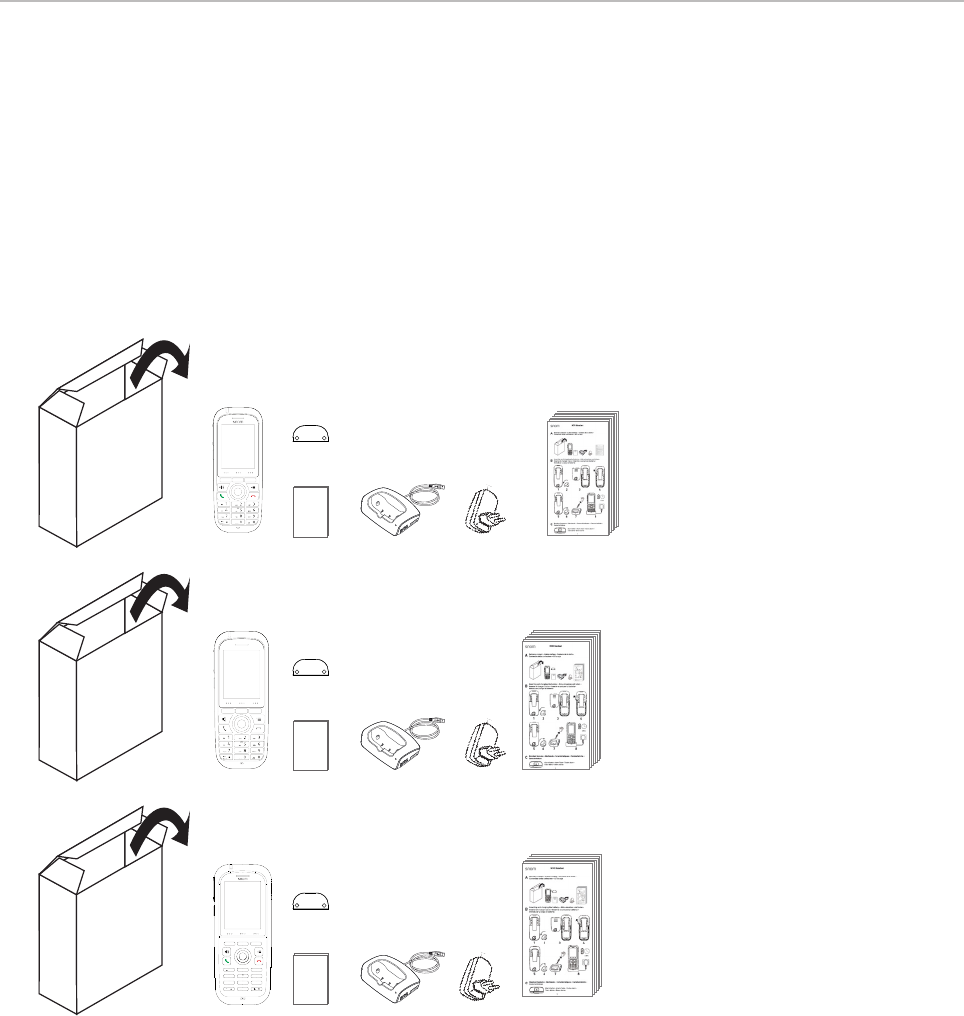
Delivery content
BATTERY
PAC K
BATTERY
PAC K
BATTERY
PAC K
1
4
7 8
0
5
GHI
JKL
PQRS
a » A
TUV
6
MNO
2ABC
3
DEF
9
WXYZ
1
4
7 8
0
5
GHI
JKL
PQRS
a » A
TUV
6
MNO
2ABC
3
DEF
9
WXYZ
Content of each box
◦ Handset with attached beltclip
◦ Spare beltclip mount
◦ 3.7 V 1100mAH Li-ion battery
◦ Charger 5 VDC with nonremovable USB cable, USB type A
◦ Power adapter 5 V with exchangeable plug clips for EU and US
◦ Quick Start Guide
◦ 6 information sheets (security, standards) in English, German, French, Italian, Spanish
M70 Handset
M80 Handset
M90 Handset
21
User Manual M70 / M80 / M90 Setting up the Phone
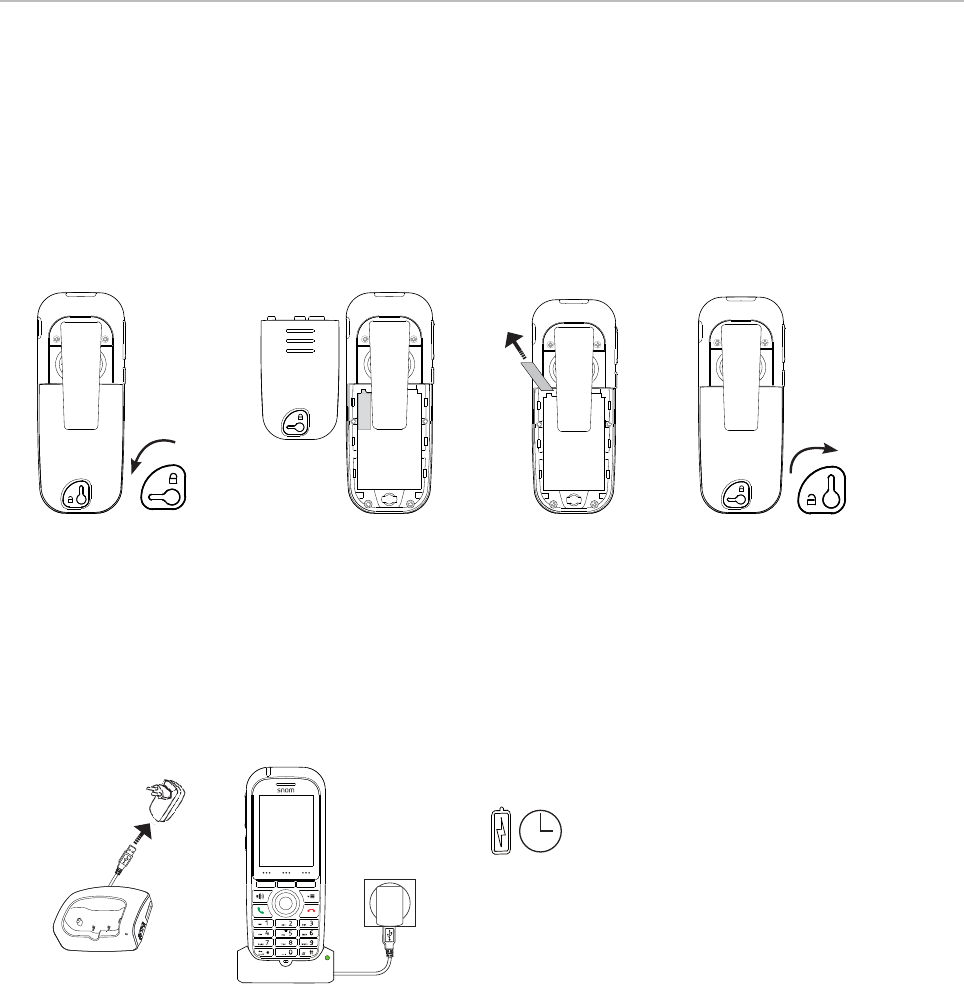
Charging the battery
The handset is delivered with the battery inserted. Before first use, remove the protective tab and
charge the battery fully. Depending on its charge status, charging the battery to maximum capacity
can take up to 6 hours.
1. Unlock the battery cover on the back of the handset by pushing the lever counterclockwise onto
the open lock symbol (Fig. 1).
BATTERY PACK
BATTERY PACK
Pull
tab
BATTERY PACK
Pull
tab
BATTERY PACK
Fig. 1 Fig. 2 Fig. 3 Fig. 4
2. Remove the battery cover from the back of the handset (Fig. 2).
3. Pull the tab away from the handset at a 90 degree angle until it is free of the battery (Fig. 3).
4. Put the cover on the battery compartment.
5. To lock the battery compartment, push the lever clockwise onto the closed lock symbol (Fig. 4).
6. Plug the USB cable of the charger into the USB port of the power adapter (Fig. 5).
Fig. 5 Fig. 6
7. Plug the power adapter into a wall outlet.
8. Place the handset into the charger (Fig. 6). The green LED on the charger lights up, indicating that
the handset is charging.
6 hrs
22
User Manual M70 / M80 / M90 Setting up the Phone
Registering the handset at the base station
To be able to register the handset at a base station, an extension must have been set up for it on that
base station. Please refer to the manual of the base station on how to set up extensions.
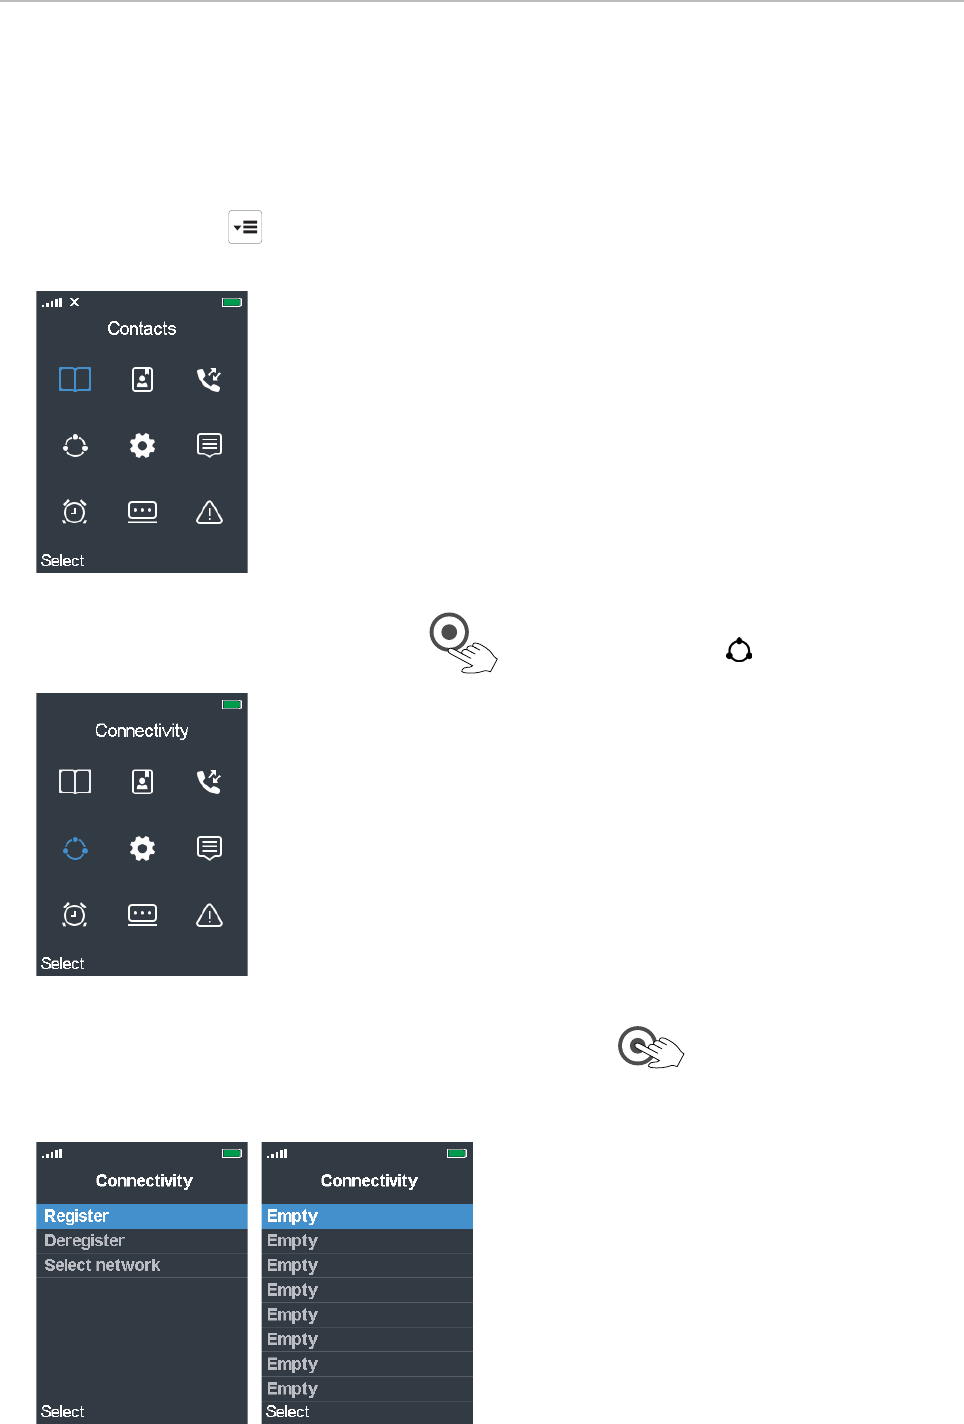
1. Press the menu key . The top menu opens; the symbol highlighted in blue is the one currently
selected (Fig. 1).
Fig. 1
2. Press the lower rim of the navigation key once to scroll down to Connectivity (Fig. 2).
Fig. 2
3. Press Select or the OK key in the center of the navigation key . The Connectivity menu
opens (Fig. 3). The blue bar highlighting one of the list items indicates that this is the currently
selected one. To register the handset at the base station, Register must be selected.
Fig. 3 Fig. 4

23
User Manual M70 / M80 / M90 Setting up the Phone
4. Press to open the line menu (Fig. 4).
5. Select the first line with the word "Empty" line and press . The text field for entering the
access code opens (Fig. 5).
Note: The default access code is 0000.
6. Enter the access code and press . The display indicates that the handset is registering
(Fig. 6). Once registration has been completed, the display shows the account/extension and the
date and time of the base station (Fig. 7). Your handset is now ready to be used.
Fig. 5 Fig. 6 Fig. 7
NOTE: The access code for registering the handset at the base station is set on the
base station. The PIN that is needed to deregister the handset from the base station
and to reset the handset to factory values is set on the handset itself. The default code
for the PIN is also 0000.
Turning the handset on and o
• The handset is turned on automatically when it is placed in the charger. Alternatively, press the
cancel key briefly.
• To turn the handset o, press the cancel key for three (3) seconds.
24
User Manual M70 / M80 / M90 Getting to know
Getting to know your phone
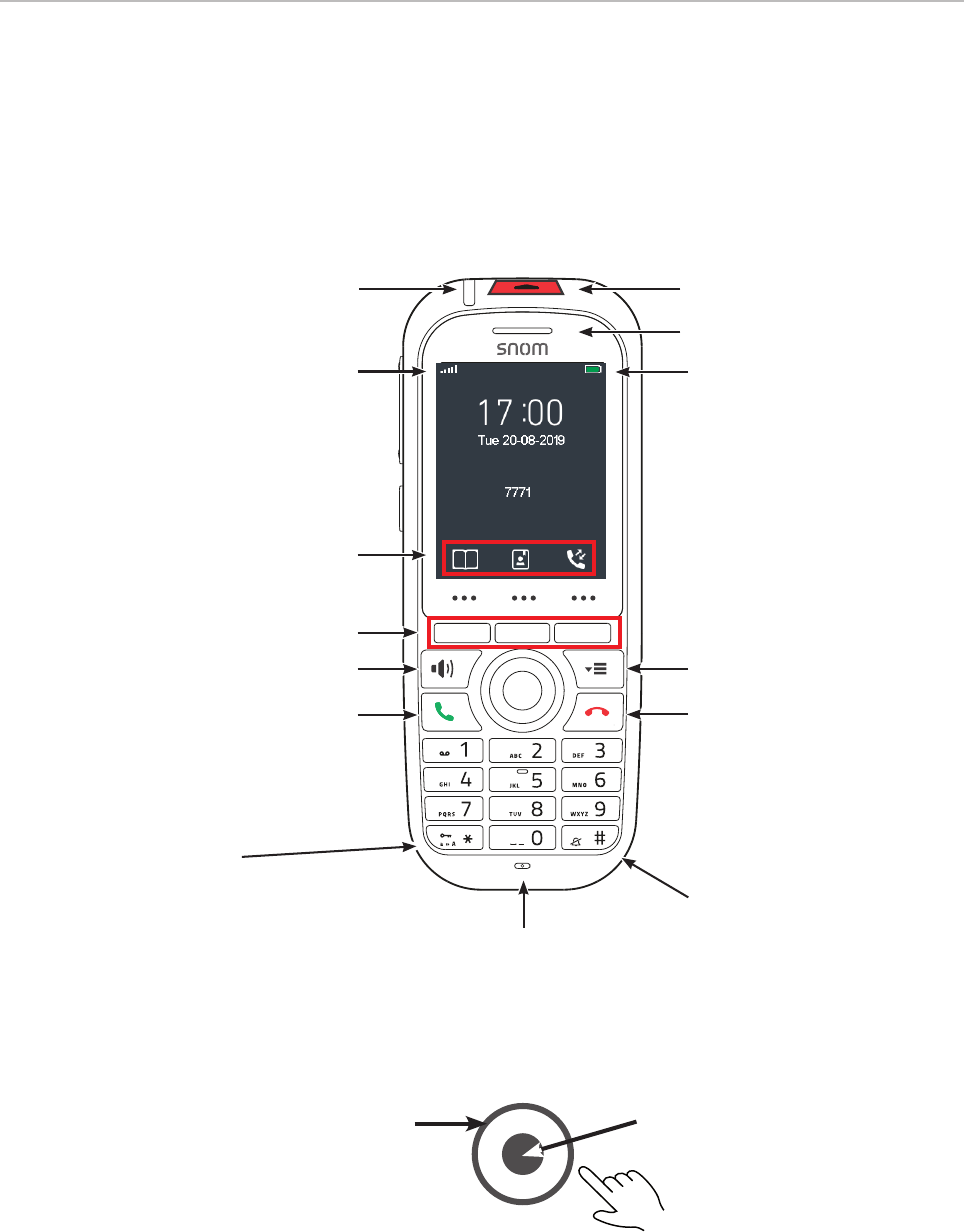
M70 / M80 at a glance
Speakerphone (on/o ) with LED
Call key (green key):
• Accepting incoming calls
• Starting to dial numbers
• From idle screen: Call lists,
redialing call from call lists
Star key:
• In editing modes:
◦ Letter mode: Press for one
second to change input mode
(lower case > upper case > v.v.)
◦ Numeral mode: Press briefly to
type *
• On idle screen: Press for 3 sec-
onds to lock/unlock the keypad
Function key line for
context-sensitive function keys
Signal strength
Context-sensitive function keys
Loudspeaker
Emergency alarm button
Cancel key (red key):
• Ending calls
• Canceling actions & input,
returning to previous screen
• Press for at least 3 seconds
to turn handset o ; press
briefl y to turn handset on
Pound/hash key
Microphone
LED indicators (MWI, missed
call, low battery)
Navigation keys: Press top, bottom,
left, or right of outer rim to navigate
in the respective direction on the
display
OK key (confi rming actions and
settings): Press center
Battery charging status
Settings menu
Note: The settings for the emergency alarm are configured on the base station where the handset
is registered. They cannot be set or changed on the handset. Please, ask your adminstrator for
more information on which type of emergency alarm, if any, pressing the alarm button will initiate.
25
User Manual M70 / M80 / M90 Getting to know
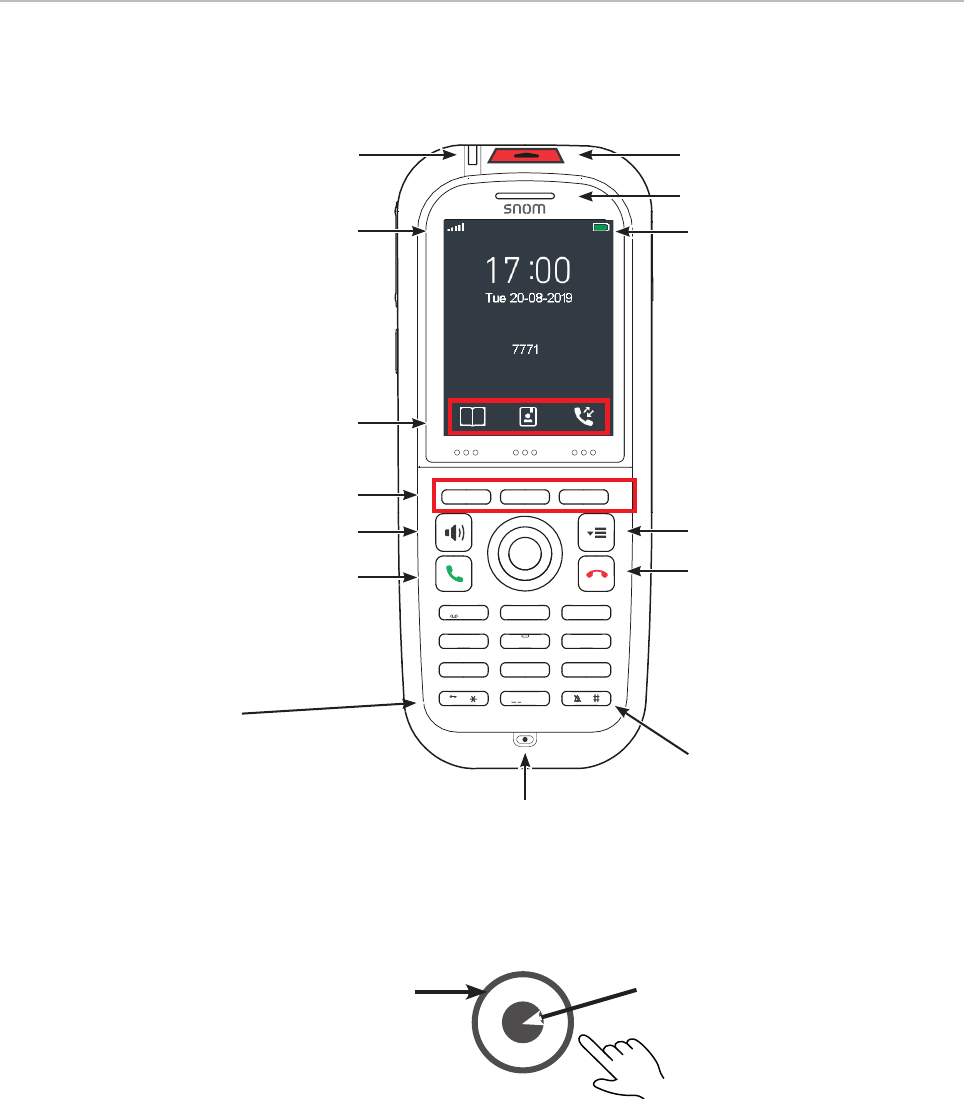
M90 at a glance
Speakerphone (on/o ) with LED
Call key (green key):
• Accepting incoming calls
• Starting to dial numbers
• From idle screen: Call lists,
redialing call from call lists
Star key:
• In editing modes:
◦ Letter mode: Press for one
second to change input mode
(lower case > upper case > v.v.)
◦ Numeral mode: Press briefly to
type *
• On idle screen: Press for 3 sec-
onds to lock/unlock the keypad
Function key line for
context-sensitive function keys
Signal strength
Context-sensitive function keys
Loudspeaker
Emergency alarm button
Cancel key (red key):
• Ending calls
• Canceling actions & input,
returning to previous screen
• Press for at least 3 seconds
to turn handset o ; press
briefl y to turn handset on
Pound/hash key
Microphone
1
4
7 8
0
5
GH I
JK L
PQRS
a » A
TUV
6
MNO
2AB C
3
DEF
9
WXYZ
LED indicators (MWI, missed
call, low battery)
Navigation keys: Press top, bottom,
left, or right of outer rim to navigate
in the respective direction on the
display
OK key (confi rming actions and
settings): Press center
Battery charging status
Settings menu
Note: The settings for the emergency alarm are configured on the base station where the handset
is registered. They cannot be set or changed on the handset. Please, ask your adminstrator for
more information on which type of emergency alarm, if any, pressing the alarm button will initiate.
26
User Manual M70 / M80 / M90 Getting to know
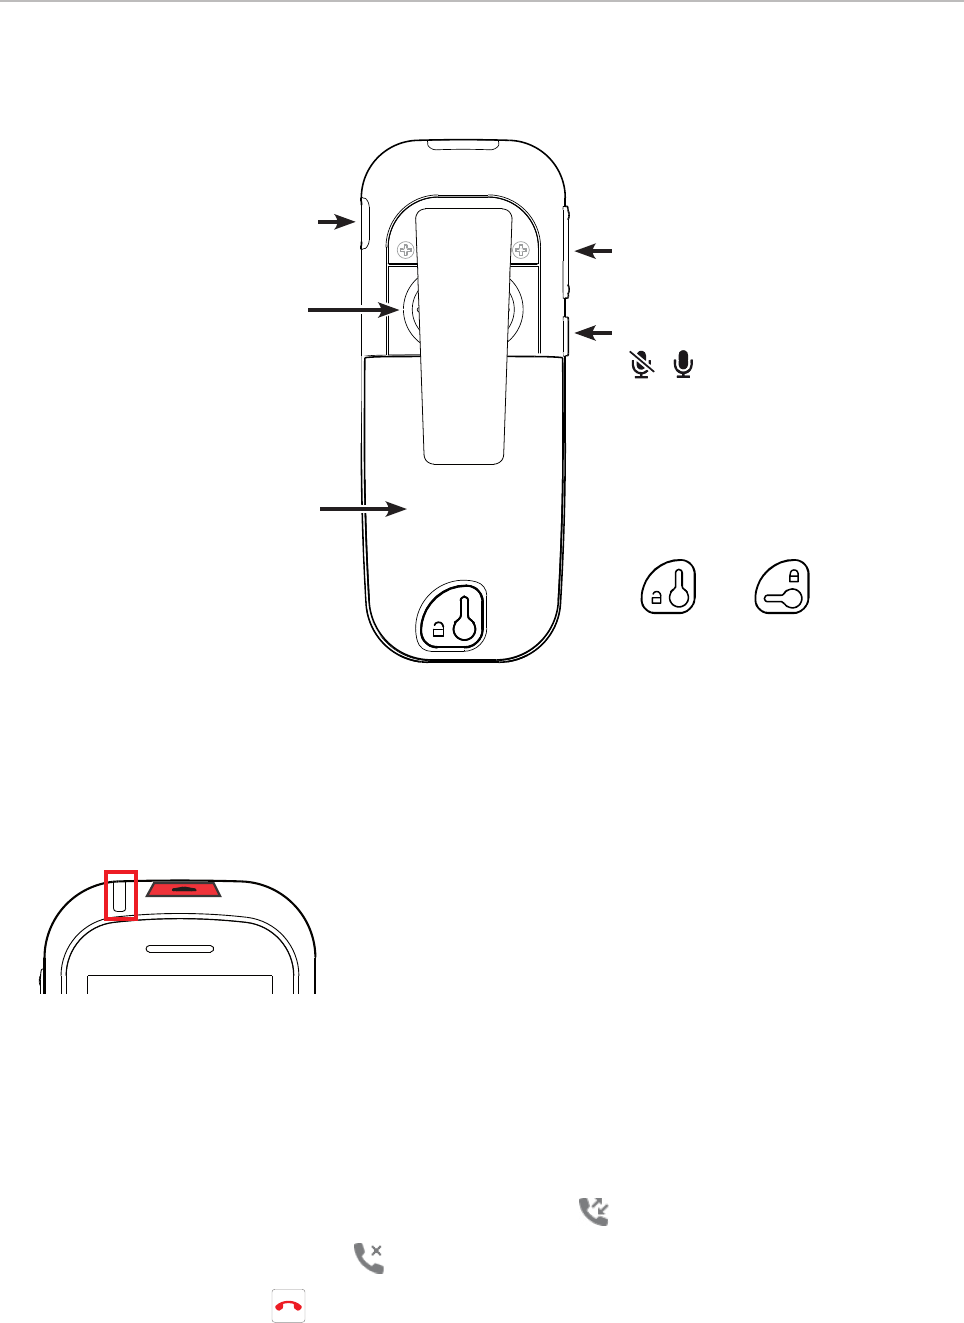
Handset back at a glance
Headset connector 3.5 mm
Battery compartment Battery compartment:
Locked | Unlocked
External loudspeaker
Ad j ust volume
Highe r: + / lower: -
+
-
Mute/unmute microphone
BATTERY PACK
Belt
clip
LED indications
Missed calls, message waiting (MWI), low battery
The LED indicator for MWI, missed calls, and low battery can signal information in three colors. The
default settings are:
• Missed call: 2 quick red flashes.
Note: Opening the All calls menu and viewing the missed call(s) will turn o the missed
call indicator. For more information, see "Call history (call lists)" on page 43 .
1. Press the function key underneath the "Calls" symbol .
2. Select the list of missed calls .
3. Press the cancel key to return to the idle screen.
• Voice message: Green LED.
• Low battery: Yellow LED.
27
User Manual M70 / M80 / M90 Getting to know
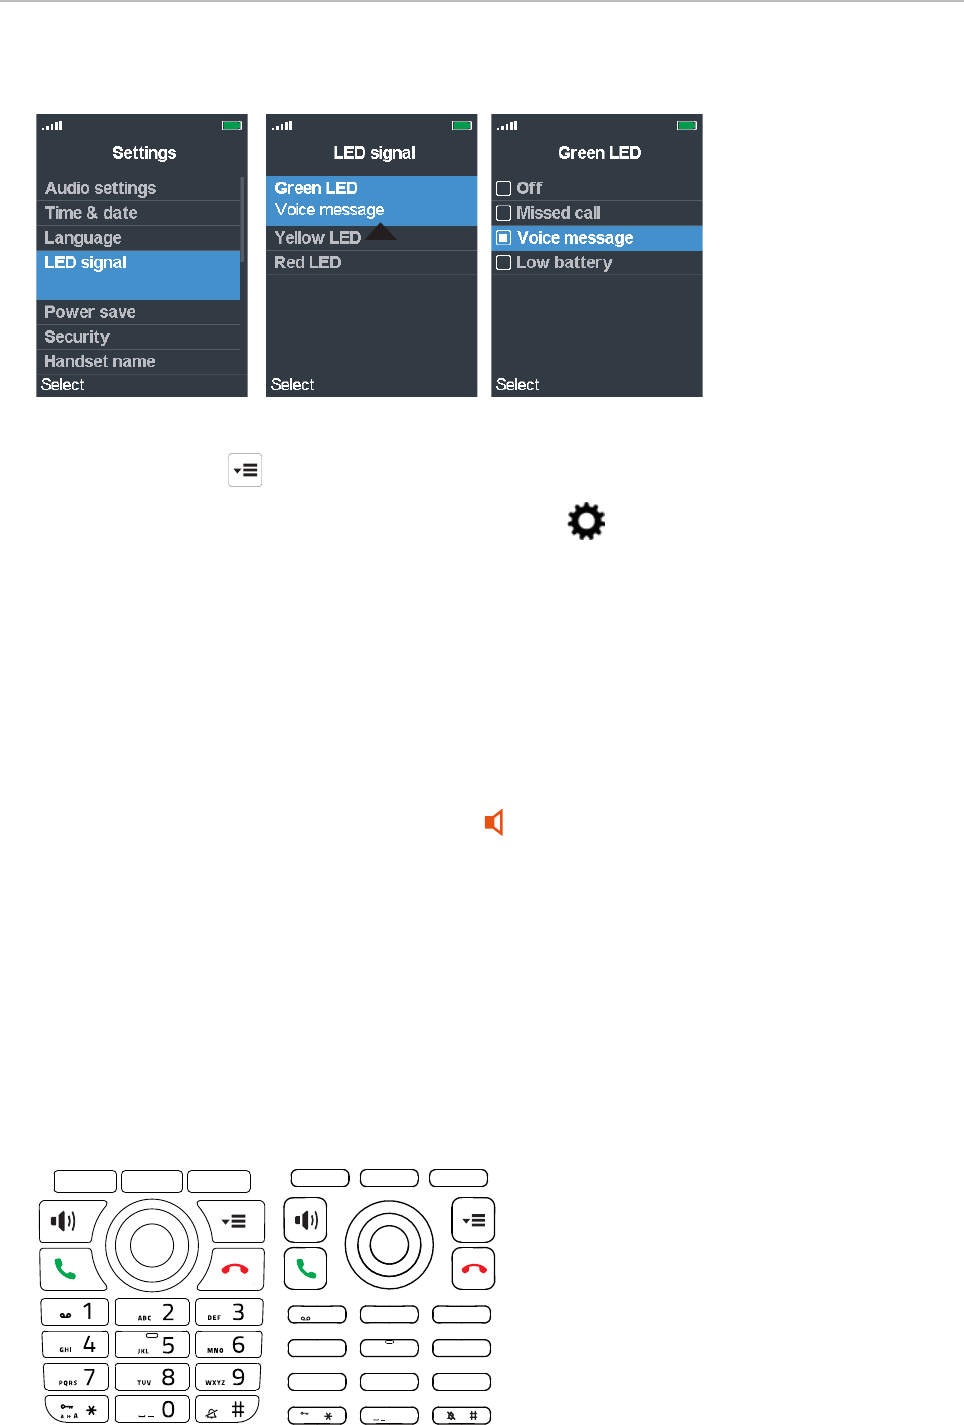
Changing the settings:
Fig. 1 Fig. 2 Fig. 3
1. Press the menu key to open the top menu (Fig. 1 on page 22).
2. Use the navigation key to navigate to the Settings menu and press the OK key (see
"Navigation and "OK" keys" on page 28).
3. In the settings menu, select LED signal (Fig. 1, above).
4. Select a color (Fig. 2).
5. Select one of the three options Voice message, Missed call, or Low battery for each color, or
select O to disable the LED for the selected color.
Speakerphone key LED
The speakerphone key has a red LED that lights up when speakerphone is turned on during a call.
Press the speakerphone key again to turn o speakerphone and the red LED.
Hard keys
Keypad illumination
The keypad is illuminated. The LEDS will light up when any key on the keypad is touched. When the
keypad is not touched for the number of seconds specified in the Power save setting (see "Power
save" on page 51), the LEDs will be turned o; the default setting is 60 seconds.
1
4
7 8
0
5
GH I
JK L
PQRS
a » A
TUV
6
MNO
2AB C
3
DEF
9
WXYZ
M70 / M80 M90
28
User Manual M70 / M80 / M90 Getting to know
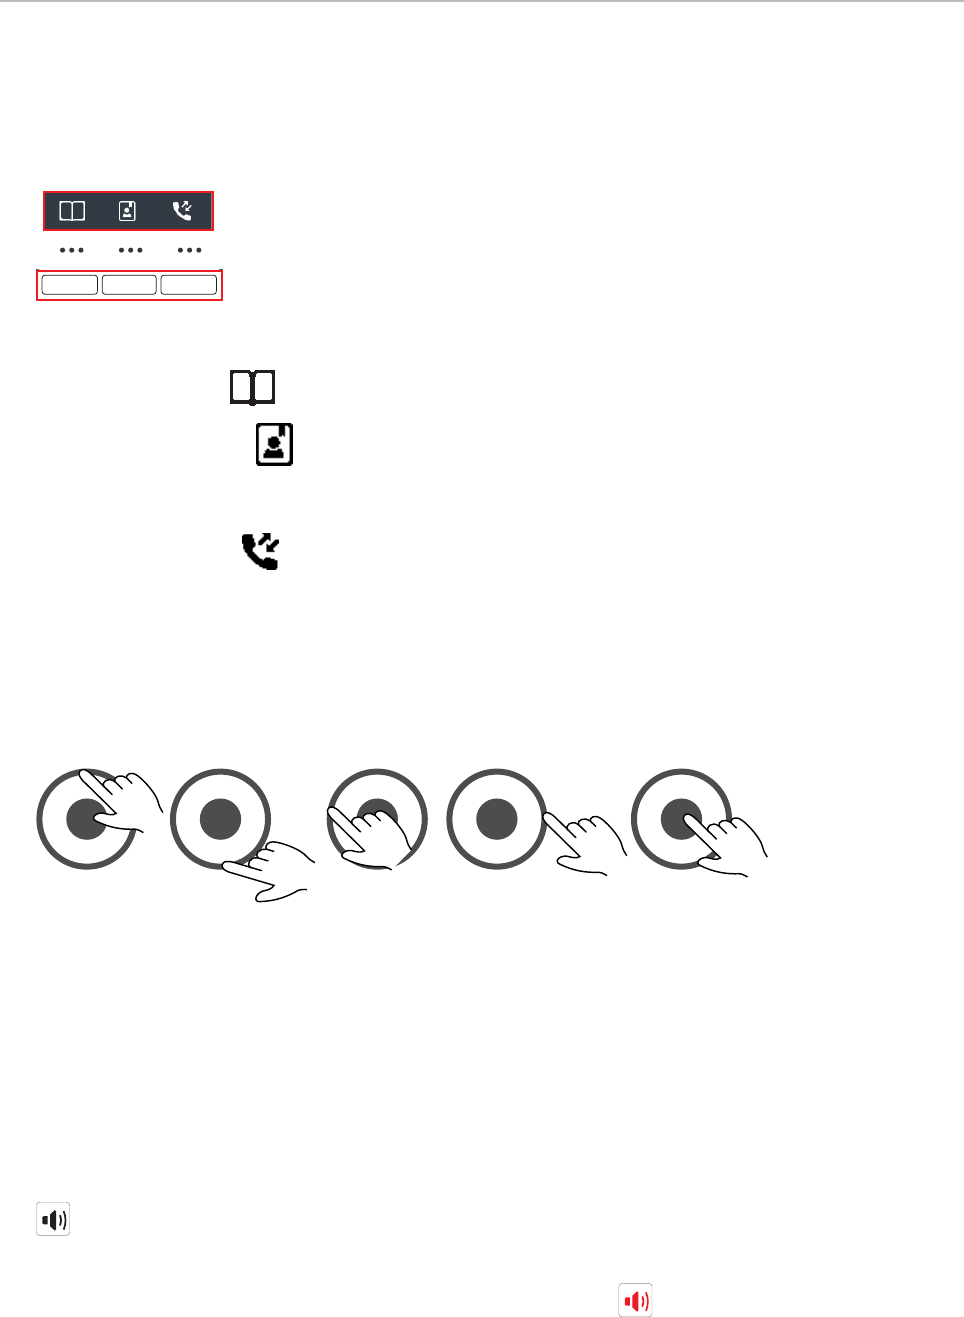
Context-sensitive function keys
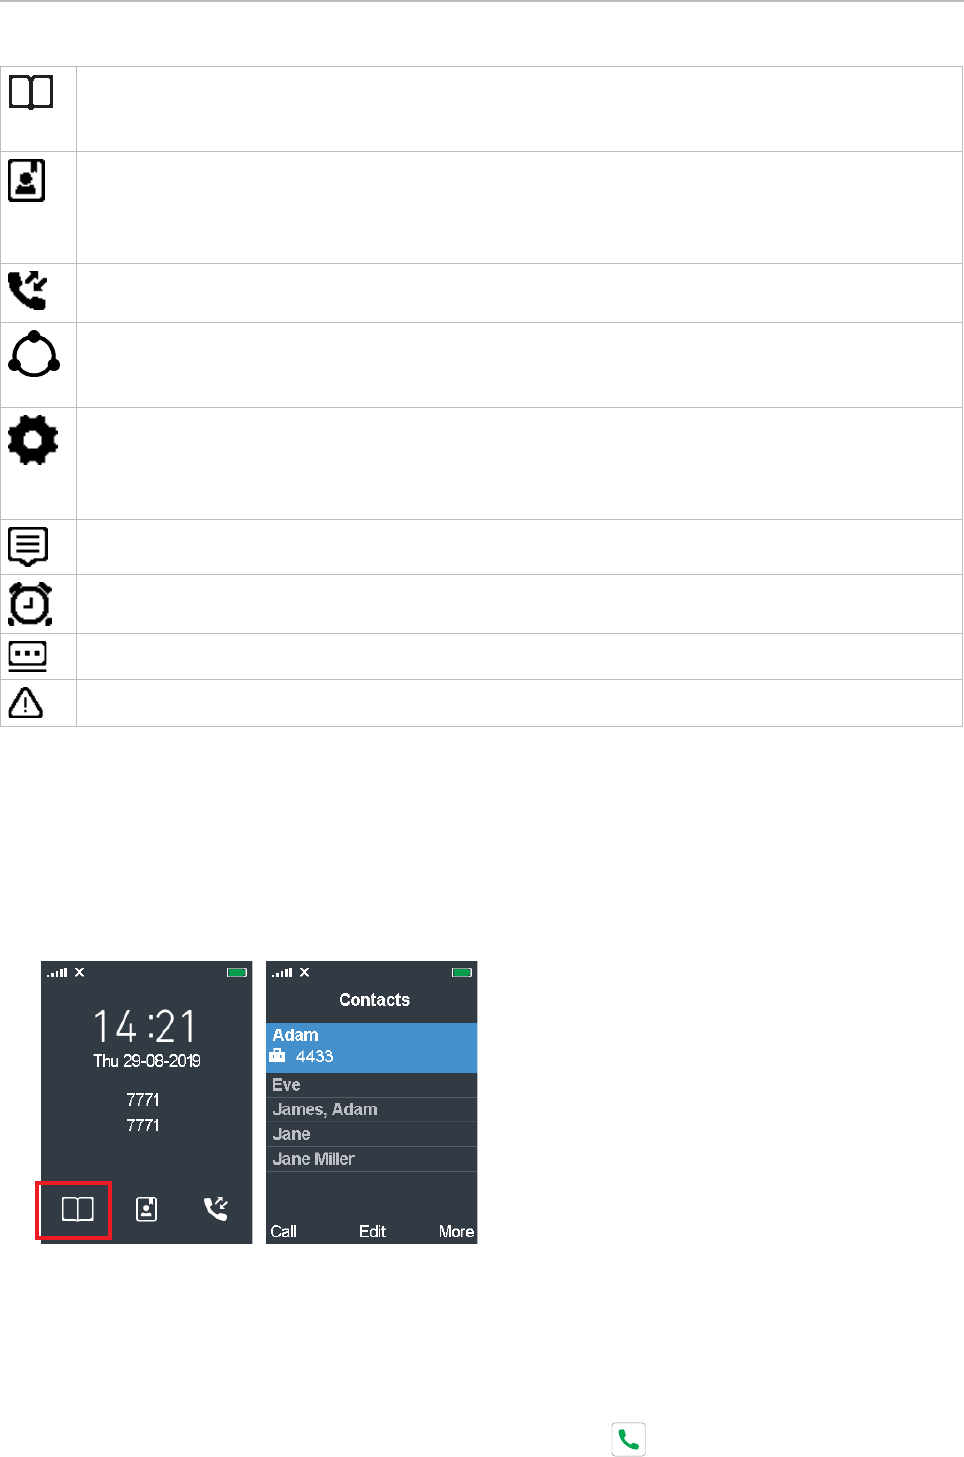
The three keys above the navigation key are context-sensitive function keys.
• When the phone is idle, they are shortcuts to directories and call lists.
◦ Left key, symbol . Personal contacts stored on the handset only.
◦ Center key, symbol . The central directory on the base station or a server directory,
depending on the setting on the base station. If neither is available, the symbol is not
displayed.
◦ Right key, symbol . The four call lists (all, received, dialed, and missed calls) .
• During calls or when you are editing settings, contacts etc., the function key line on the display
directly above the context-sensitive function keys shows the functions available at that particular
moment (hold, transfer, etc.).
Navigation and "OK" keys
"OK"
Fig. 1 Fig. 2 Fig. 3 Fig. 4 Fig. 5
• Outer ring: Navigation keys. Press the top (Fig. 1), bottom (Fig. 2), left (Fig. 3) or right (Fig. 4) of
the outer ring to navigate up , down , left , or right , respectively, on the display.
• Center: OK key for confirming actions and settings. Press the center key (Fig. 5) to confirm
actions and settings.
Speakerphone key
• During a call, press the speakerphone key to turn on speakerphone. The speakerphone symbol
appears on the display. The key's bright-red LED will light up and remain illuminated as long
as speakerphone is on.
• Press the key again to turn o speakerphone. The speakerphone symbol disappears from the
display. The key's red LED goes out.
29
User Manual M70 / M80 / M90 Getting to know
Menu key
Press the menu key to bring the top menu on-screen. For further information on the phone's menus,
see "Menus" on page 35.
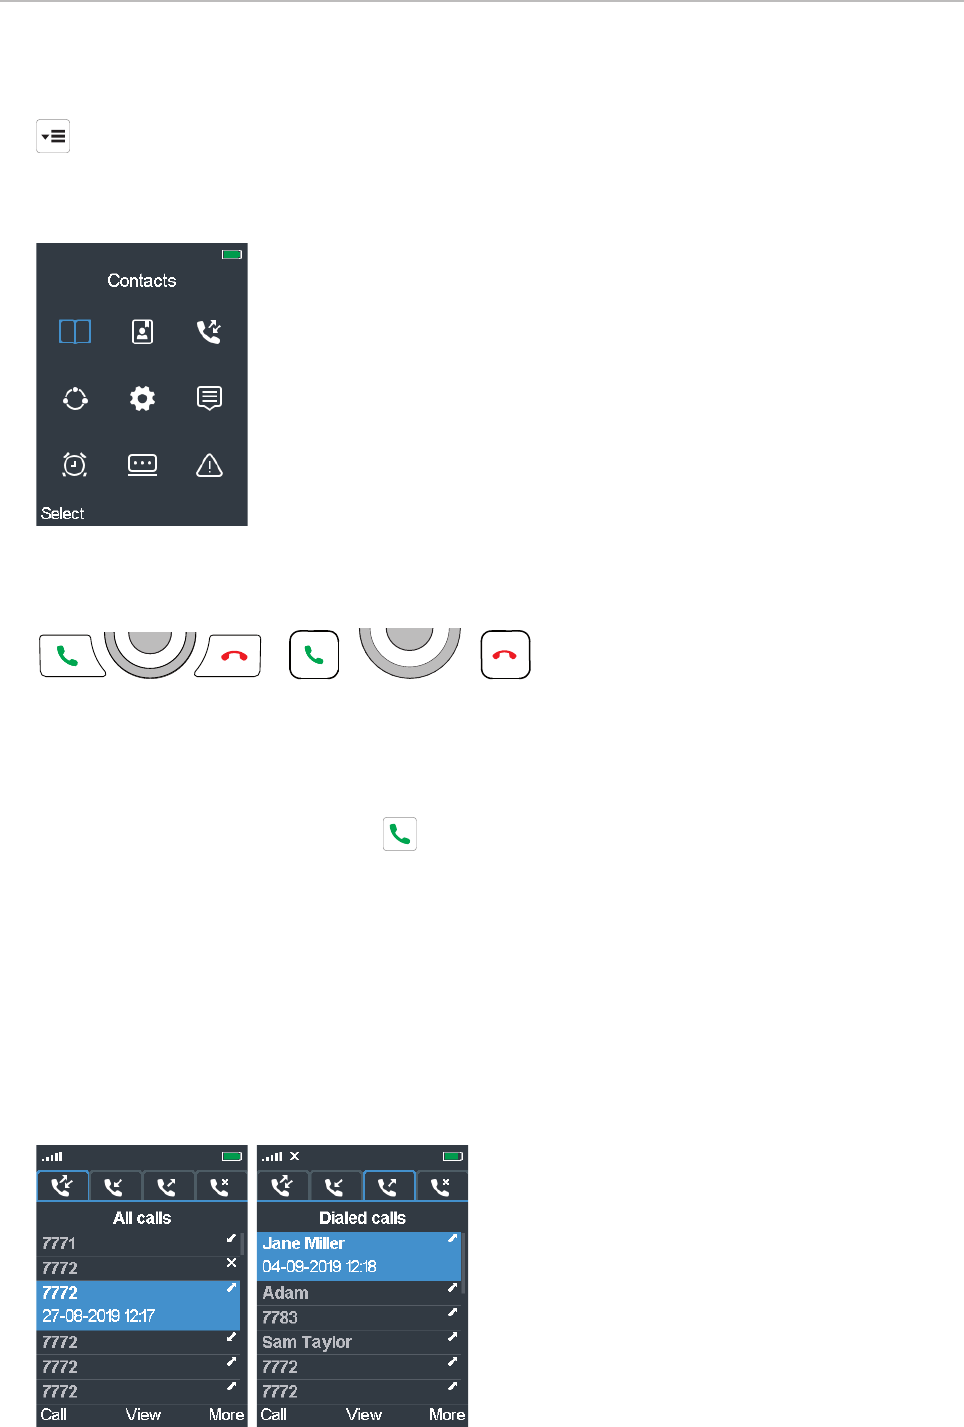
Call keys
M70/M80 M90
Green key
Depending on the context, the green key serves to:
• accept incoming calls;
• start dialing the number typed on the keypad or selected from your contacts or the global
directory.
• From the idle screen, the key can be used for redialing calls. Please note that it will open the list
of all calls (Fig. 1, below), so your last dialed call may not be at the top of the list. You can either
scroll down to your last dialed call or switch to the list of dialed calls where the last dialed call is
at the top of the list (Fig. 2). For more information, see "Call history (call lists)" on page 43.
Press the green key to redial the selected (i.e., highlighted) number (Fig. 1 and 2).
Fig. 1 Fig. 2

30
User Manual M70 / M80 / M90 Getting to know
Red key
Depending on the context, the red key serves to:
• end calls;
• cancel actions & input;
• return the display to the previous screen.
• The key is also used to turn the handset on and o.
◦ Press the key for at least 3 seconds to turn the handset o.
◦ Press the key briefly to turn the handset on.
Star key
The star key serves three dierent purposes:
• When entering numerals, pressing the key briefly will enter the asterisk *.
• When editing in letter mode, the key is used to manually switch the input mode between upper
and lower-case letters.
• On idle screen: Locking and unlocking the keypad. To prevent accidental dialing, press the
key for 3 seconds to lock the keypad. You will briefly see the Keylock screen (Fig. 1) before the
display returns to the idle screen with the keyboard locked symbol next to the signal strength
indicator in the upper left corner (Fig. 2).
On a locked keyboard, pressing any key briefly brings the Keylock message on-screen (Fig. 1);
pressing the star key for 3 seconds unlocks the keypad.
Fig. 1 Fig. 2
31
User Manual M70 / M80 / M90 Getting to know
Alphanumeric keys
1
4
7 8
0
5
GH I
JK L
PQRS
a » A
TUV
6
MNO
2AB C
3
DEF
9
WXYZ
M70 / M80 M90
The alphanumeric keys are used to enter numerals and letters.
• When entering characters in letter mode, pause briefly after each character until the cursor has
moved forward. Pausing is not necessary when entering numerals in numeral mode.
• Press the function key underneath Clear to delete the character to the left of the cursor.
• Keys 2 - 9 can also be used to speed dial contacts. For more information, see "Assigning speed
dial key to contact" on page 40 and "Speed dialing a contact" on page 65.
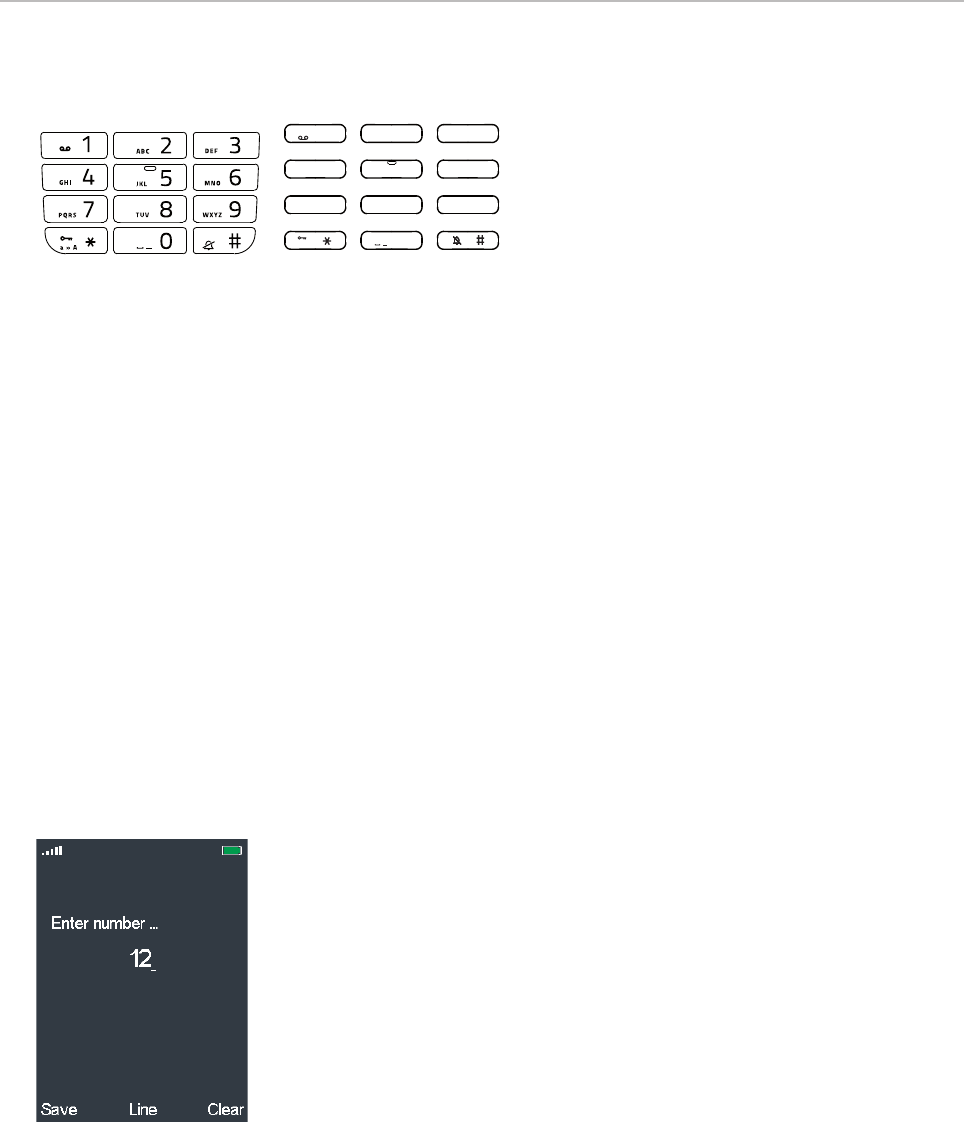
Entering phone numbers (numeral mode)
When you are entering numbers, whether dialing or editing the phone numbers of one of your
contacts, only the numerals 1-9 and 0 and the asterisk * and the pound/hash # symbols will be
accepted by the phone. Letters, special symbols, and spaces are not available.
• Pausing between characters is not necessary when entering numerals in numeral mode. The
cursor will move forward without delay.
• Press the function key underneath Clear to delete the character to the left of the cursor.
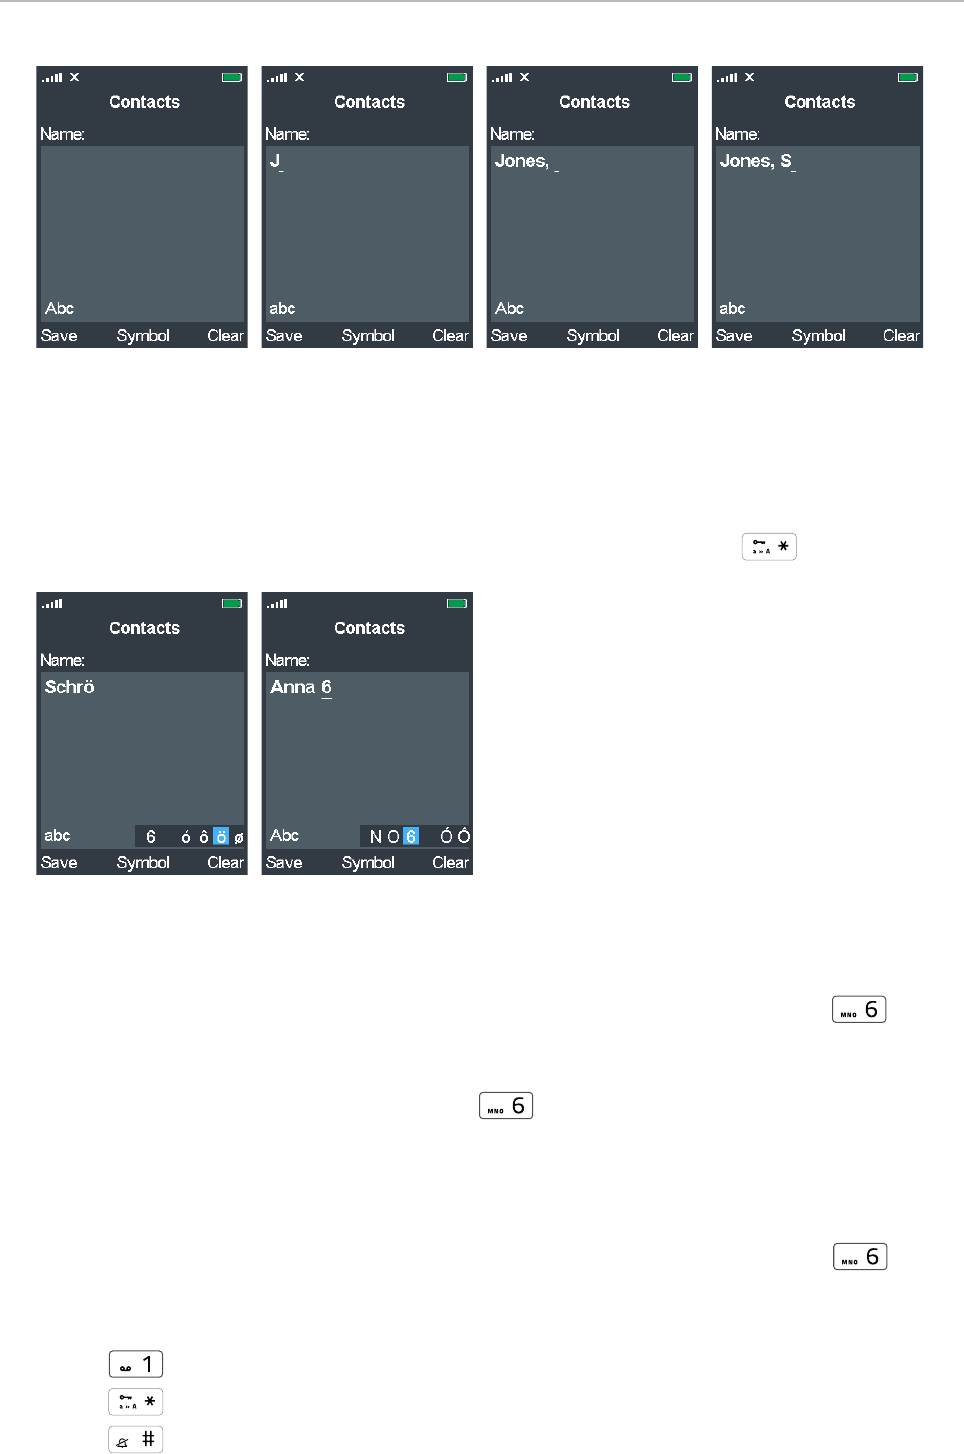
Letter modes
In letter mode, i.e., when editing the names in your contacts, pause briefly after each character until
the cursor has moved forward (Fig. 2). When you are done editing the name, press the function key
underneath Save or the center of the navigation key.
The default setting in letter mode is "name mode", i.e., the first letter is upper-case, followed by lower-
case letters, eliminating the need to toggle between upper and lower-case letter modes.
◦ A capital letter will automatically be used at the beginning of the name (Fig. 1) and after a
space (Fig. 3), as indicated by the letters Abc in the lower left corner of the text field.
32
User Manual M70 / M80 / M90 Getting to know
Fig. 1 Fig. 2 Fig. 3 Fig. 4
◦ When you have typed the first letter (Fig. 2 and 4), letter mode will switch to lower-case
letters, as indicated by the letters abc in the lower left corner of the text field.
Note: Unless you want to type in all upper or lower-case letters, it is not
necessary to switch back and forth between upper and lower-case letter
modes. To switch manually between modes, press the star key .
Fig. 5 Fig. 6
• To type one of the letters printed on a key, press the key one, two, three, or four times quickly to
type the first, second, third, or fourth letter printed on the key. In small letter mode, for example,
as indicated by abc in the lower left corner of the editing text field (Fig. 5), press key once to
type an m, twice to type an n, and three times to type an o.
Pressing the key quickly more often than 4 or 5 times will produce any available letters with
accents and umlauts. For example: Press key with the vowel o seven times to type the
French ô, eight times to type the German umlaut ö.
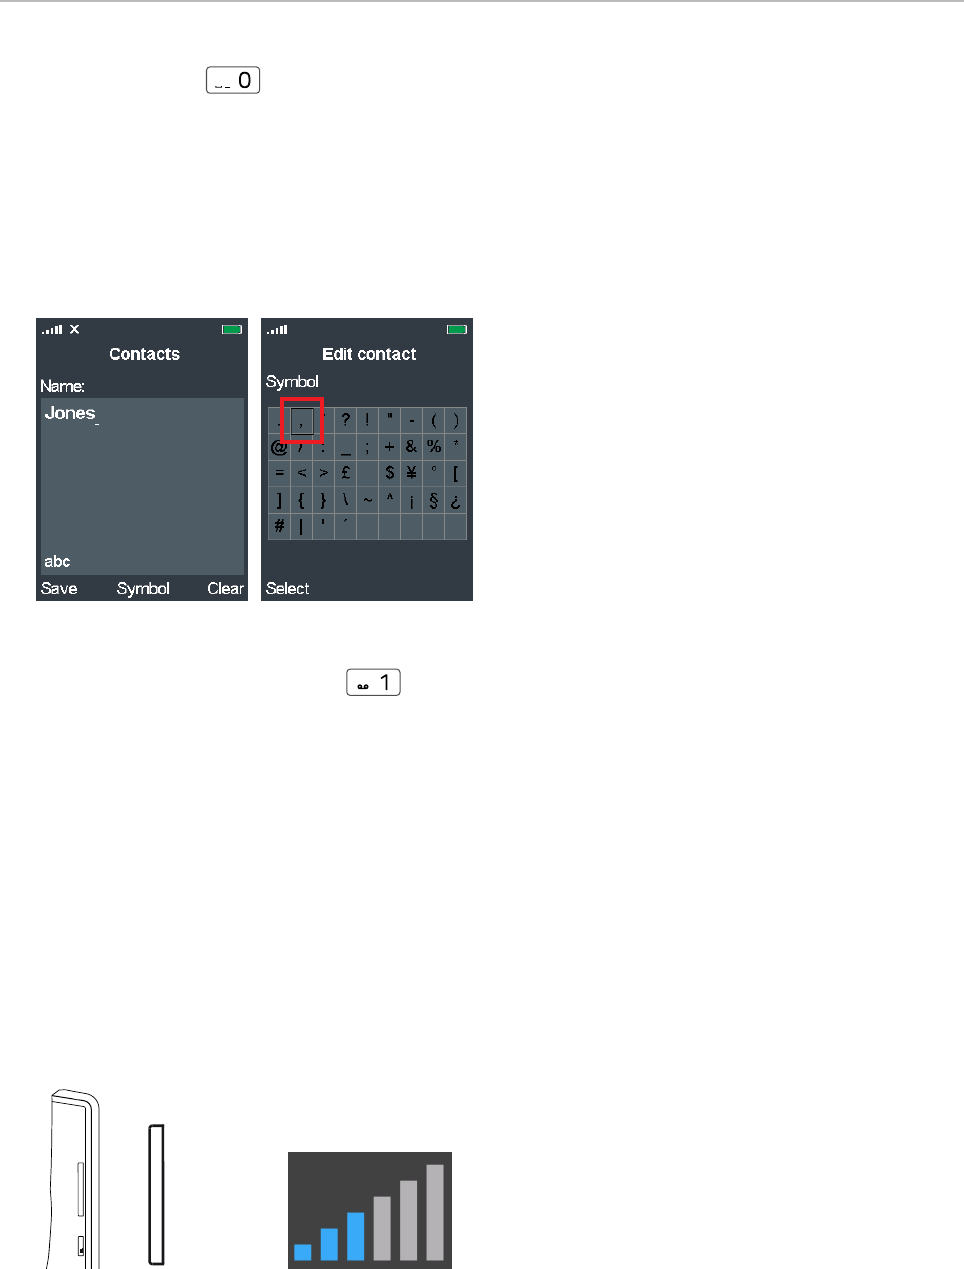
• Typing the number or symbol on the key:
◦ If there are three letters printed on the key, press the key 4 times quickly to type the number;
if there are four letters, press the key 5 times. For example, to type 6, press key four
times (Fig. 6).
◦ Press the key
◦ once to type the characters ;
◦ once to type the asterisk *;
◦ once to type the pound/hash symbol #.
33
User Manual M70 / M80 / M90 Getting to know
◦ Press the key once to enter a space, twice quickly to type the character 0.
• Adding punctuation and special symbols like @. In all letter modes, punctuation marks and
special symbols are available from the symbols screen.
◦ With the cursor in the position where you want to add the symbol, press the function key
underneath Symbol (Fig. 7) to display the table of symbols.
◦ Use the navigation keys to navigate to the symbol (the comma, in our example, Fig. 8) and
press Select or the center of the navigation key to add the symbol to the text.
Fig. 7 Fig. 8
Alternatively, you can also press quickly until the desired symbol is on-screen, then pause
briefly until the cursor has moved forward.
• Press the function key underneath Clear to delete the character to the left of the cursor.
Volume key
The volume key is the upper key on the left side of the handset. When in a call, press:
• the upper end of the key (marked +) to increase the volume of the loudspeaker one bar at a time.
• the lower end of the key (marked -) to lower the volume of the loudspeaker one bar at a time.
Note: To adjust the volume of the ringer, open Ring volume in the Audio settings menu
(see "Ring volume" on page 48).
TE
mu
+
_
+
_
34
User Manual M70 / M80 / M90 Getting to know
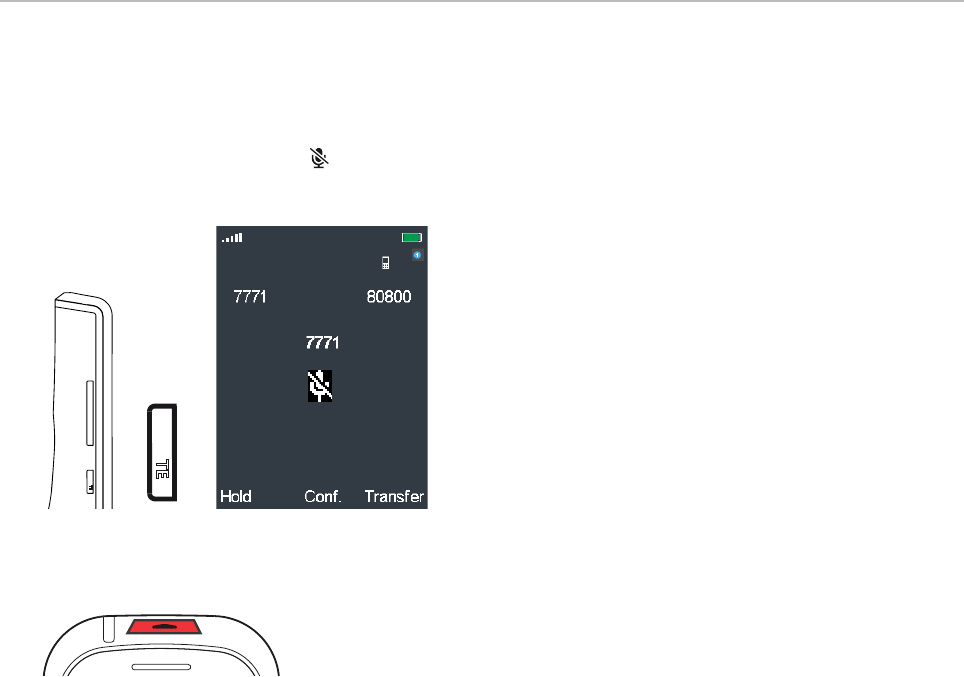
Mute key
The mute key is the lower key on the left side of the handset. Press the key to mute the microphone
during a call, as indicated by the symbol on the screen. Press the key again to unmute the
microphone.
TE
mu
+
_
TE
mu
Connected
Emergency alarm button
The emergency alarm settings are configured on the base station where the handset is registered.
Please, ask your administrator for more information on which type of emergency alarm will be
triggered when you press the alarm button and whether it is possible to terminate the alarm from the
handset.
Press the red button at the top of the handset for at least 3 seconds to set o the emergency alarm.
35
User Manual M70 / M80 / M90 Getting to know
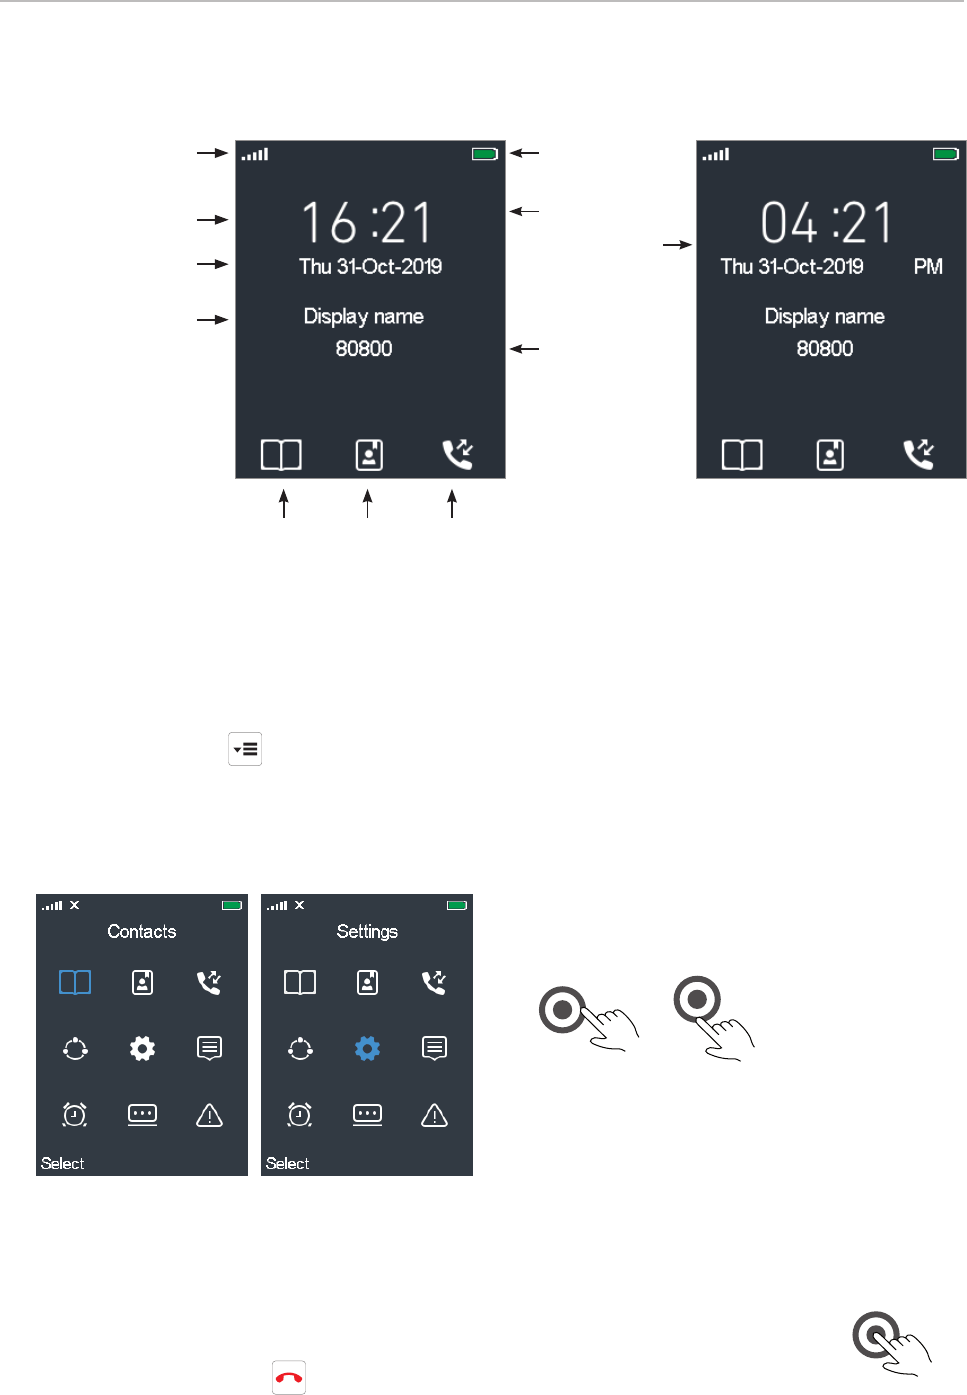
Idle screen layout
Signal strength Battery charge
status
24-hr. clock
12-hr. AM/PM
Extension
Time
Date
Display name,
if a name has been
set on base station.
Context-sensitive
function key symbols
Menus
The menus are arranged a bit dierently from the ones you may be used to from Snom desk phones.
1. Press the menu key to open the top menu. The screen will open with the Contacts symbol
selected, i.e., highlighted in blue (Fig. 1).
Note: The three symbols in the top row of the main menu are also accessible on the idle
screen by pressing the function key underneath the respective symbol.
Fig. 1 Fig. 2
2. Use the navigation keys to select a dierent symbol and press the OK key to open the selected
submenu (see "Navigation and "OK" keys" on page 28). The selected item will turn blue (Fig. 2).
3. Press the center of the navigation key or the function key underneath
Select to open the selected submenu.
Press the red cancel key to return to the previous screen or go back one step.
36
User Manual M70 / M80 / M90 Getting to know
Contacts. Contains the personal contacts available only on the handset where they have
been entered and saved and the list of speed dial numbers for keys 2–9. See "Contacts" on
page 36.
Central directory. This is a list of phone numbers accessible from all handsets registered at
the same base station or to a base station in the same multicell installation. This could be
a phone list downloaded to the base or an external source like the company LDAP register.
For further information, see "Central directory" on page 42 .
Call history. The call history contains four call lists: All calls, answered calls, dialed calls,
and missed calls. For further information, see "Call history (call lists)" on page 43.
Connectivity. In this submenu you can register and deregister the handset and select a
network, if more than one is available. For further information, see "Connectivity" on page
45.
Settings. Contains the options for personalizing the settings of your handset (language,
time and date formats, LED signaling, audio settings, etc.), call settings like call forwarding,
auto answer, DND, hiding your number, etc., and the status information of the handset and
the base station it is registered to. For further information, see "Settings" on page 46.
Messages. Your text messages (received, drafts, sent).
Alarm clock. There are three alarm clock settings: Non-recurring alarm, recurring alarm,
snooze time. For further information, see "Alarm clock settings" on page 59.
F-keys. Another list for contacts (one number per name only).
Alarms list.
Contacts
These are the personal contacts that are available only on the handset where they have been entered
and saved. You can open your contacts either via the menu (see Fig. 1 on page 35) or by pressing
the function key underneath the contacts symbol on the idle screen (Fig. 1). Your list of personal
contacts opens in alphabetical order (Fig. 2).
Fig. 1 Fig. 2
• Finding a contact. Use the navigation keys to scroll up and down (see "Navigation and "OK" keys"
on page 28) or enter the first letter of the contact you want to dial to go to the first contact
beginning with that letter, then scroll down if it is not the contact you are looking for.
• Calling the contact. If the default phone number underneath the name is the number you want to
dial, press the function key underneath Call or the green key . The arrow on the right side of
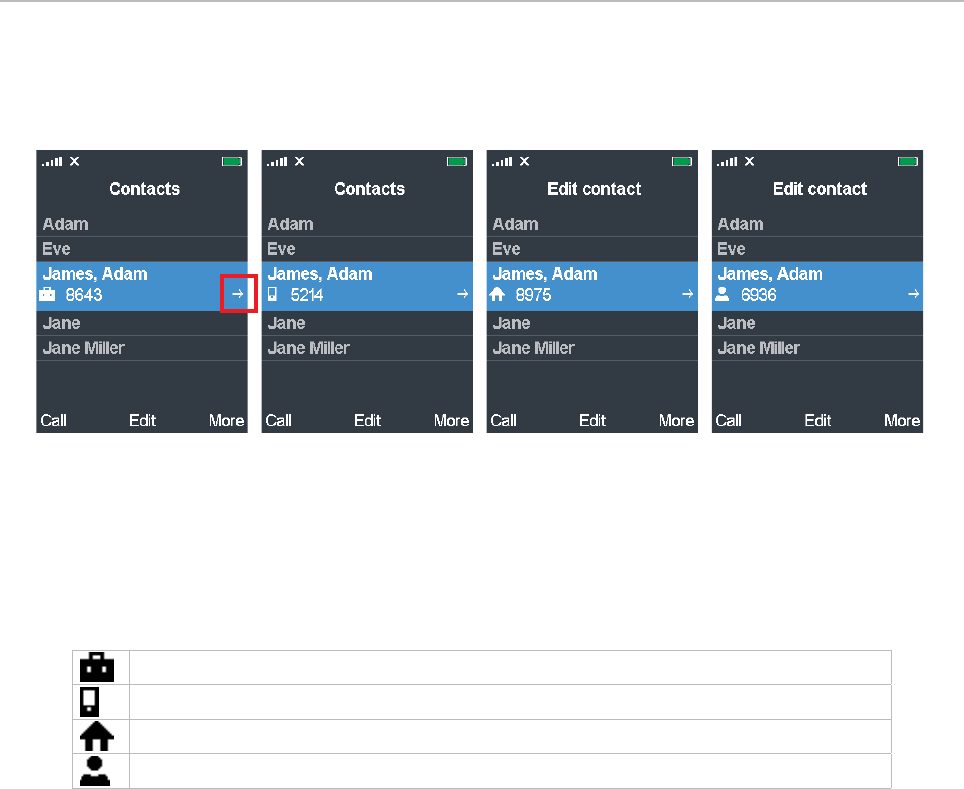
37
User Manual M70 / M80 / M90 Getting to know
the contact (Fig. 3) indicates that there is at least one other name associated with the name. If you
want to dial one of the other numbers press the right rim of the navigation key to scroll to it (Fig.
4–6), then dial.
Fig. 3 Fig. 4 Fig. 5 Fig. 6
• Each contact must have a name and at least one phone number. Up to four phone numbers per
contact are possible: Work (Fig. 3), mobile (Fig. 4), home (Fig. 5), other (Fig. 6). If there is more
than one phone number associated with a contact, the "work" number is the default number
presented by the phone when you select the contact. If there is no oce number, the mobile
number is the default number.
Work number (default number)
Mobile number (default number if there is no work number)
Home phone number (default number if there are no work or mobile numbers)
Other phone number (default number if there are no other numbers)
• Assigning a ringtone to the contact. Twenty (20) ringtones are available and can be set for calls
in general and individually to announce ringing calls from the respective contact. The default
is melody 1. For assigning ringtones to contacts, see "Editing contacts" on page 39. For the
general settings, see "Ring melody" on page 48.
• Assigning a speed dial key to the contact. The keys 2 to 9 can be assigned for speed dialing one
each of your contacts. If the contact has more than one phone number, the speed dial function
is assigned to the default number (see table on page 36). For assigning speed dial keys, see
"Assigning speed dial key to contact" on page 40.
Adding contacts
See "Letter modes" on page 31 and "Entering phone numbers (numeral mode)" on page 31 on
how to enter names and numbers.
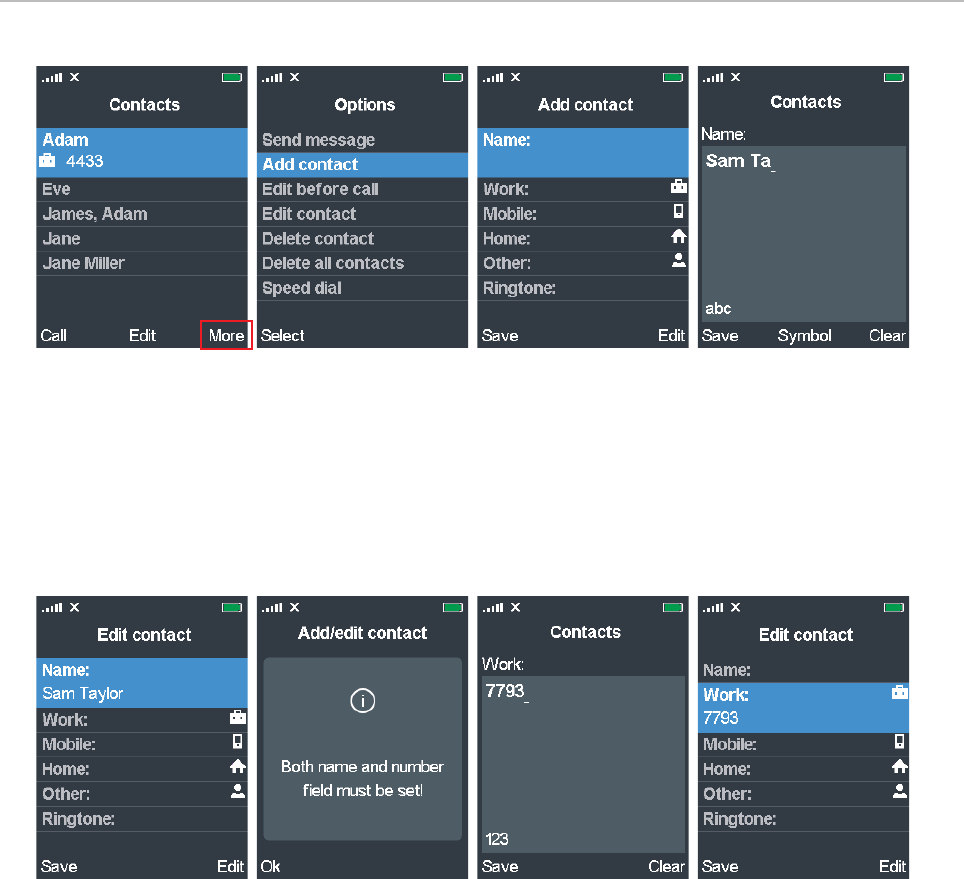
1. Open the contacts menu and press the function key underneath More (Fig. 7) to open the Options
menu (Fig. 8).
38
User Manual M70 / M80 / M90 Getting to know
Fig. 7 Fig. 8 Fig. 9 Fig. 10
2. Scroll to Add contact and press the function key underneath Select. The Add contact screen
opens (Fig. 9).
3. With Name highlighted, press the function key underneath Edit. The blank editing field for Name
appears (Fig. 10).
4. Enter the name and press the function key underneath Save. The name has been added to the
Edit contact menu (Fig. 11).
Fig. 11 Fig. 12 Fig. 13 Fig. 14
Note: The name is stored only temporarily. If you try saving the contact with just a name
or a number, you will receive an error message (Fig. 12). If you leave the Edit contact
menu without pressing the function key underneath Save, the contact and/or any edits
you have made will not be saved.
5. Scroll to Work (or one of the other numbers) and press the function key underneath Edit. The
blank editing field for the type of number opens (Fig. 13).
6. Enter the number and press the function key underneath Save. The number is stored temporarily
in the Edit contact menu (Fig. 14).
7. Press Save. You will be asked whether you want to save the contact in the local contacts on the
handset (Fig. 15).

39
User Manual M70 / M80 / M90 Getting to know
Fig. 15 Fig. 16
8. Press the function key underneath Yes if you do. The contact has been added to the handset's
contacts (Fig. 16).
Note: If you don't want to save the contact press the function key underneath No to
return to the Edit contact menu (Fig.14), and then press the red cancel key to
return to the Contacts directory (Fig. 7).
Editing contacts
1. Scroll to the contact with the navigation key (Fig. 16, above).
2. Press the function key underneath Edit. The Edit contact screen opens. In our example we want
to add a cellphone number to the contact and select a dierent ringtone.
3. Scroll to Mobile (Fig. 17).
4. Press Edit. The Contacts screen opens (Fig. 18).
Fig. 17 Fig. 18 Fig. 19 Fig. 20
5. Enter the number and press Save. The Edit contact menu appears (Fig. 19).
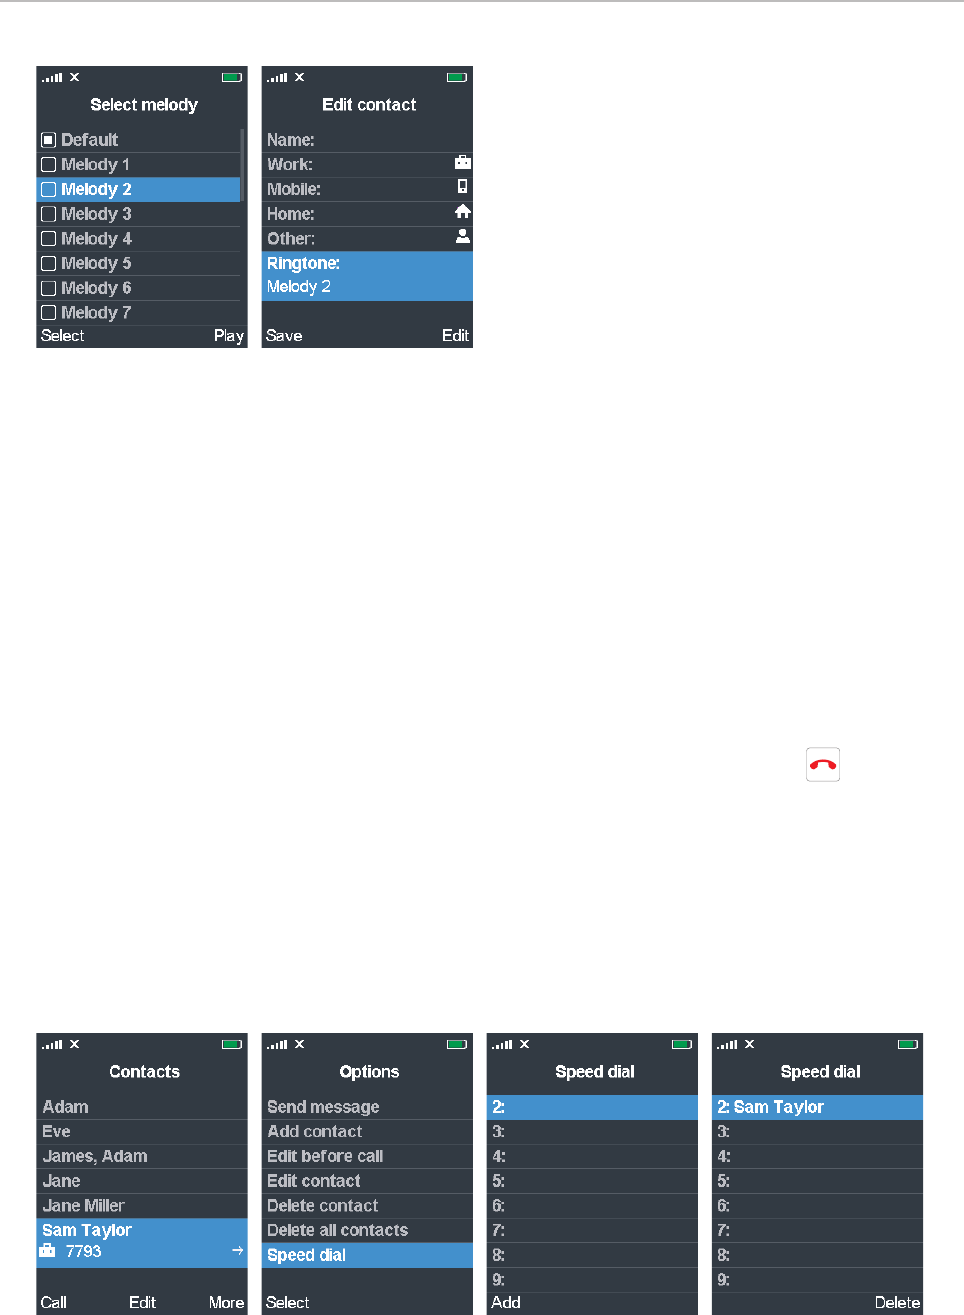
6. Scroll to Ringtone and press Edit (Fig. 20). The default setting is melody 1.
40
User Manual M70 / M80 / M90 Getting to know
Fig. 21 Fig. 22
7. Scroll to another melody (Fig. 21).
◦ Press Play to play the highlighted melody.
◦ Press Save to save the highlighted melody. The Edit contact screen appears (Fig. 22).
8. Press Save. You will be asked whether you want to save the contact in the local contacts on the
handset (Fig. 15).
Note: Up to this point, the changes have been stored only temporarily. If you leave the
edit menu at any time before the final confirmation, the changes will not be saved.
9. Press the function key underneath Yes if you want to save your edit(s) and return to the Edit
contact screen.
Note: If you don't want to save the changes press the function key underneath No
to return to the Edit contact menu (Fig. 22), and then press the red cancel key to
return to the Contact directory (Fig. 16).
Assigning speed dial key to contact
The keys 2 to 9 can be assigned for speed dialing one each of your contacts. If the contact has more
than one phone number, the speed dial function is assigned to the default number (see table on page
36). Reassigning an assigned key to a dierent contact: See "Reassigning speed dial key to a
dierent contact" on page 41.
Fig. 23 Fig. 24 Fig. 25 Fig. 26
1. Select the contact and press the function key underneath More (Fig. 23).
2. Scroll to Speed dial and press the function key underneath Select (Fig. 24).
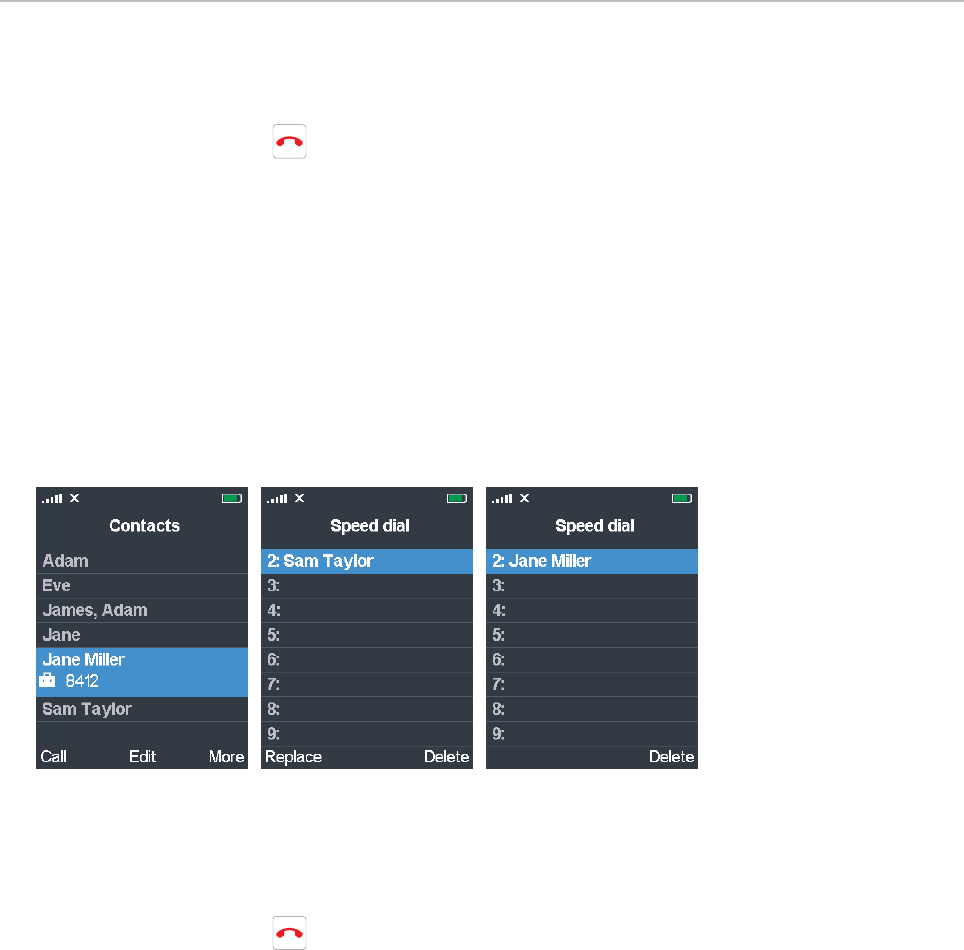
41
User Manual M70 / M80 / M90 Getting to know
3. Select one of the empty list items and press the function key underneath Add (Fig. 25). The
contact is added to the line (Fig. 26).
4. Press the red cancel key to return to the Options screen.
To view the list of assigned speed dial numbers, open the main contact menu (see page 36, Fig. 6),
select any of your contacts, press the function key underneath More, and select Speed Dial.
To speed dial a contact, long-press the key for approx. 3 seconds from the idle screen.
Reassigning speed dial key to a dierent contact
1. To reassign an assigned speed dial key, scroll to the contact (Jane Miller, in our example) you want
to dial by pressing the speed dial key and press the function key underneath More (Fig. 27).
2. In the Options menu, scroll to Speed dial and press the function key underneath Select (Fig. 24).
Fig. 27 Fig. 28 Fig. 29
3. Select the assigned speed dial key you want to reassign to this contact and press the function
key underneath Replace (Fig. 28) to save and return to the Options menu. The speed dial key is
reassigned (Fig. 29).
4. Press the red cancel key to return to the Options menu.
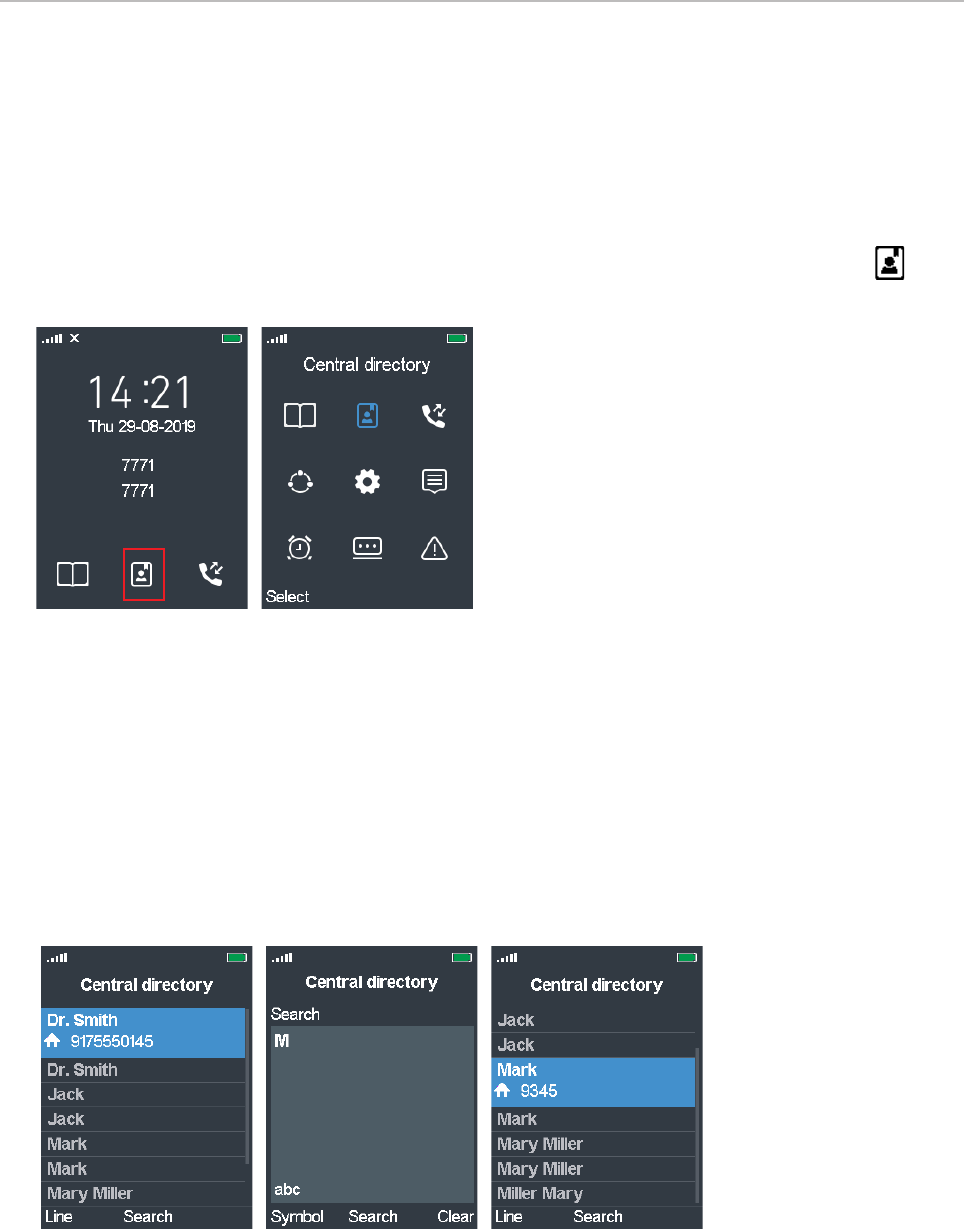
42
User Manual M70 / M80 / M90 Getting to know
Central directory
The central directory is accessible from all handsets registered at the same base or in the same
multicell installation. Depending on the setting of the base, this could be a phone list downloaded
to the base or an external source like the company LDAP register. It is not possible to add or delete
entries or to edit existing entries on the handset.
You can open the central directory pressing the key underneath the central directory symbol on
the idle screen (Fig. 1) or by selecting the symbol in the main menu (Fig. 2) and pressing Select.
Fig. 1 Fig. 2
Finding a name
Use one of the following methods:
• Scrolling. Use the navigation keys to scroll up and down (see "Navigation and "OK" keys" on page
28) until you find the name you are looking for.
• Combining the search function and scrolling.
1. Press the function key underneath Search (Fig. 3). The Search text field appears.
Fig. 3 Fig. 4 Fig. 5
2. Type the first letter of the name you are looking for into the text field (Fig. 4), for example, the
letter M.
3. Press the function key underneath Search. The central directory menu appears with the first
name beginning with the letter M highlighted (Fig. 5).
4. Use the navigation key to scroll down to the name you are looking for.
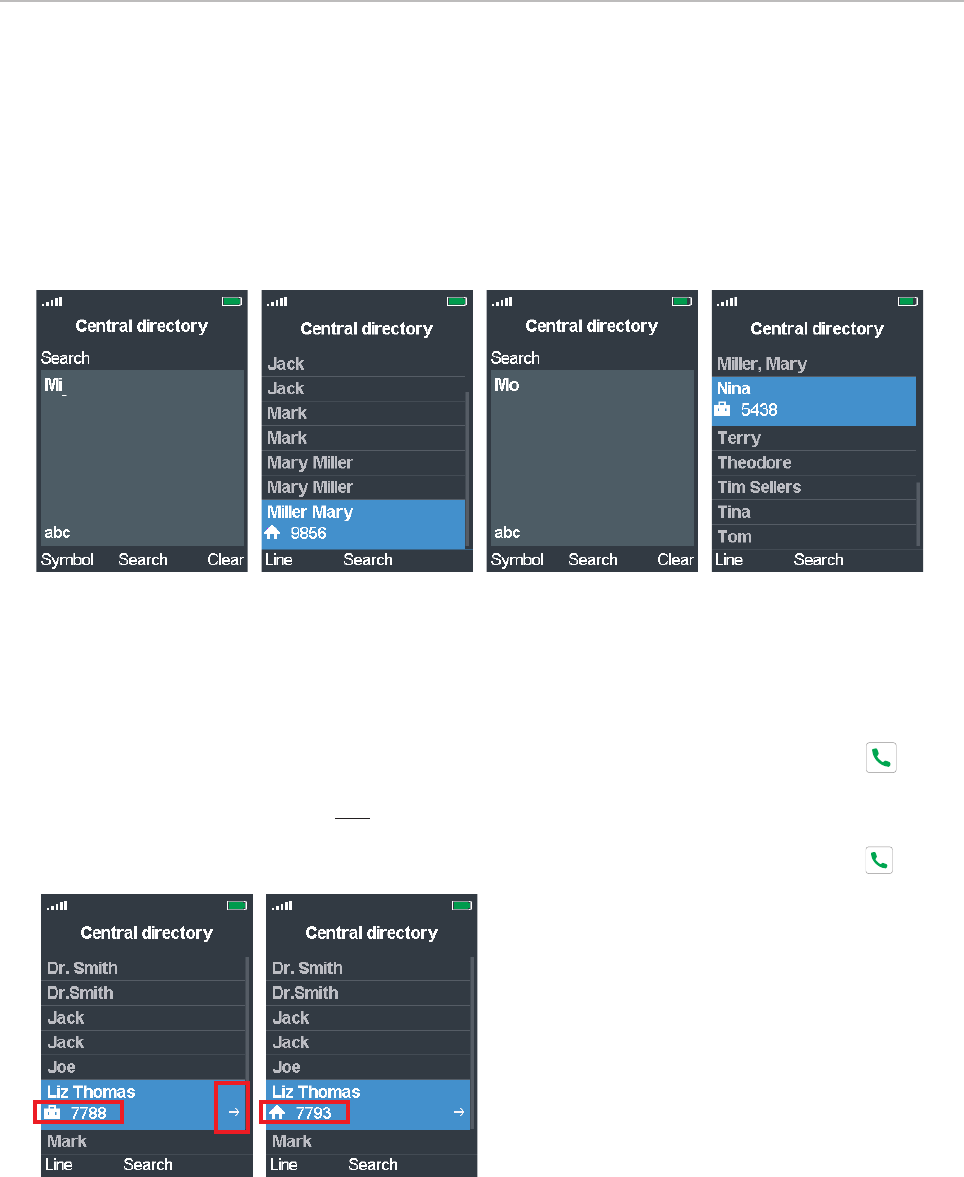
43
User Manual M70 / M80 / M90 Getting to know
• Using the search function.
1. Press the function key underneath Search (Fig. 3). The Search text field appears.
2. Enter the name you are looking for or several letters of it into the text field (Fig. 6).
3. Press the function underneath Search. The search results are narrowed down to the name
or names beginning with the letter(s) will be displayed in alphabetical order (Fig. 7). If the
directory does not contain the string, the search is discontinued at the entry where it would
have been located (Fig. 8 and 9).
Fig. 6 Fig. 7 Fig. 8 Fig. 9
Calling a number from the central directory
1. Find the name as described in "Finding a name" on page 42.
2. If the number underneath the name is the number you want to dial, press the green key .
3. If it is not the number you want and if there is an arrow on the right side of the line indicating
more than one number associated with the name (Fig. 10), press the right side of the navigation
key to scroll right until you find the number you want (Fig. 11), then press the green key .
Abb. 10 Abb. 11
Call history (call lists)
There are four call history lists. The most recent call is at the top of each respective list. When the
available memory is full, the oldest call on the list will be overwritten by the latest call. The list will
show the name of the caller or callee, respectively, if available (either because it is in your contacts or
because it was transmitted to the phone); if not, the phone number will be shown. The selected (i.e.,
highlighted) call expands to also show the date and time of the call.
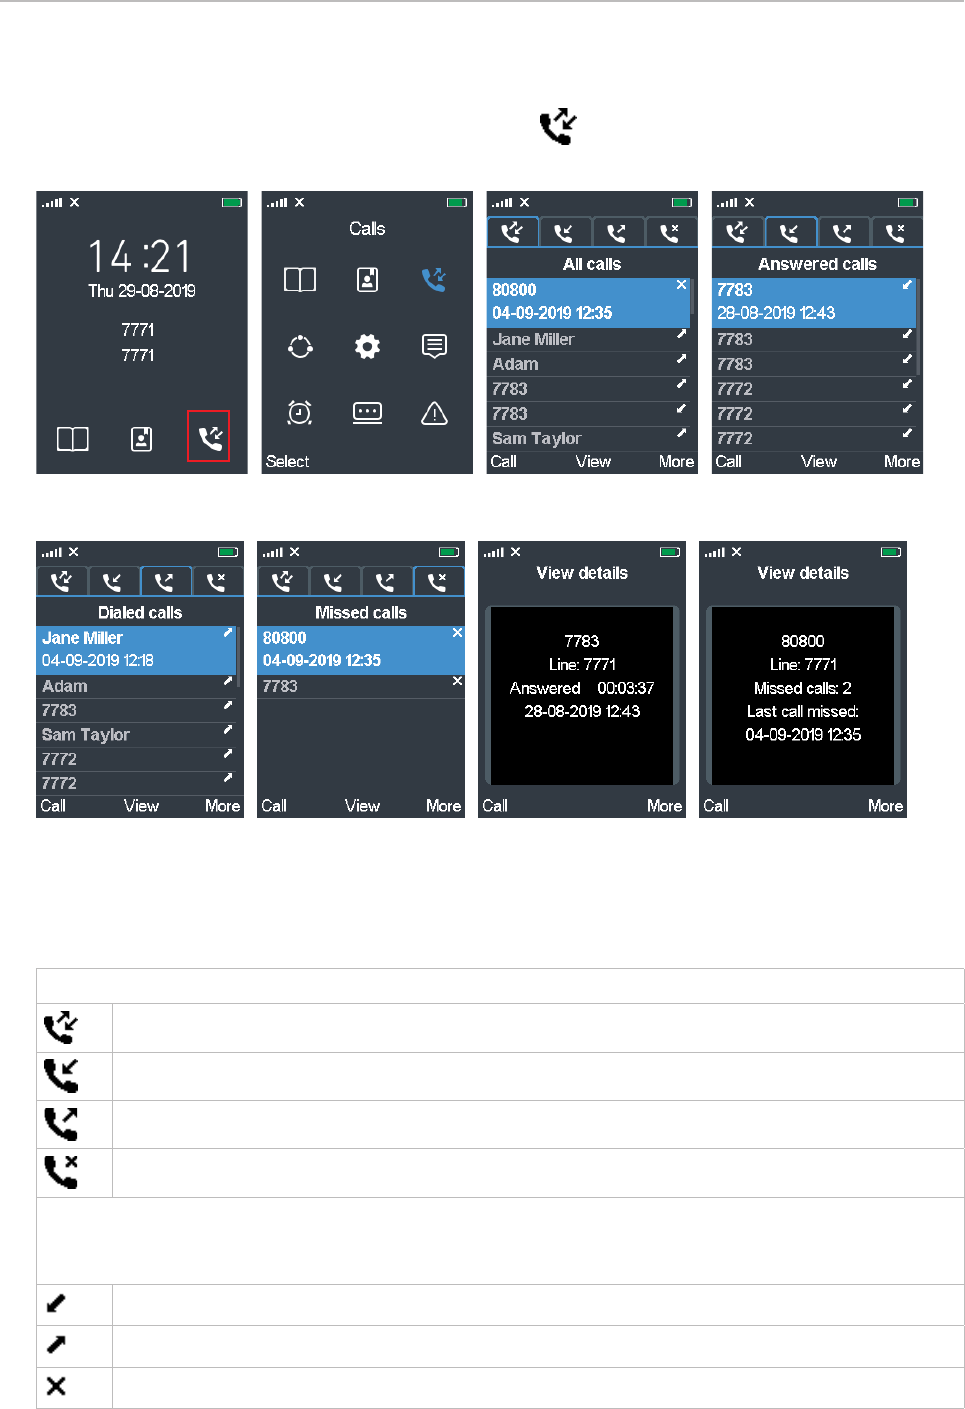
44
User Manual M70 / M80 / M90 Getting to know
Accessing the call history
1. Press the function key underneath the Calls shortcut on the idle screen (Fig. 1) or select the
symbol in the main menu (Fig. 2) and press Select. The All calls screen opens (Fig. 3).
Fig. 1 Fig. 2 Fig. 3 Fig. 4
Fig. 5 Fig. 6 Fig. 7 Fig. 8
2. Use the navigation key to scroll through the list of all calls (Fig. 3). Alternatively, you can view the
individual lists of received (Fig. 4), dialed (Fig. 5), or missed calls (Fig. 6) by selecting them with
the navigation key. The frame around the selected list's symbol turns bright blue.
Call list menu symbols:
All calls received or missed by or made from the phone (Fig. 1, 2, and 3)
Received (answered) calls (Fig. 4)
Dialed calls (Fig. 5)
Missed calls (Fig. 6)
List item symbols. Each call is represented by one line on the list. The line contains the name,
if available, or the number of the caller and a symbol on the right side of each line indicating
whether the call was received, dialed, or missed.
Received (answered) calls
Dialed calls
Missed calls.
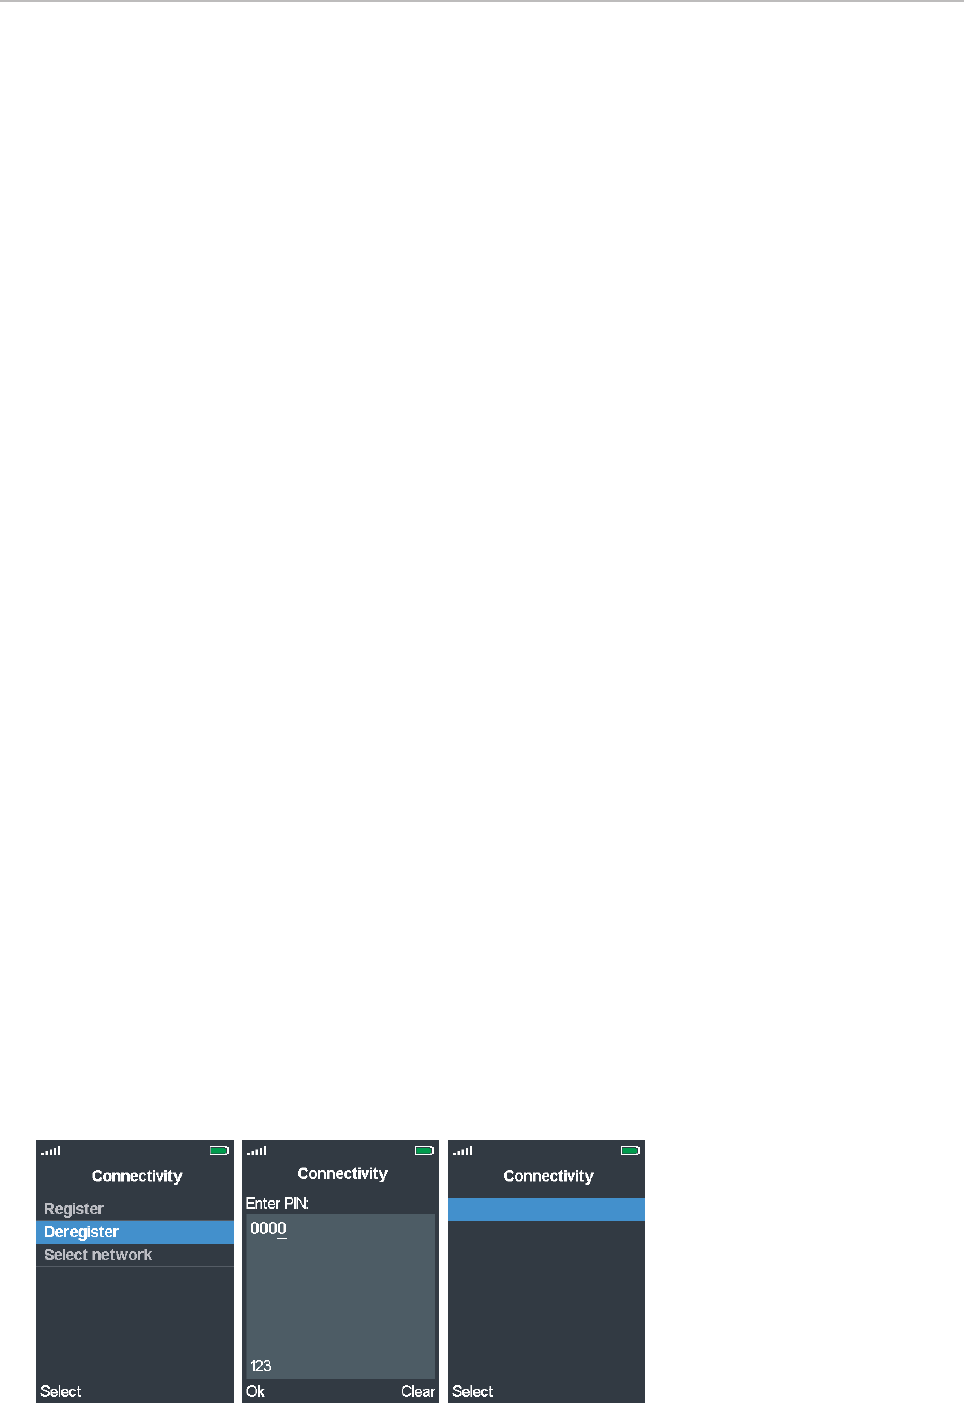
45
User Manual M70 / M80 / M90 Getting to know
Viewing the details of a call
You can view the details of calls on all lists:
1. Scroll to the call. The selected call is highlighted in blue and expands to show the time and date
of the call (Fig. 3–6, above).
2. Press the function key underneath View to view the details of the highlighted call: the caller or
callee, your account, and the date and time of the call. Additionally, the details of received and
dialed calls also contain the duration of the call (Fig. 7) while the details of missed calls contain
the total number of missed calls (Fig. 8).
Calling a number from a call list
You can return calls and call numbers from all lists:
1. Open the call list, for example the list of missed calls (Fig. 6) and scroll to a call. The selected call
is highlighted.
2. Press the function key underneath Call to dial the number.
Connectivity
This submenu is where you register and deregister the handset at the base station and where you can
select the network, if more than one is available.
To be able to register the handset at a base station, an extension must have been set up for it on that
base station. Please refer to the manual of the base station on how to set up extensions.
Registering
See "Registering the handset at the base station" on page 22.
Deregistering
The handset with all extensions is deregistered from the base station. The settings are not removed
from the base station; you can use them again by registering in the Connectivity menu of the handset.
You may also have to Start SIP registration(s) for the extension on the base station's Extension page.
1. Select Deregister (Fig. 1).
Fig. 1 Fig. 2 Fig. 3
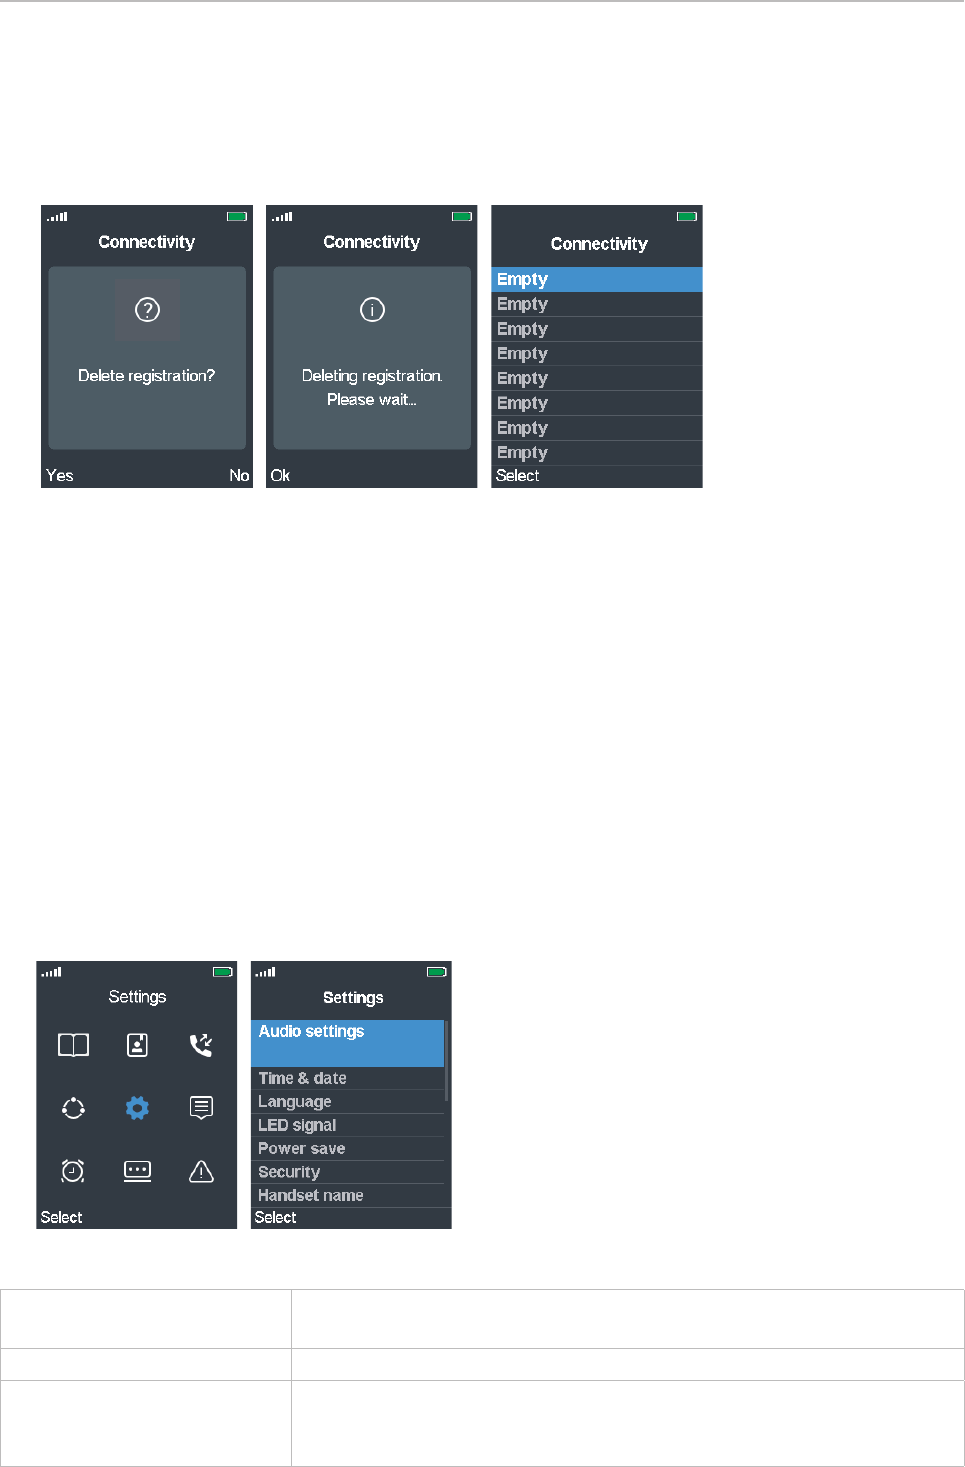
46
User Manual M70 / M80 / M90 Getting to know
2. Enter the PIN and press the function key underneath Ok (Fig. 2). The default PIN is 0000.
3. Press the function key underneath Select (Fig. 3).
4. You will be asked whether you want to deregister. If you do, press the function key underneath
Yes (Fig. 4). The handset is deregistered (Fig. 5), and the line's status reverts to Empty (Fig. 6).
Fig. 4 Fig. 5 Fig. 6
Note: The access code for registering the handset at the base station is set on the base
station. The PIN that is needed to deregister the handset from the base station and to
reset the handset to factory values is set on the handset itself (see "Change PIN" on page
52). The default code for both is 0000.
Selecting the network
The default setting is Auto select.
Settings
This submenu contains a variety of settings that determine the handset language, time and date
formats, call forwarding, etc.
Fig. 1 Fig. 2
Audio settings Ringer and alert tones and their volume settings, various other
sounds, and vibrator settings. See "Audio settings" on page 47.
Time & date See "Time and date settings" on page 49.
Language List of languages available for the handset. The default is English;
scroll to a dierent language and press the function key underneath
Select to change the setting to the selected language.

47
User Manual M70 / M80 / M90 Getting to know
LED signal See "LED indications" on page 26.
Power Save Determines how many seconds after the last activity on the handset
the display illumination will turn o. See "Power save" on page 51.
Security Settings for automatically locking the keypad and for changing the
handset PIN. See "Security" on page 51.
Handset name Here you can enter a name to be displayed below the account/
extension number on the display. The default is blank.
Line Selecting the default SIP extension/account for outgoing calls, if
more than one is available. See "Line" on page 53.
Reset settings Press the function key underneath Yes to reset the handset settings.
NOTE: Resetting the handset will not clear the DECT registration.
Removing the registration: See "Deregistering" on page 45.
Status View IP & MAC addresses, SW & HW versions of base station and
handset, IPEI, etc. See "Status" on page 54.
Auto answer Determines how incoming calls can be accepted. See "Auto answer"
on page 54.
Silent charging Determines whether the phone will ring when the battery is charging
or not. The default is O (phone rings).
Do not disturb See "Do not disturb (DND)" on page 55.
Hide number Determines whether your phone number will be sent to callers/
callees. You can hide your number for the next call, always, or never.
The default is O (your phone number will be sent).
Call forward See "Call forwarding" on page 56.
Idle screen saver Will dim display illumination before turning it o completely as set in
"Power Save".
Bluetooth Using the handset with a BT headset. See "Bluetooth" on page 57.
Audio settings
The audio settings contain the available ringer and alert tones and their volume settings, various
other sounds like key and confirmation sounds, etc., and the vibrator settings.
Silent This setting determines whether incoming calls will be announced visually
only or visually and acoustically. The options are on and o. When set to
"on", incoming calls will be announced visually only. The default is o. It is
possible to add the vibrator to the visual announcement.
Ring volume Setting the ringer volume. See "Ring volume" on page 48
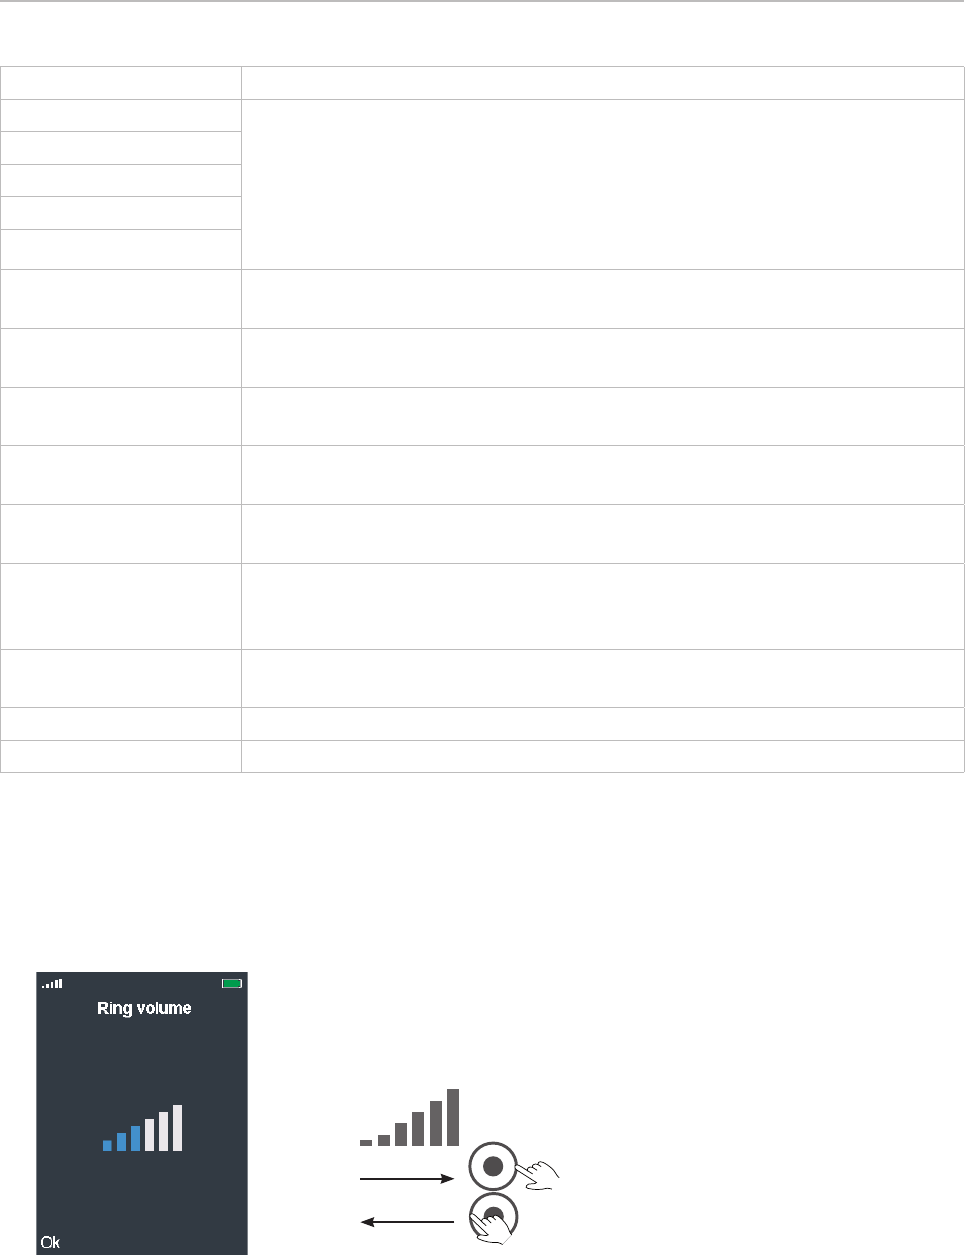
48
User Manual M70 / M80 / M90 Getting to know
Ring melody Selecting a ringer. See "Ring melody" on page 48
Ring normal msg. Selecting a ringer for normal and urgent calls and for emergency calls
with high, medium, and low priority. The settings are done the same way
as Ring melody.
Ring emergency: This is the ringer played during the pre-alarm delay, if
available and configured (see chapter "Emergency alarm" in the "M900
Admin and Installation Guide" or ask your administrator).
Ring urgent msg.
Ring emerg. high
Ring emerg. med
Ring emerg. low
Alert volume Setting the volume for the alarm clock tones (single alarm and recurrent
alarm). See Ring volume on how to increase and lower the volume.
Alert tone Selecting the ringtone for the alarm clock (one-time-only alarm and
recurrent alarm). See Ring melody on how to do the selection.
Vibrator Having the phone indicate incoming calls by vibration with or without
ringer. See "Vibrator" on page 49.
Key sound Determines whether pressing a key will result in a Click or beeping Tone
or no sound. The default is Silent.
Confirmation sound Determines whether the handset will emit a beep when a setting is
changed. Select On or O. The default is On.
Coverage warning Determines whether the handset will emit a warning tone when it
is getting close to the coverage limit of the base station or multicell
installation. The default setting is O.
Charger warning Determines whether the handset will emit a beep when it is placed in the
charger. Select On or O. The default is On.
Speakerphone profiles Options: Balanced (default) and Loud
Noise cancel mode Reducing unwanted sound. Options: O (default), Low, High
Ring volume
Increase/lower the volume of the ringer by pressing the right or left rim of the navigation key. When
you navigate to a dierent volume bar, the ringtone is played at the new volume. Press the function
key underneath OK to set and save the current volume and return to the previous screen.
Ring melody
Twenty (20) ringtones are available. Please note that these ringtones can be set for calls in general
and for individual contacts to announce ringing calls from selected phonebook entries.
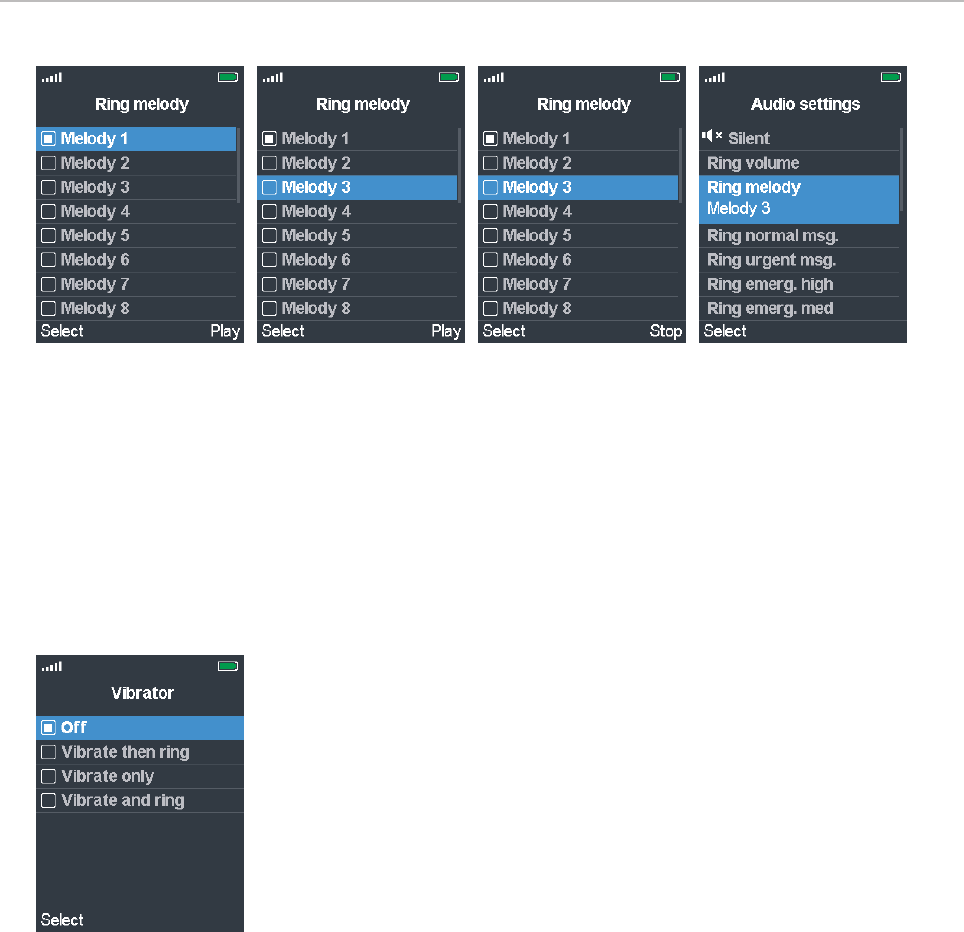
49
User Manual M70 / M80 / M90 Getting to know
Fig. 1 Fig. 2 Fig. 3 Fig. 4
• Scroll to a ringtone and press the function key underneath Play to listen to the ringtone (Fig. 2).
The text above the key changes to Stop (Fig. 3). Press the key to stop the playing of the ringtone.
• Press the function key underneath Select to set the highlighted ringtone and return to the Audio
settings menu (Fig. 4).
Vibrator
Three vibration settings and the O setting are available.
• O
• Vibrate then ring: The handset will vibrate four times, then start ringing.
• Vibrate only
• Vibrate and ring: The handset will simultaneously ring and vibrate.
The default setting is O . To change the setting, scroll to a dierent one,
and press the function key underneath Select.
Time and date settings
Available time formats are 24 hours and 12 hours AM/PM. There are six available date formats.
The time and the date are received from and synchronized the base station where the handset is
registered, so normally it is not necessary or advisable to adjust them manually.
Time format
1. In the Settings menu select Time & date (Fig. 1).
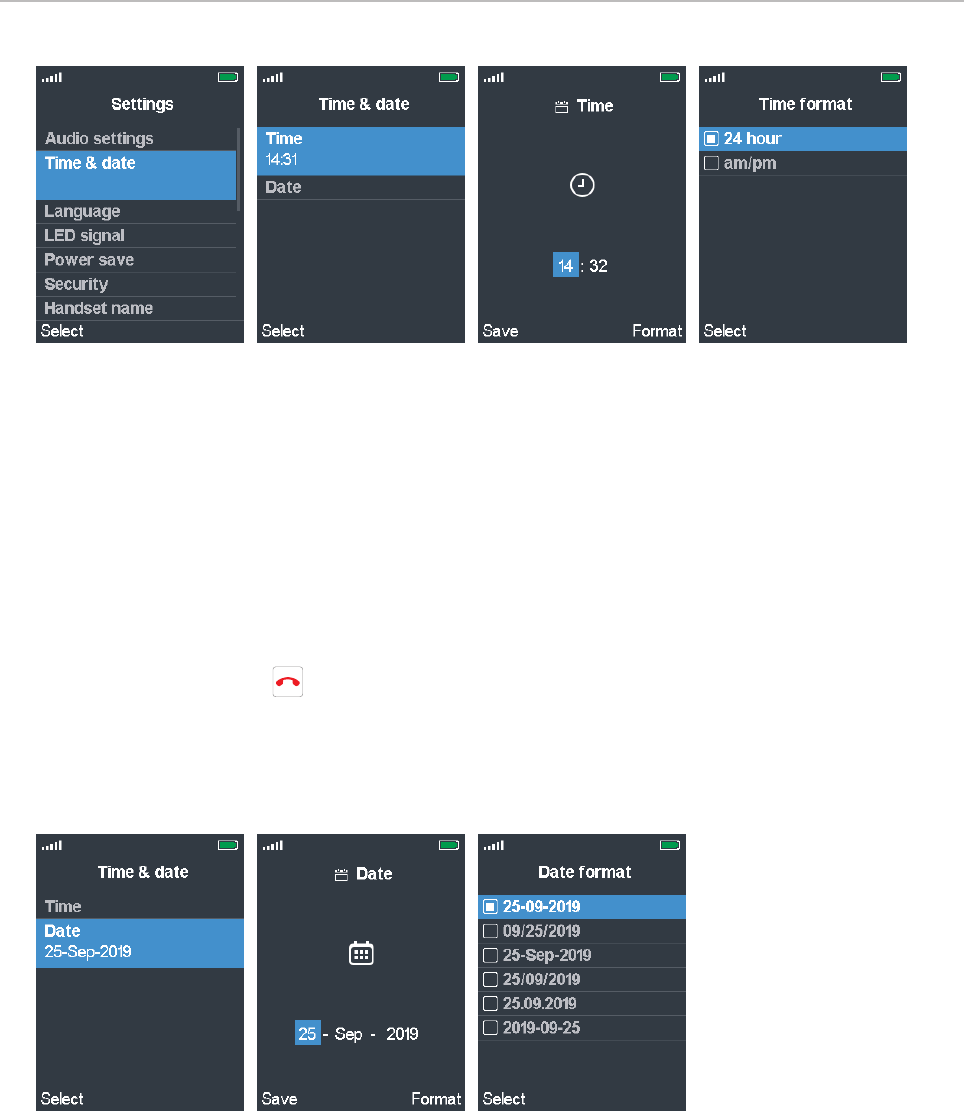
50
User Manual M70 / M80 / M90 Getting to know
Fig. 1 Fig. 2 Fig. 3 Fig. 4
2. In the Time & date menu, select Time (Fig 2).
3. The time is transmitted from the base station. You can enter a dierent hour and minute setting
on the handset's keypad`(Fig. 3) but the clock will be reset to the time setting of the base station
when the handset is rebooted.
4. Select Format.
5. Select 24 hour or am/pm (Fig. 4).
6. Press the function key underneath Select to select and return to the Time screen (Fig. 2).
7. Press Save to save and return to the Time & date menu.
8. Press the red cancel key to return to the Settings menu.
Date format
1. In the Time & date menu, select Date (Fig 5).
Fig. 5 Fig. 6 Fig. 7
2. The date is transmitted from the base station. You can enter a dierent date setting on the
handset's keypad and the navigation key (Fig. 6) but the date will be reset to the date setting of the
base station when the handset is rebooted.
3. Select Format.
4. Scroll to one of the formats (Fig. 7):
Day · month · year, separated by hyphens: 25-01-2019
Month · Day · year, separated by slashes: 09/25/2019
Day · month · year, separated by hyphens: 25-Sep-2019
Day · month · year, separated by slashes: 25/09/2019
Day · month · year, separated by periods: 25.09.2019
Year · month · Day, separated by hyphens: 2019-09-25
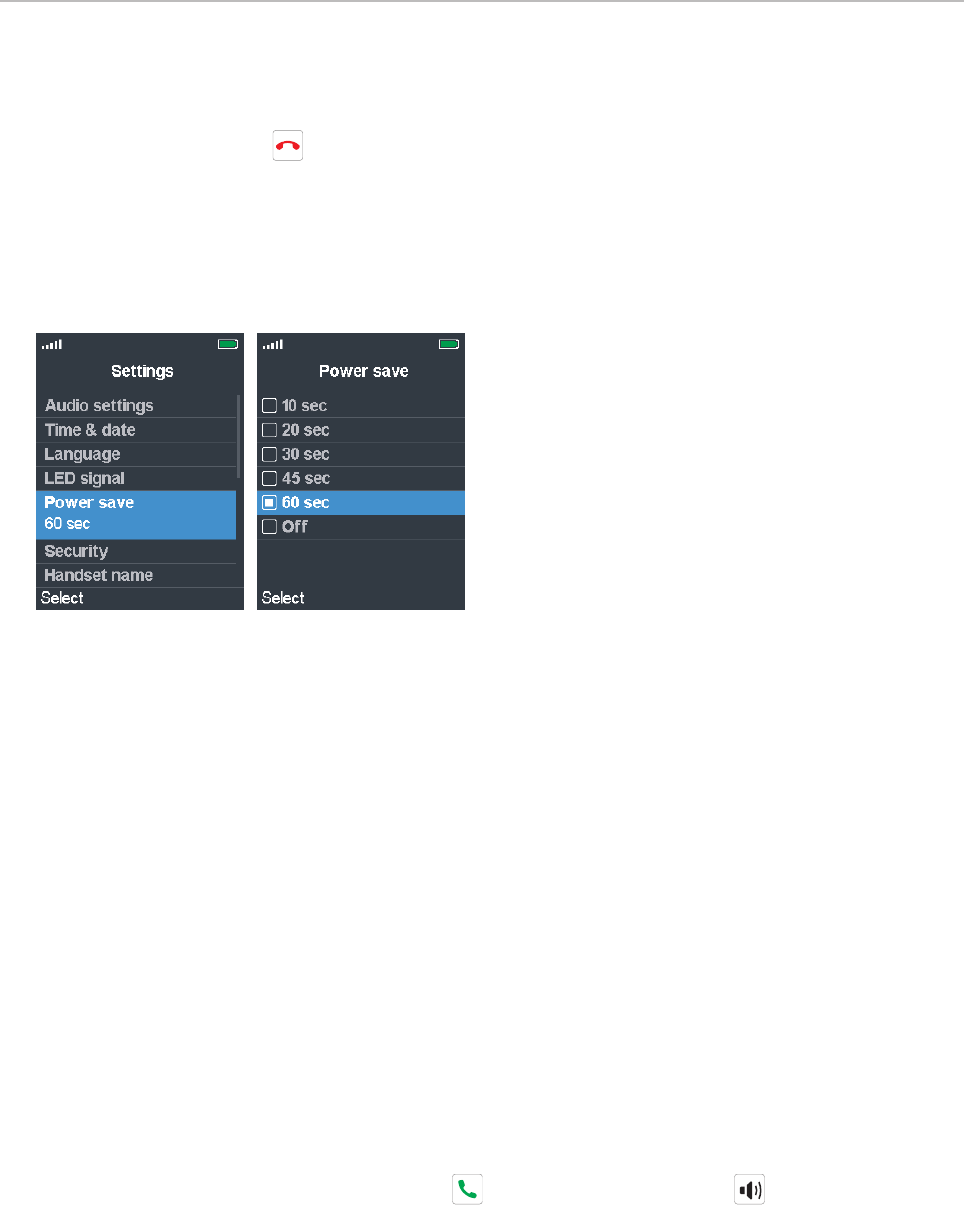
51
User Manual M70 / M80 / M90 Getting to know
5. Press the function key underneath Select to select and return to the Date screen (Fig. 5 ).
6. Press Save to save and return to the Time & date menu.
7. Press the red cancel key to return to the Settings menu..
Power save
This setting specifies how many seconds after the last activity on the handset the display illumination
will turn o. The default is 60 seconds.
Fig. 1 Fig. 2
1. In the Settings menu (Fig. 1), select Power save.
2. Scroll to the number of seconds you want to select or to O if you do not want the illumination to
be turned o in periods of inactivity.
3. Press the function key underneath Select or the center of the navigation key to save your
selection and return to the Settings menu.
Security
This menu contains the settings for automatically locking the keypad after a specified period of
inactivity and for changing the handset PIN for deregistering the handset from the base station.
Automatic keylock
To prevent unintentional dialing, the keypad can be locked manually by pressing the star key for
at least 3 seconds (see "Star key" on page 30). The handset can also be programmed to lock
automatically after a specified period of inactivity.
NOTE: When the keypad is locked, incoming calls will still ring on your phone. You can
accept them by pressing the green key or the speakerphone key , put them on
hold, and transfer them. The keypad remains locked for other outgoing calls.
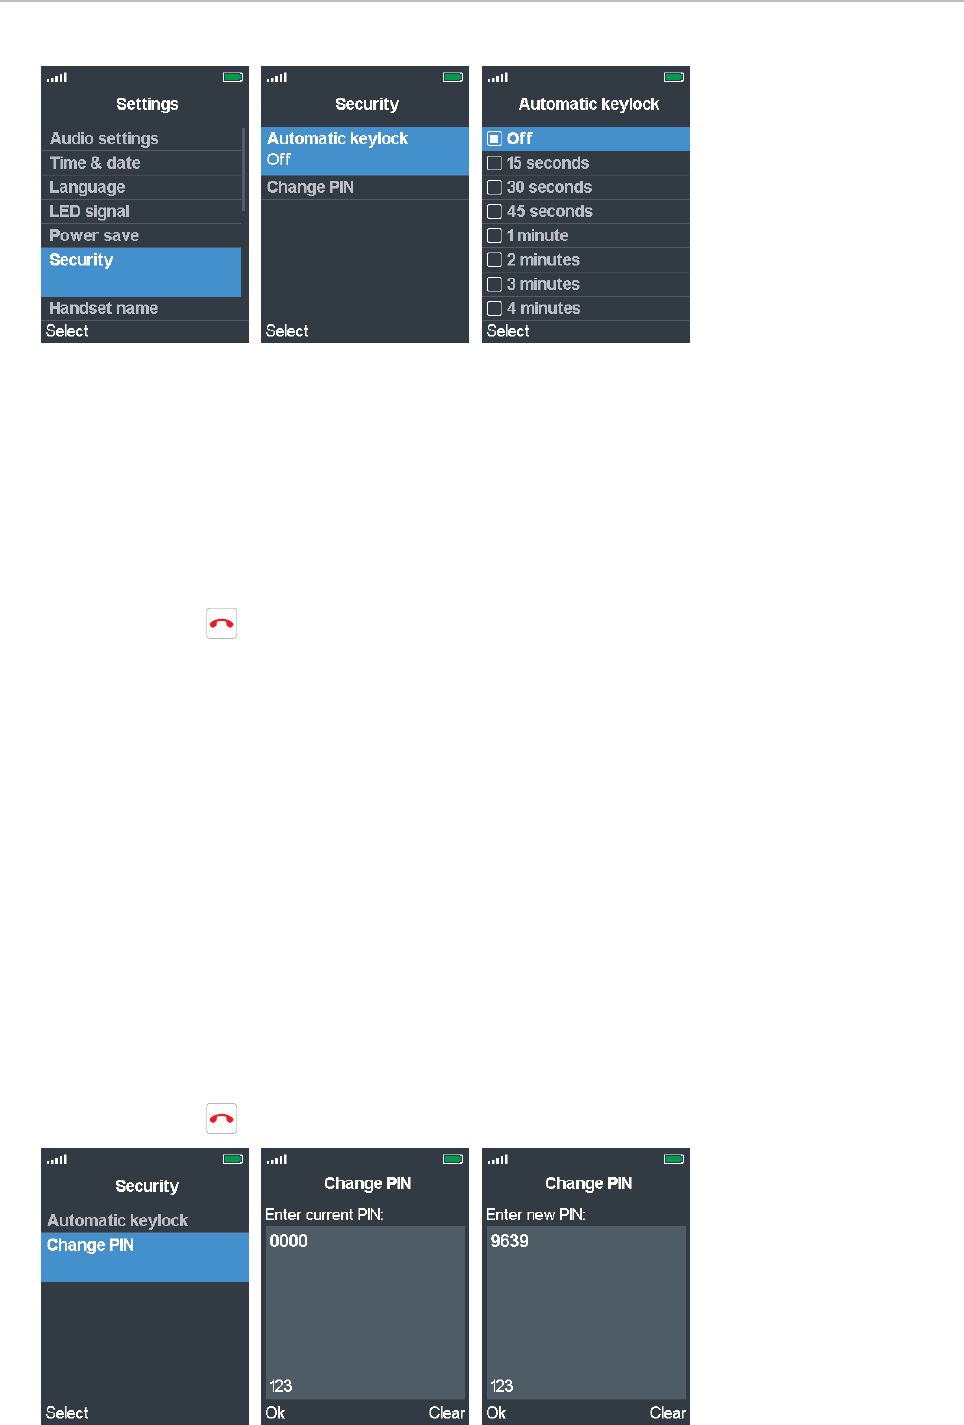
52
User Manual M70 / M80 / M90 Getting to know
Fig. 1 Fig. 2 Fig. 3
Setting:
1. In the Settings menu, select Security (Fig. 1).
2. In the Security menu, select Automatic keylock (Fig. 2). The default is O.
3. If you select a period of inactivity in seconds (15, 30, or 45) or minutes (1–5), the keyboard will be
locked automatically when the period has elapsed (Fig. 3).
4. Press Select to save and return to the Security menu.
5. Press the red key to return to the Settings menu.
Unlocking the keypad
To unlock the keypad after it has been locked manually or automatically, press the star key until the
lock symbol disappears.
Change PIN
This is the PIN that is required for deregistering the handset from the base and to reset it to factory
values. The default is 0000.
1. In the Settings menu, select Security (Fig. 1).
2. In the Security menu (Fig. 4), select Change PIN.
3. Enter the current PIN in the text field (Fig. 5), and press OK.
4. Enter the new PIN in the text field (Fig. 6), and press OK to save and return to the Security menu.
5. Press the red key to return to the Settings menu.
Fig. 4 Fig. 5 Fig. 6
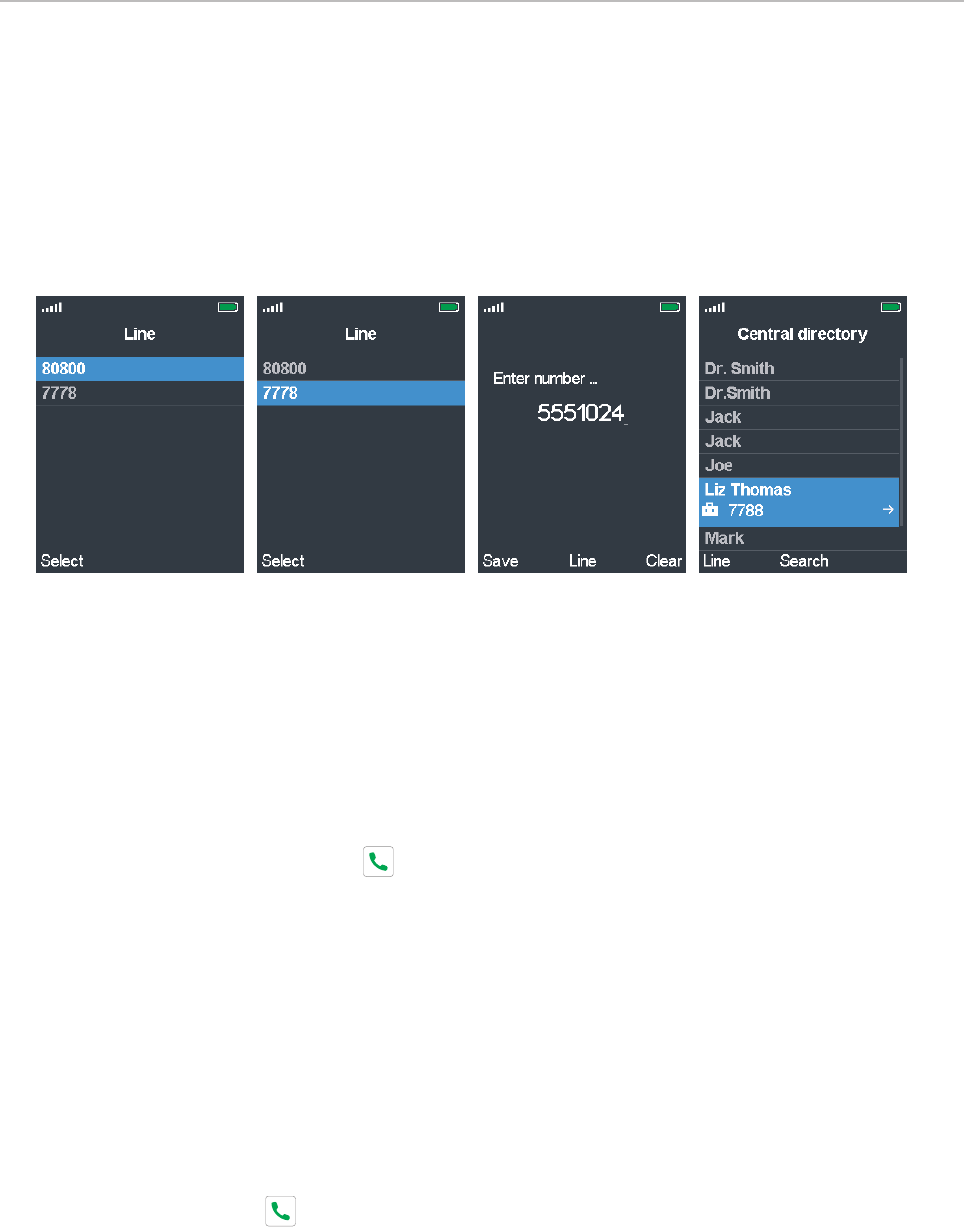
53
User Manual M70 / M80 / M90 Getting to know
Line
The handset supports up to ten extensions (accounts/phone numbers). On corded Snom deskphones
they are called "identities".
In the Line menu (Fig. 1), you select the identity (and thus the SIP server, i.e., "phone line", where it is
set up) that will be your default identity when making calls. This identity is shown on the display (see
Fig. 1 on page 51).
Fig. 1 Fig. 2 Fig. 3 Fig. 4
• Selecting the default identity for outgoing calls.
1. Use the up/down arrows on the navigation key to select the extension.
2. Press the OK key or the function key underneath Select to save (Fig. 1 and 2). This is the
identity that is shown on your display.
• Changing the identity for the current outgoing call. The default identity will not be changed.
1. Before pressing the green key to dial a number, press the function key underneath Line
(
Fig. 3)
.
◦ When dialing manually: You can do this at any time while or after entering the digits on
the keypad manually.
◦ When calling a number from the global phonebook, select the contact, then press the
function key underneath Line (Fig. 4).
2. Select the extension to be used for the next outgoing call and press the function key
underneath Select (Fig. 1 and 2).
3. When dialing manually, the display will return to the Enter number screen (Fig. 3) where
you can enter any remaining digits, if necessary. When dialing a number from the central
directory, the display will return to the directory page with the number you want to dial (Fig. 4).
4. Press the green key to dial.
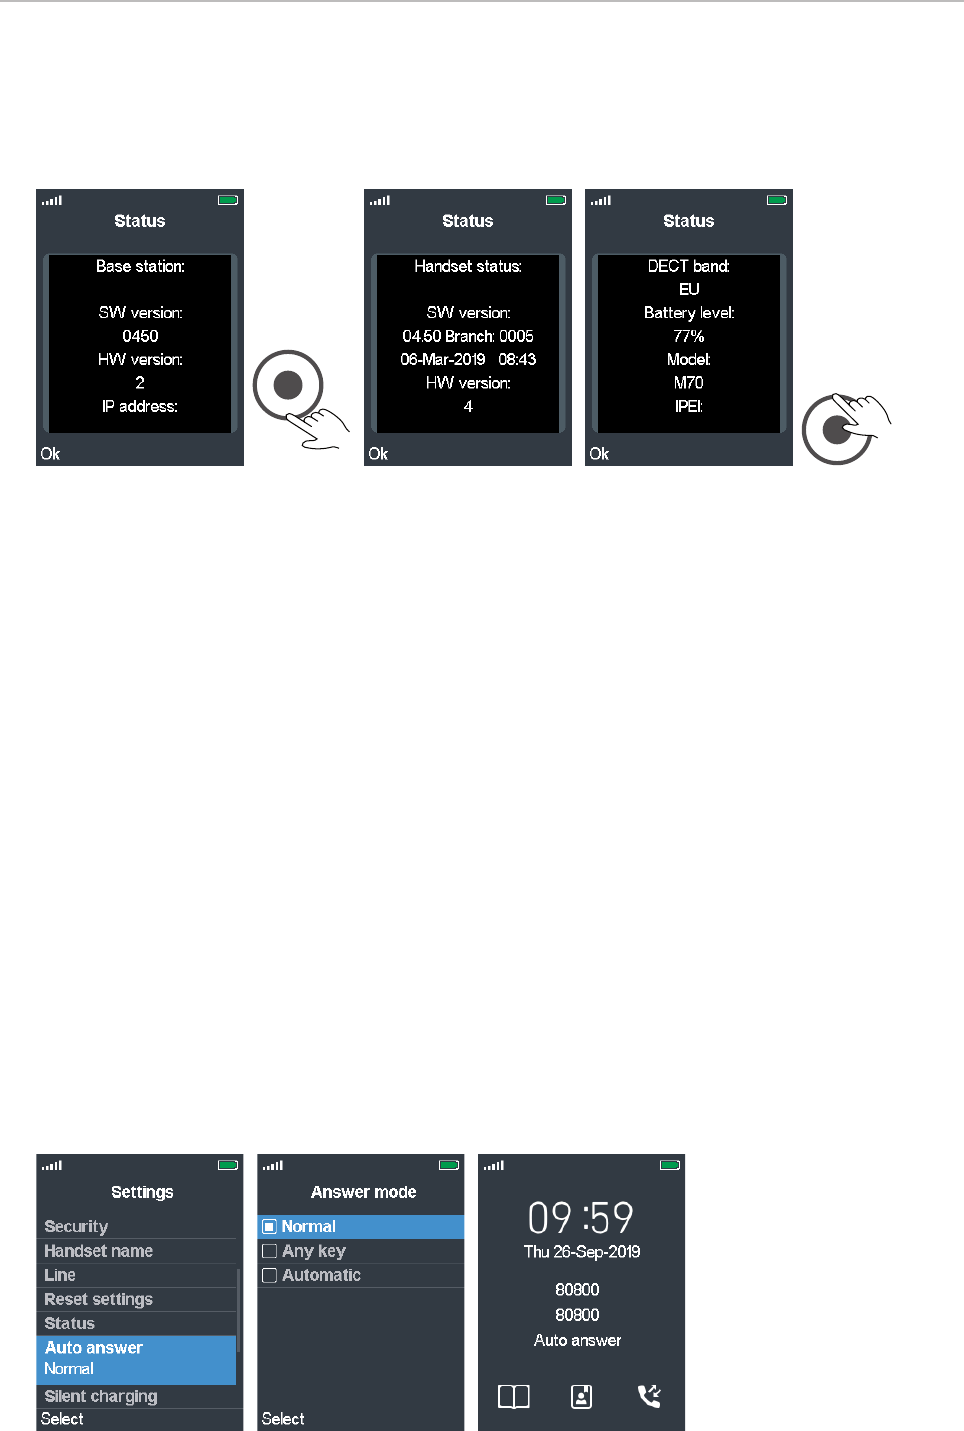
54
User Manual M70 / M80 / M90 Getting to know
Status
The status screen contains software and hardware information on the handset and on the base
station the handset is registered at. Scroll down and back up to view all the information.
Base station information
Software version (firmware version)
Hardware version
IP address
MAC address
System name*
* This is the name entered in the text field of Base Station Name on the Management Settings
page of the web interface of the base station. The default name is the base station type, i.e.,
M900, M700, etc.
Handset information
Software version (firmware version
Hardware version
DECT band (i.e., DECT frequency EU, US, etc.)
Battery level
Model
IPEI
Bluetooth (MAC address of handset's Bluetooth module)
Auto answer
This setting determines how you can accept incoming calls on the handset. The default is Normal.
Fig. 1 Fig. 2 Fig. 3
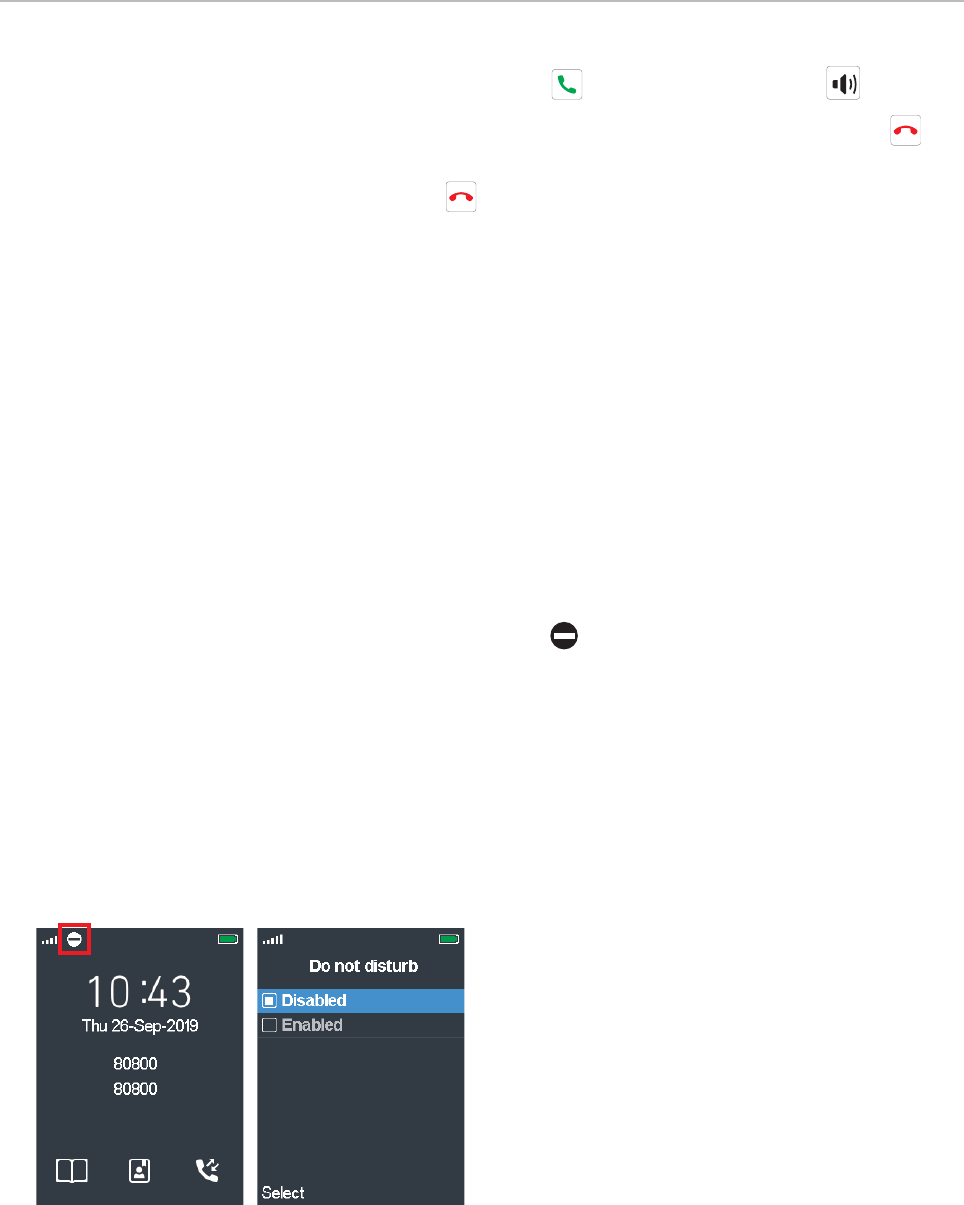
55
User Manual M70 / M80 / M90 Getting to know
• Normal: Calls are accepted by pressing the green key or the speakerphone key .
• Any key: Calls are accepted by pressing any key - with the exception of the red cancel key - on
the keypad.
Exception: Pressing the red cancel key will reject the ringing call; the caller hears the
busy signal.
• Automatic: Calls are accepted automatically, as indicated by the line Auto answer on the idle
screen (Fig. 3). The handset will announce the incoming call once in accordance with its audio
settings (see "Audio settings" on page 47) and then accept the call.
Exception: Calls waiting when you are in a call will not be accepted automatically but continue
to be announced visually and/or acoustically.
1. In the Settings menu, select Auto answer.
2. Scroll up or down to the setting you want to select.
3. Press Select or the center of the navigation key to save and return to the Settings menu.
Do not disturb (DND)
When this setting is activated. as indicated by the symbol to the right of the signal strength
indication in the upper left corner of the display (Fig. 1), incoming calls will be rejected and callers
hear the "busy" signal.
Turning DND on:
1. In the Settings menu, select Do not disturb.
2. Scroll down to Enabled (Fig. 2).
3. Press Select or the center of the navigation key to save and return to the Settings menu.
Fig. 1 Fig. 2
Turning DND o:
1. In the Settings menu, select Do not disturb.
2. Scroll up to Disabled.
3. Press Select or the center of the navigation key to save and return to the Settings menu.
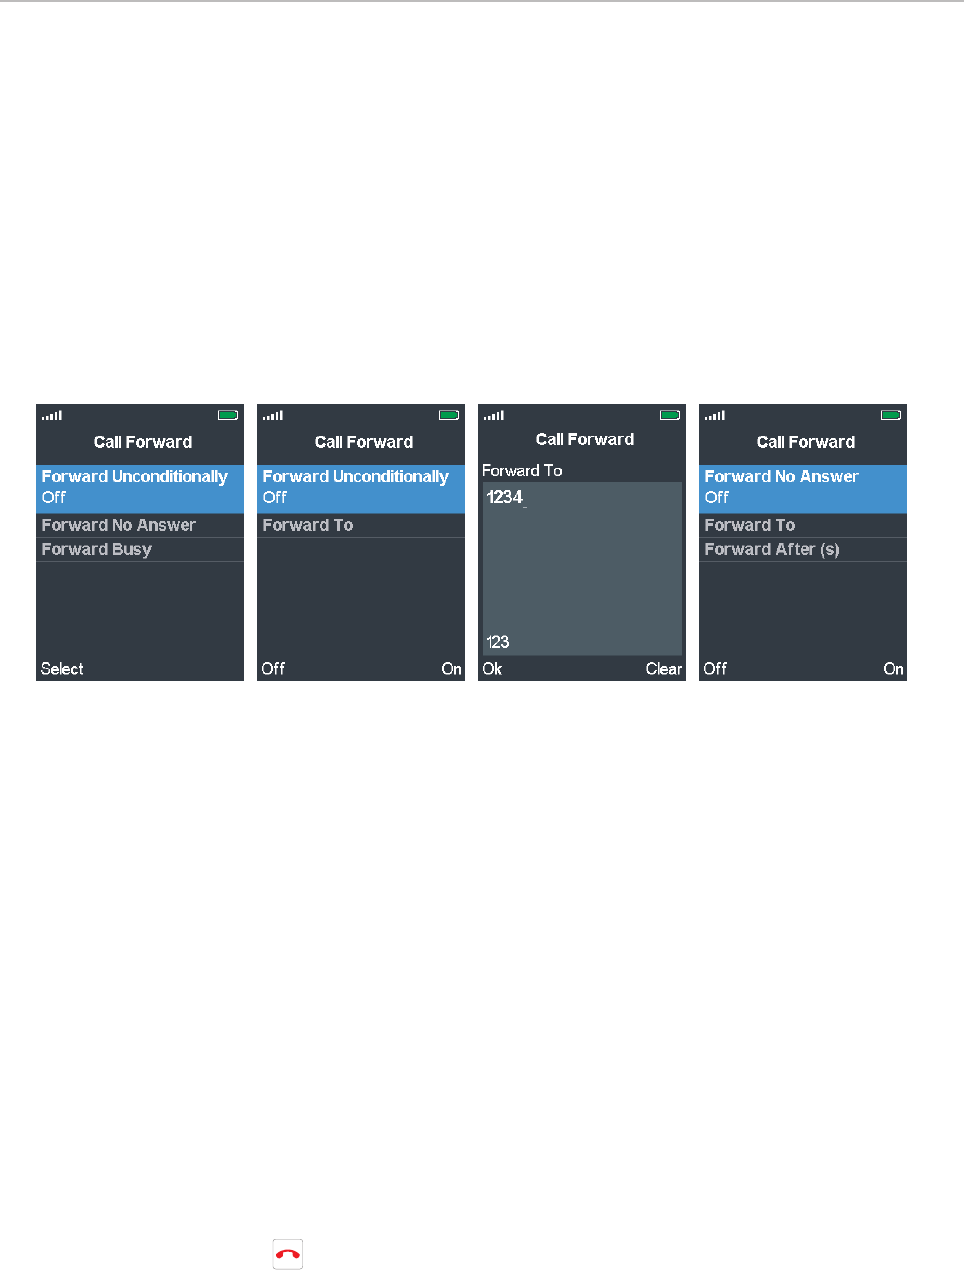
56
User Manual M70 / M80 / M90 Getting to know
Call forwarding
The phone can be set to forward incoming calls, either always or under certain conditions:
• Forward Unconditionally (Fig. 2): Forwarding all incoming calls to the number of the phone,
extension, or mailbox specified as this function’s target.
• Forward Busy: Forwarding calls ringing when the phone is busy to the number of the phone,
extension, or mailbox specified as this function’s target.
• Forward No Answer (Fig. 4): Forwarding ringing calls that have not been accepted within the
specified number of seconds to the number of the phone, extension, or mailbox specified as this
function’s target.
Fig. 1 Fig. 2 Fig. 3 Fig. 4
Turning call forwarding on
1. In the Settings menu, select Call Forward.
2. In the Call Forward menu (Fig. 1), select one of the three call forwarding options.
3. To turn the respective forwarding function on, press the function key underneath On (e.g., Fig. 2
and 4).
4. Scroll down to Forward to and press Select or the center of the navigation key.
5. Enter the phone number the call is to be forwarded to in the text field of Forward to (Fig. 3).
6. Press the function key underneath OK to save and return to the menu of the call forward event
(e.g., Fig. 2 and 4).
7. Forward No Answer only (Fig. 4). When the time period in seconds has elapsed without the call
having been accepted, the call is forwarded to the number set in Forward to.
a. Scroll down to Forward after (s) and press Select or the center of the navigation key.
b. Enter the number of seconds in the text field of Forward after (s) and press OK or the center
of the navigation key to save and return to the call forward menu.
8. Press the red cancel key once to return to the call forward menu, twice to return to the
Settings menu.
Turning call forwarding o
1. In the Settings menu, select Call Forward.
2. In the Call Forward menu (Fig. 1), select the call forwarding event
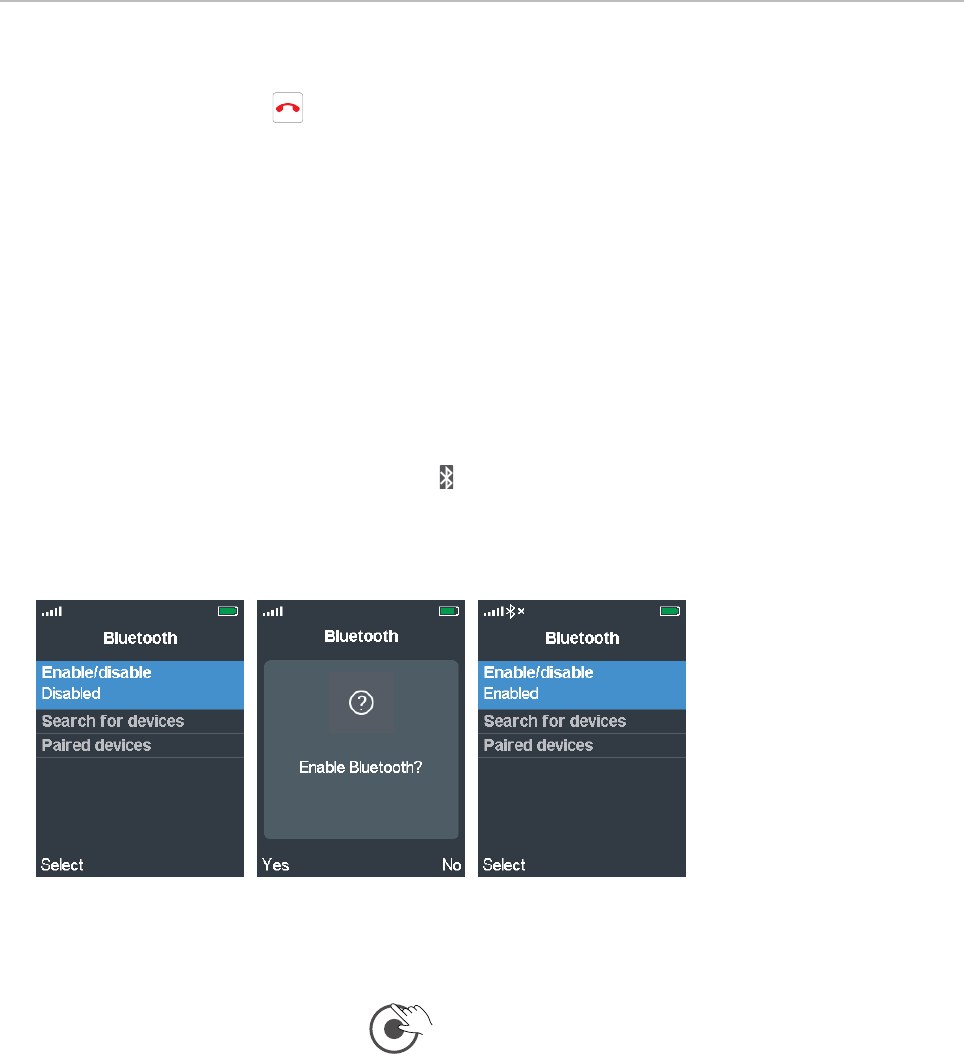
57
User Manual M70 / M80 / M90 Getting to know
3. Press the function key underneath O (e.g., Fig. 2 and 4).
4. Press the red cancel key once to return to the call forward menu, twice to return to the
Settings menu.
Bluetooth
The handset can be used with a Bluetooth headset which must be paired with the handset first. When
the headset has been paired, it is added to the list of Paired Devices. The connection to the headsets
on this list can be disconnected and reestablished with one key press without having to go through
the entire pairing process again.
In the default setting, Bluetooth is disabled to save battery power and avoid unnecessary radiation,
however minimal. To be able to use Bluetooth, the function must be enabled; we recommend turning
it o when it is not being used.
When Bluetooth is enabled, the Bluetooth logo is shown to the right of the signal strength indicator
in the top line of the display. You can usually use the headset to accept and terminate calls ringing
on the handset; any further functions (hold, swap, transfer call) depend on the headset and its
interoperability with the handset.
Fig. 1 Fig. 2 Fig. 3
Enabling and disabling Bluetooth
1. Open the Settings menu and press to go directly to Bluetooth at the bottom of the menu.
2. Press Select or the center of the navigation key to select Enable/Disable (Fig. 1). You will be
asked whether to enable or disable Bluetooth, depending on its current status (Fig. 2).
3. Press Yes or No to save changing or keeping the current status and to return to the Bluetooth
menu (Fig. 3).
Pairing
1. Make sure that Bluetooth is enabled.
2. Scroll to Search for devices and press Select or the center of the navigation key.
3. Put the headset into pairing mode as described in your headset's user guide. The display shows
the message "Searching" (Fig. 4) and then presents the detected headsets (Fig. 5).
4. If there is more one, select the one you want to pair with the handset.
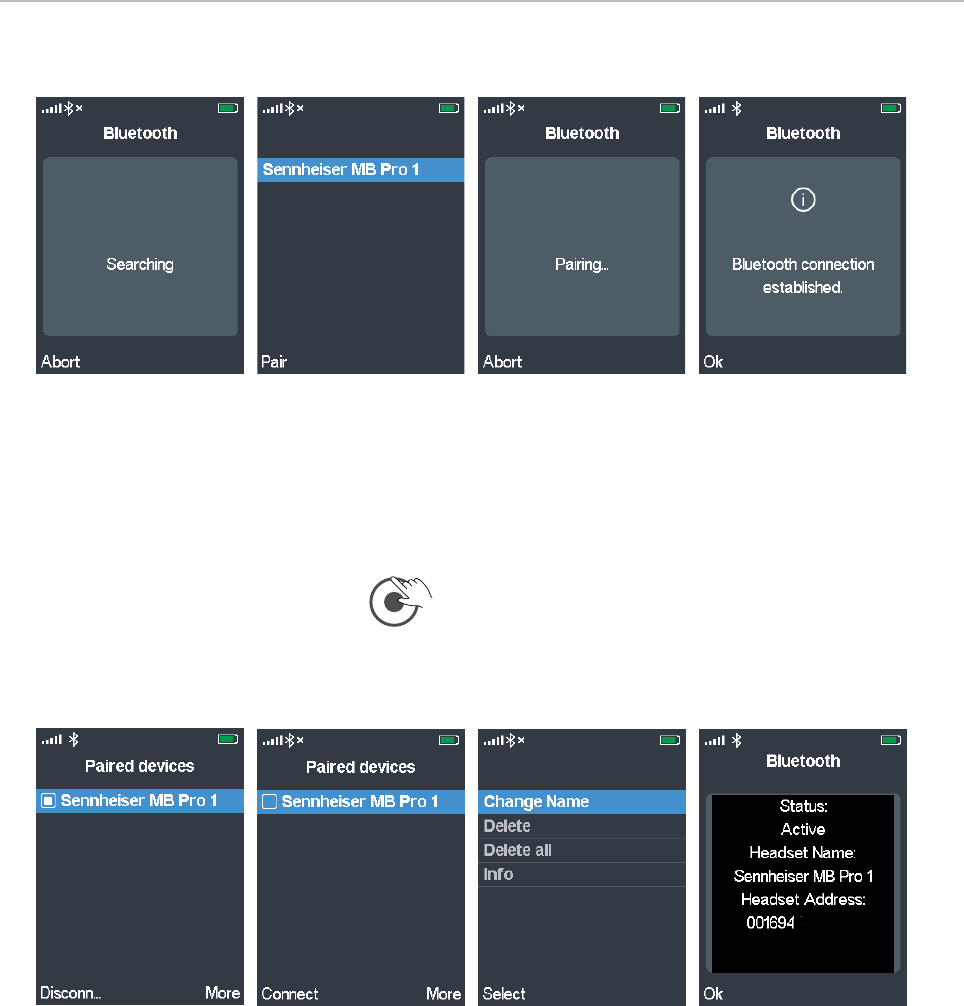
58
User Manual M70 / M80 / M90 Getting to know
5. Press the function key underneath Pair.
Fig. 4 Fig. 5 Fig. 6 Fig. 7
6. The display shows the message "Pairing" (Fig. 6).
7. If pairing was successful, you will see the message "Bluetooth connection established" (Fig. 4).
Managing paired headsets
1. Open the Settings menu and press to go directly to Bluetooth at the bottom of the menu.
2. Select Paired Devices.
3. If there is more than one paired device, select the device.
Fig. 8 Fig. 9 Fig. 10 Fig. 11
◦ If the headset is connected to the handset, the function key label in the left lower corner says
Disconn (Fig. 8); when it is not connected, the label says Connect (Fig. 9).
◦ If the label says Disconn, press the function key underneath it to change the device's
current status from connected to disconnected;
◦ if it says Connect, press the function key underneath it to change the device's current
status from disconnected to connected.
◦ Press the function key underneath More to open the submenu (Fig. 10) where you can change
the name of the device, delete the selected device, delete all devices, or view the Info screen
with the product's name and Bluetooth MAC (Fig. 11).
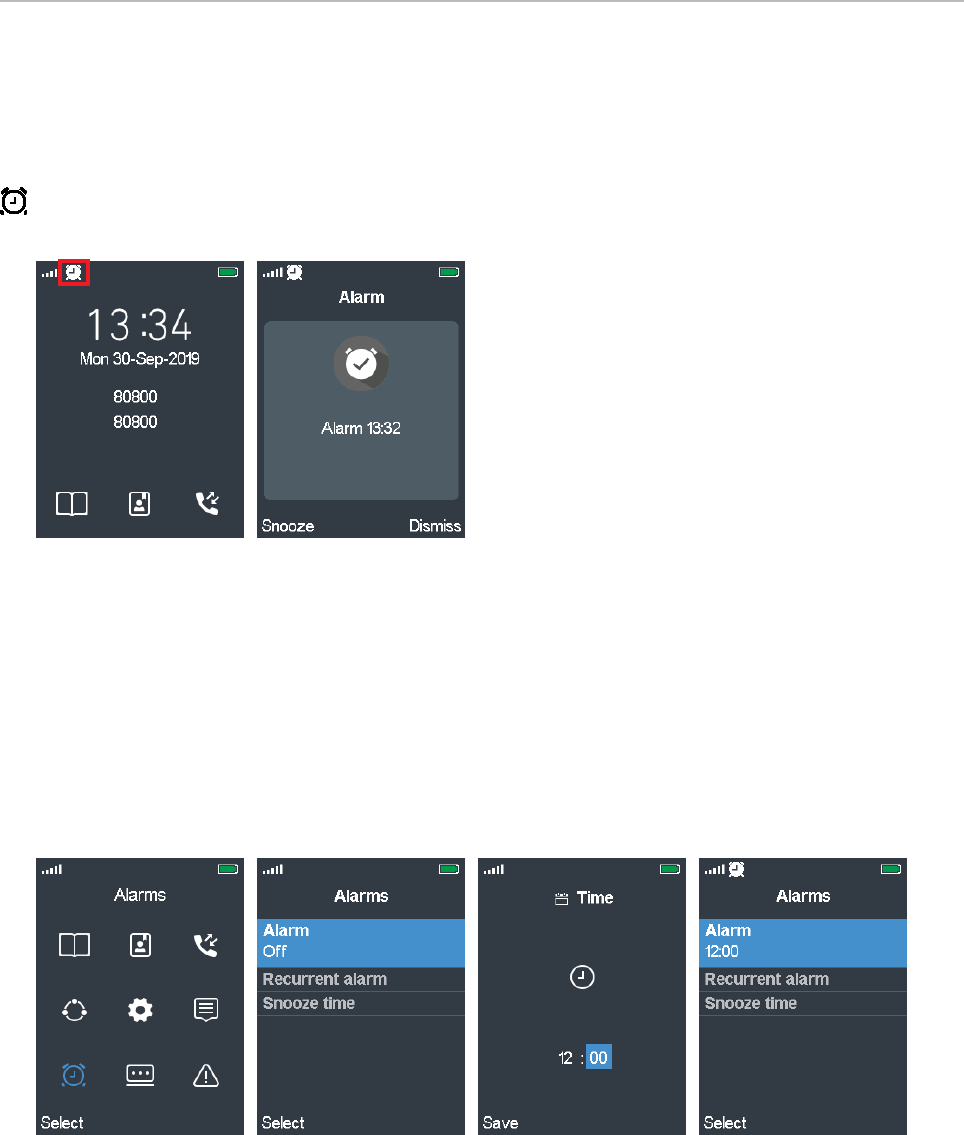
59
User Manual M70 / M80 / M90 Getting to know
Alarm clock settings
The phone has two alarm clock settings, for a one-time alarm and for a recurring alarm at the same
time on specified days of the week; it also has a snooze setting that applies to both. The clock symbol
in the top line to the right of the signal strength symbol indicates that an alarm setting is active
(Fig. 1).
Fig. 1 Fig. 2
• When the alarm goes o, the display indicates the time the alarm is set for (Fig. 2).
• You can turn the alarm o by pressing the function key underneath Dismiss.
• Press the function key underneath Snooze to turn on the snooze function so that the alarm will go
o again after the specified snooze time period in minutes has elapsed.
Alarm
The one-time alarm will go o at the specified time every day when it is set.
Fig. 3 Fig. 4 Fig. 5 Fig. 6
Setting the alarm
1. In the main menu, scroll to the Alarms symbol (Fig. 3) and press the function key underneath
Select.
2. In the Alarms menu, select Alarm and press the function key underneath Select (Fig. 4).
3. If you want to change the time setting, use the navigation key to select hour and minutes,
respectively, the enter the digits on the keypad (Fig. 5).
4. Press the function key underneath Save to save the setting and return to the Alarms menu
(Fig. 6).
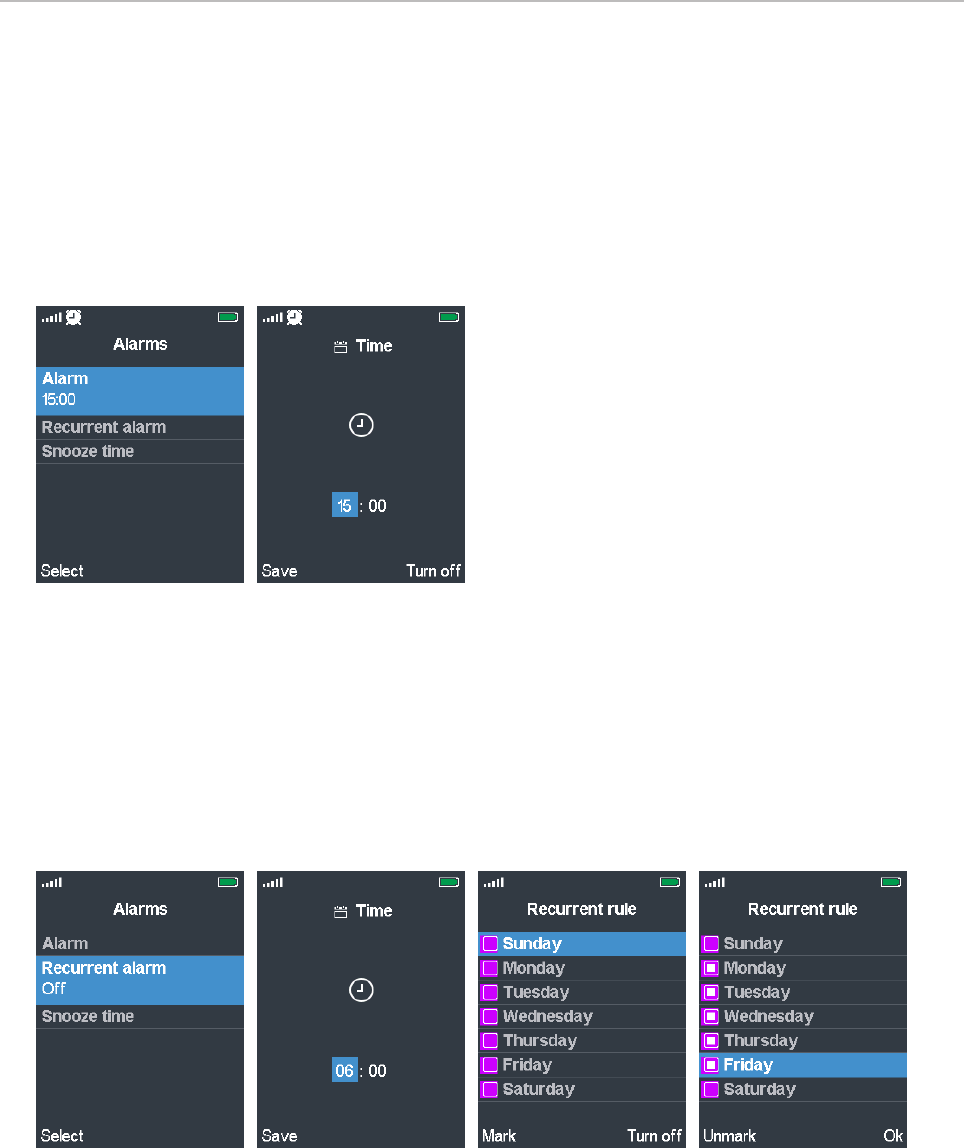
60
User Manual M70 / M80 / M90 Getting to know
Turning the alarm o
You can turn the setting o in the Alarms menu. Pressing the function key underneath Dismiss when
the alarm goes o will also turn it o.
1. In the main menu, scroll to the Alarms symbol (Fig. 3) and press the function key underneath
Select.
2. In the Alarms menu, select Alarm and press the function key underneath Select (Fig. 7).
Fig. 7 Fig. 8
3. Press the function key underneath Turn o (Fig. 8) to turn the alarm and return to the Alarms
menu (Fig. 4).
Recurring alarm
This alarm will ring at the specified time on the selected days of the week. It isn't possible to set a
dierent time for dierent days of the week.
Fig. 9 Fig. 10 Fig. 11 Fig. 12
Setting the alarm
1. In the main menu, scroll to the Alarms symbol (Fig. 3) and press the function key underneath
Select.
2. In the Alarms menu, scroll to Recurrent alarm and press the function key underneath Select
(Fig. 9).
3. To set the time, use the navigation key to select hour and minute, respectively; use the keypad
keys to enter the digits (Fig. 10).
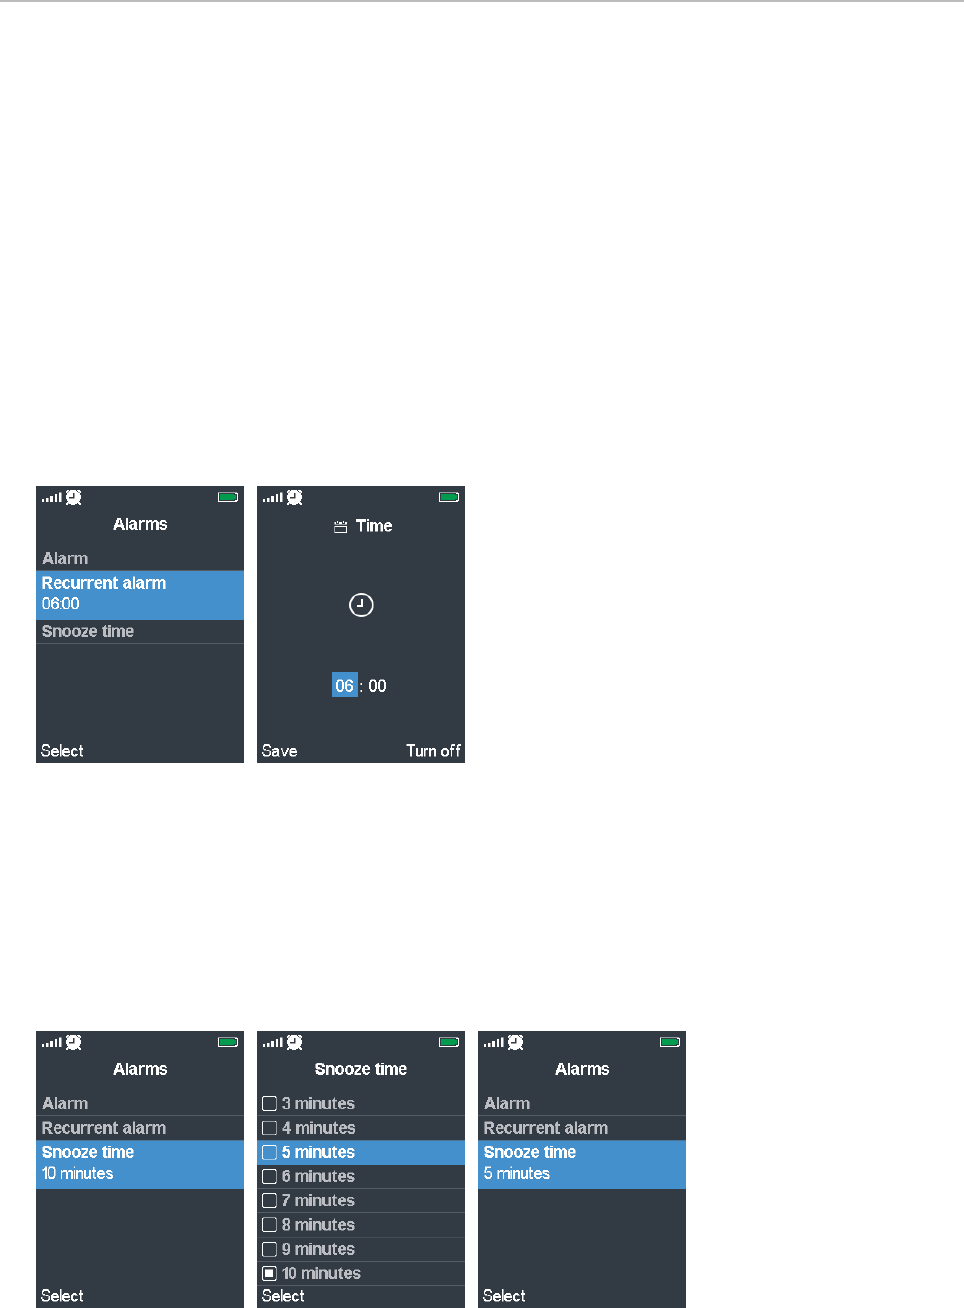
61
User Manual M70 / M80 / M90 Getting to know
4. Press Save to save the time setting and open the Recurrent rule screen (Fig. 11).
5. Scroll to each day of the week on which you want the alarm to go o and press the function key
underneath Mark for each one.
Note: To turn o the alarm for one of the checkmarked days, scroll to it and press the
function key underneath Unmark (Fig. 12).
6. Press the function key underneath Ok to save the settings and return to the Alarms menu
(Fig. 13).
Turning the alarm o
1. In the main menu, scroll to the Alarms symbol (Fig. 3) and press the function key underneath
Select.
2. In the Alarms menu, scroll to Recurrent alarm and press the function key underneath Select
(Fig. 14).
Fig. 14 Fig. 15
3. Press the function key underneath Turn o (Fig. 15) to save the setting and return to the Alarms
menu.
Snooze time
Snooze time applies to all alarm settings and can be set from 1 to 10 minutes. The default is 10
minutes.
Fig. 16 Fig. 17 Fig. 18
Setting snooze time
1. In the main menu, scroll to the Alarms symbol (Fig. 3) and press the function key underneath
Select.

62
User Manual M70 / M80 / M90 Getting to know
2. In the Alarms menu, scroll to Snooze time and press the function key underneath Select.
3. Scroll to the minute setting and press the function key underneath Select (Fig. 17) to save the
setting and return to the Alarms menu.
Using snooze time
When the alarm goes o, press the function key underneath Snooze (see "Alarm clock settings" on
page 59, Fig 2). If snooze time is 10 minutes, for example, the alarm will go o again 10 minutes
later, showing the time of the original alarm setting on the display.
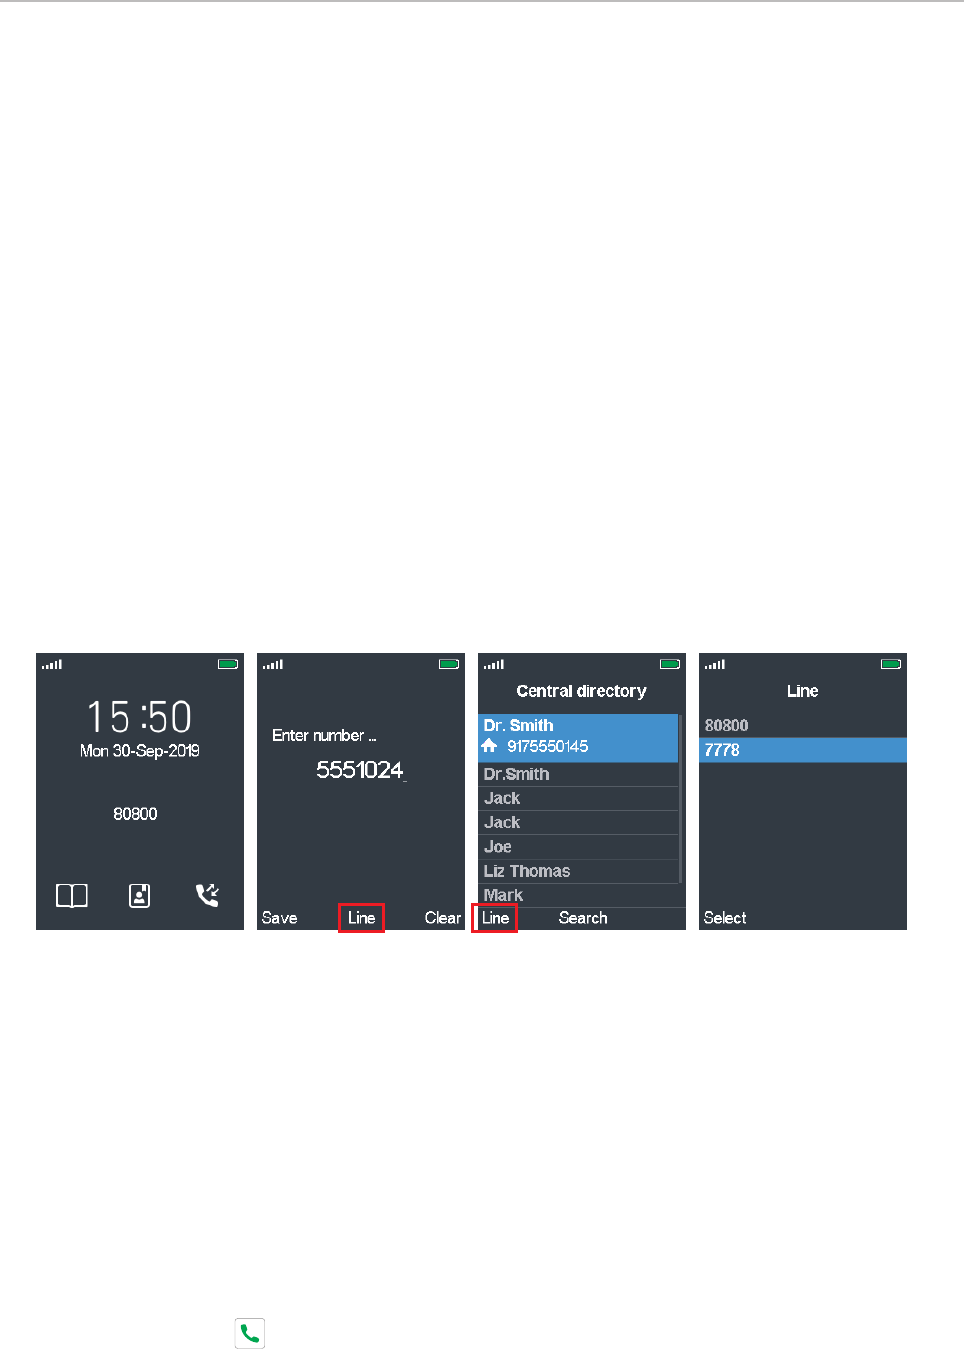
63
User Manual M70 / M80 / M90 Using the handset
Using the handset
This section describes the use of the phone with the default settings. If your phone was installed
and/or set up by someone else, the default settings may have been changed. Please check with that
person or company if the phone does not react as described in this manual.
Making calls
See "Alphanumeric keys" on page 31 for information on input modes and entering letters,
numerals, and special characters.
Selecting an identity for the outgoing call
The identity (extension) displayed on the idle screen of your handset (Fig. 1) is the default identity for
outgoing calls. For more information, see "Line" on page 53. If the handset has more identities and
you do not want to use the one on the display for the next outgoing call, you can select a dierent one
just for this call without changing the settings.
Fig. 1 Fig. 2 Fig. 3 Fig. 4
1. Before pressing the green key to dial a number, press the function key underneath Line.
◦ When dialing manually, you can select a dierent outgoing identity at any time while or after
entering the digits on the keypad (Fig. 2).
◦ When calling a number from the global phonebook, select the name, then press the function
key underneath Line (Fig. 3).
2. Select the identity to be used for the next outgoing call with the up/down arrows on the navigation
key and press the function key underneath Select (Fig. 4).
◦ If dialing manually: The display will return to the Enter number screen where you can enter
any remaining digits, if necessary (Fig. 2).
◦ If dialing from the central directory: The display will return to the directory (Fig. 3).
3. Press the green key to dial.
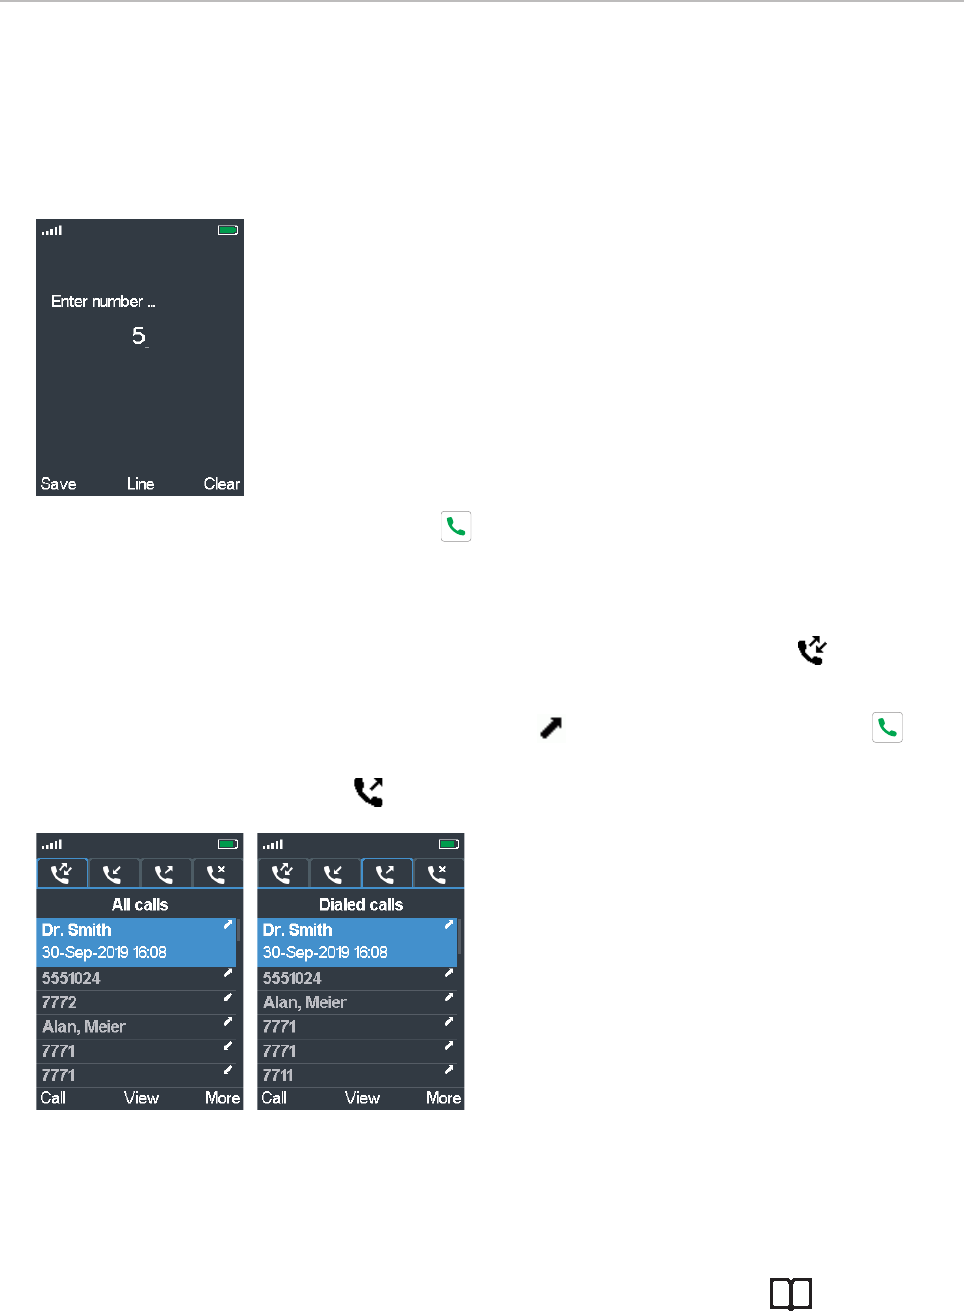
64
User Manual M70 / M80 / M90 Using the handset
Using dierent dialing methods
Entering the number manually
1. Press a number key on the keypad to open the Enter number screen.
2. Enter the number and press the green key to dial.
Redialing
To redial the last number dialed, press the green key or the function key underneath to open the
call history to the default list All calls.
• Either scroll to the uppermost line with the up arrow (Fig. 1) and press the green key to
dial,
• or navigate to the dialed calls list (Fig. 2) and press the green key.
Fig. 1 Fig. 2
Calling a contact
See "Contacts" on page 36 for information on finding, adding, and editing contacts.
1. From the idle screen, press the function key underneath the Contacts symbol .
2. Select a contact by scrolling to it or by entering the first or more letters of the name.
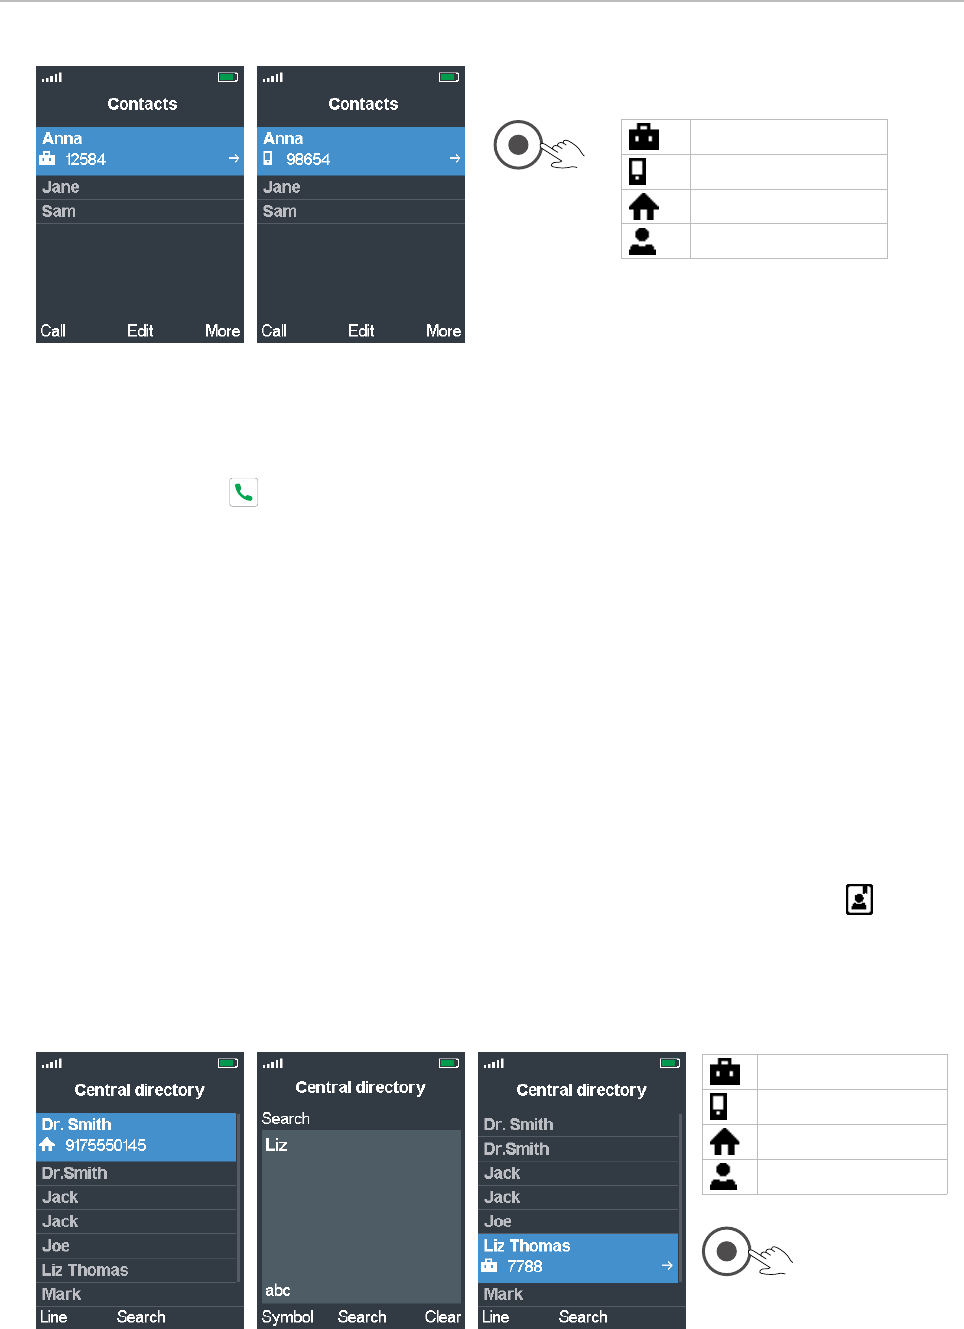
65
User Manual M70 / M80 / M90 Using the handset
Fig. 1 Fig. 2
3. If the contact has more than one number, as indicated by the arrow at the left edge of the contact's
line (Fig. 1), and the number on the display is not the one you want to dial, use the navigation key
to select a dierent one (Fig. 2).
4. Press the green key to dial the number of the highlighted contact.
Speed dialing a contact
For information on assigning keys 2-9 for speed dialing contacts, see "Assigning speed dial key to
contact" on page 40.
To speed dial a contact, long-press the assigned speed dial key for approx. 3 seconds. To view the list
of assigned speed dial numbers, open the main contact menu (see page 36, Fig. 2), select any of
your contacts, and press the function key underneath More.
Calling a number from the Central Directory
See "Central directory" on page 42 for more information on this directory.
1. From the idle screen, press the function key underneath the Central Directory symbol to open
the Central Directory (Fig. 1).
2. Select a name by scrolling to it or by entering the first letter of the name, or by pressing the
function key underneath Search (Fig. 1), entering the name (Fig. 2), and pressing the function key
underneath Search again.
Fig. 1 Fig. 2 Fig. 3
3. If there is more than one number assigned to a name, as indicated by the arrow at the left edge
of the entry's line (Fig. 3), and the number on the display is not the one you want to dial, use the
navigation key to select a dierent one.
Work number
Mobile number
Home phone number
Other phone number
Work number
Mobile number
Home phone number
Other phone number
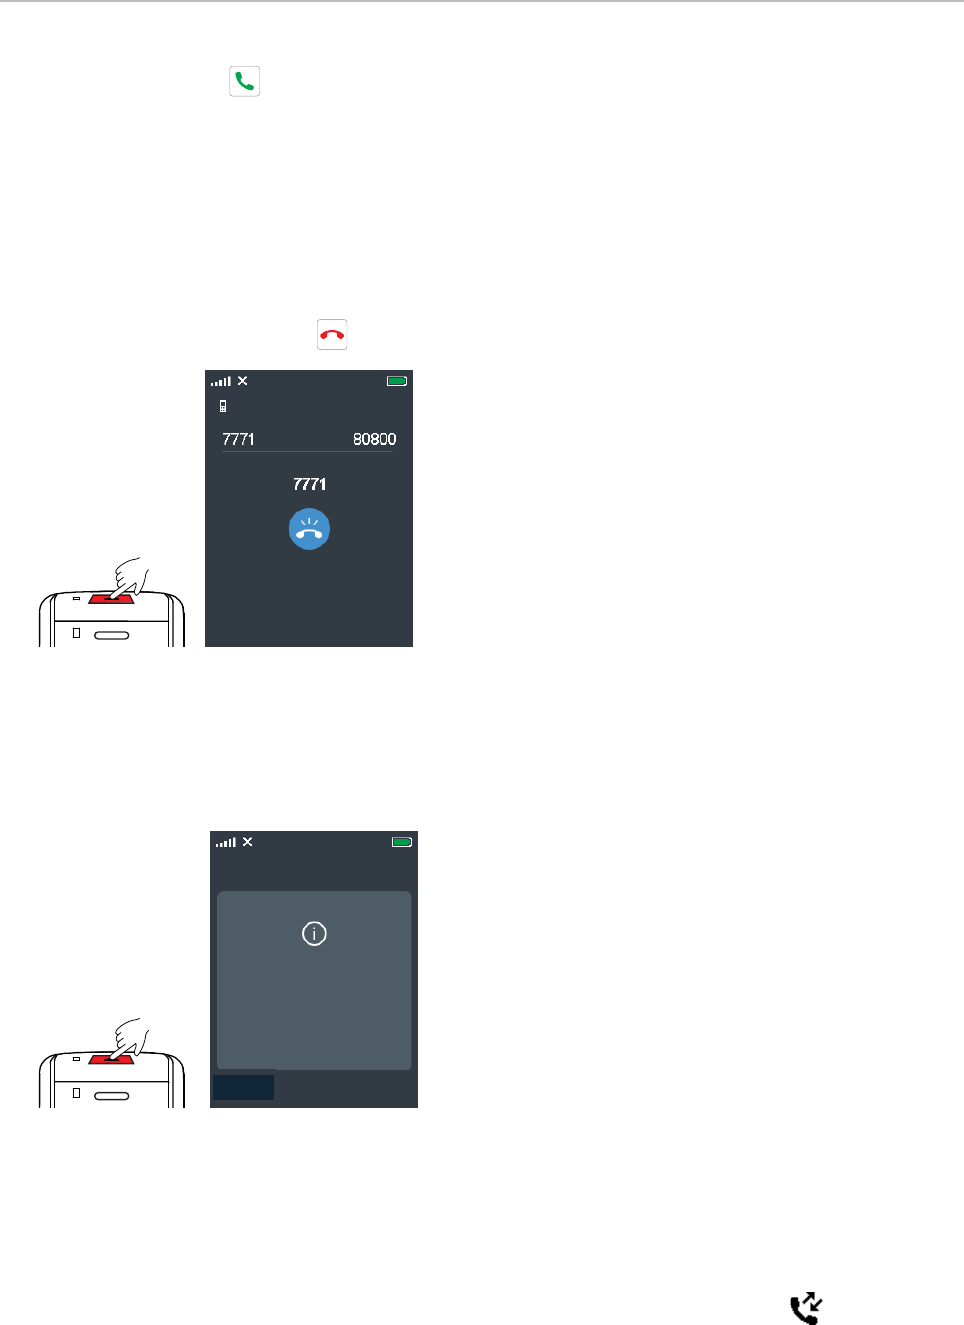
66
User Manual M70 / M80 / M90 Using the handset
4. Press the green key to dial the number of the highlighted name.
Calling emergency alarm number
The alarm profiles are configured on the Alarm page of the base station. One emergency alarm
profile can be assigned to each individual handset on the respective handset page of the base station.
To trigger the alarm, press the red button on top of the handset for three seconds to dial the number.
If the ability to stop the emergency call on the handset is enabled and a trigger delay period is set, the
call can be cancelled by pressing before the delay period has elapsed.
Calling
Fig. 1
If the pre-alarm delay in seconds is set, pressing the red emergency key will initially trigger the pre-
alarm delay. If the ability to cancel the pre-alarm from the handset is enabled, you can cancel the
alarm before the pre-alarm delay has elapsed by pressing the function key underneath Cancel
(Fig. 2).
Cancel
Emergency Alarm
Triggered
Cancel
Fig. 2
Calling a number from call history (all, missed, received, dialed calls)
See "Call history (call lists)" on page 43 for more information on these lists.
1. From the idle screen, press the function key underneath the call history symbol and select a
list.
2. Select a call.
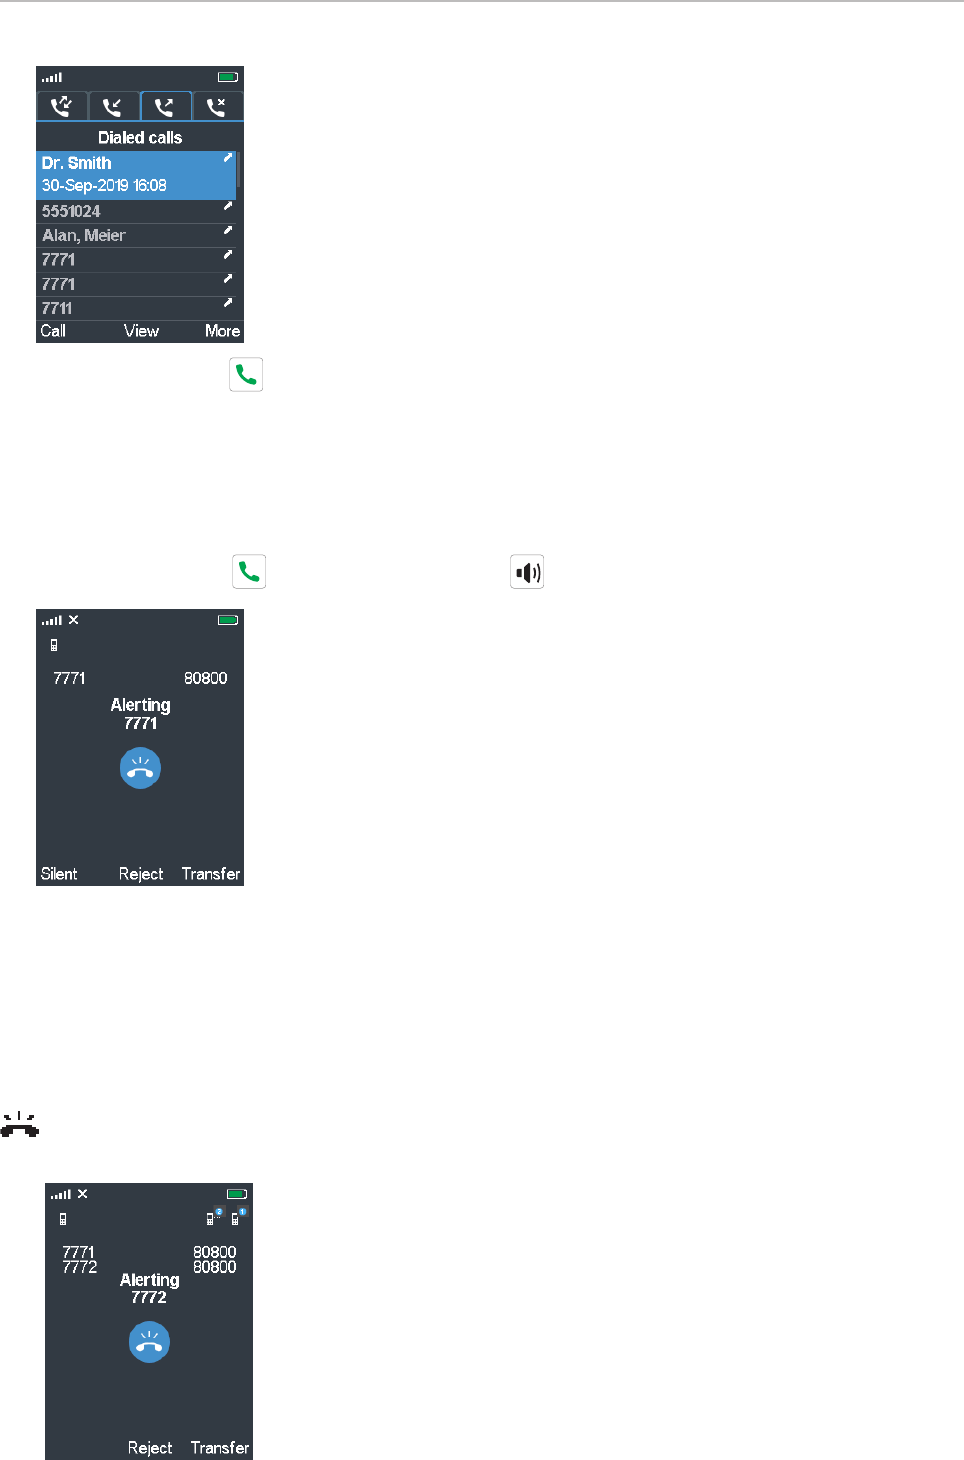
67
User Manual M70 / M80 / M90 Using the handset
3. Press the green key to dial the number of the highlighted item.
Accepting calls
Accepting a ringing call
Press the green call key or the speakerphone key to accept the call.
• Press the function key underneath Reject to reject the call; the caller is informed that the number
is busy.
• Press the function key underneath Silent to turn o the ringer.
Call waiting
When you are in a call, a second call will be announced visually by the "phone ringing" symbol
and acoustically by the sound of a beep; you will also see the caller ID on-screen if it is being
transmitted.
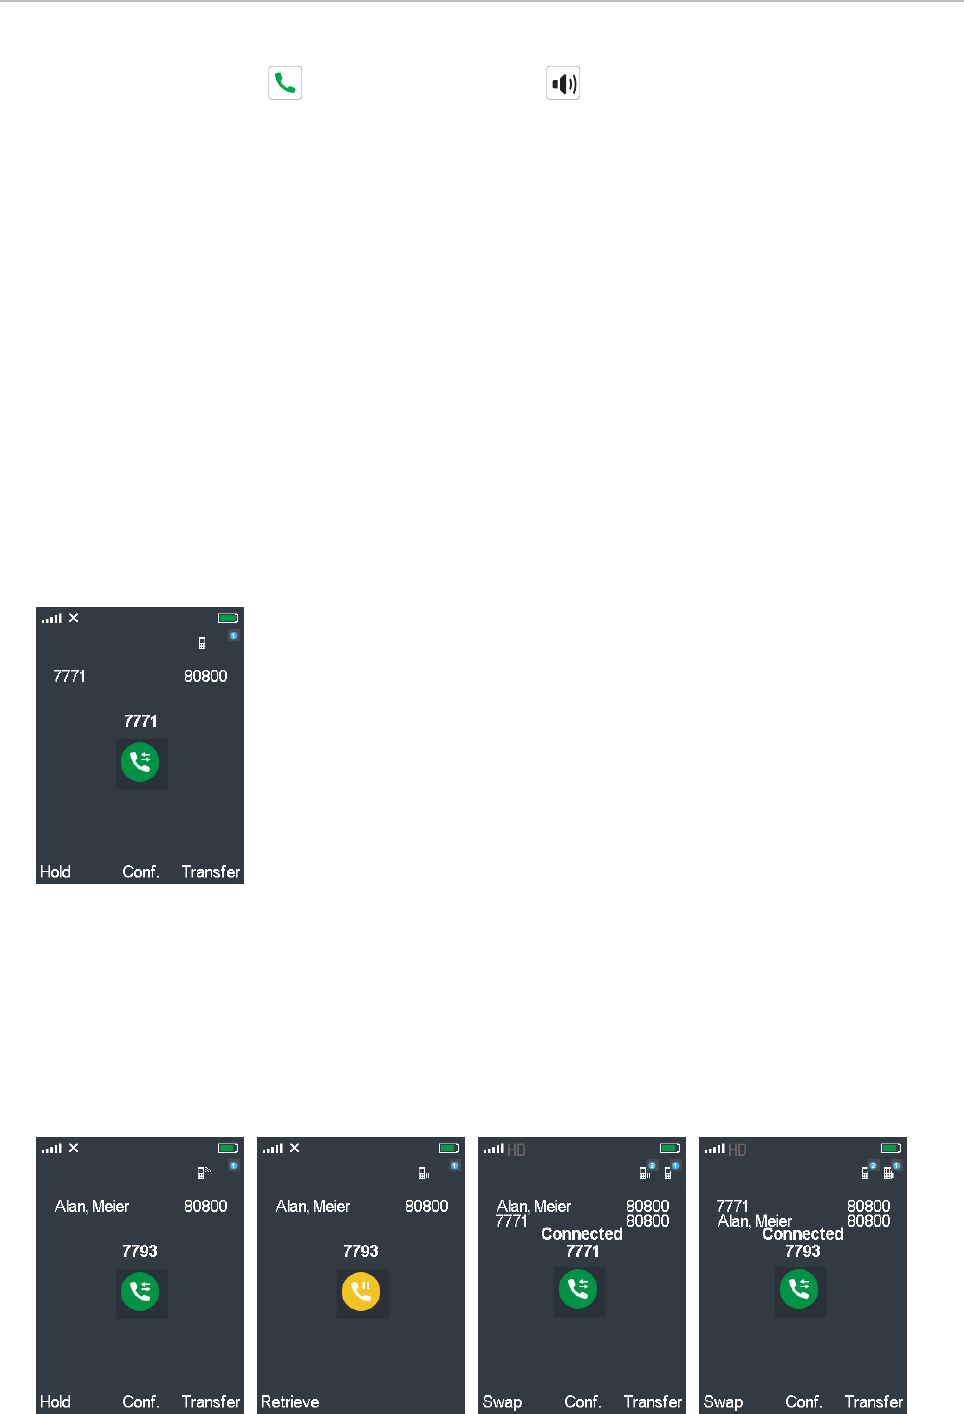
68
User Manual M70 / M80 / M90 Using the handset
• Press the green call key or the speakerphone key to accept the waiting call and put the
first call on hold.
• Press the function key underneath Reject to reject the waiting call; the caller is informed that the
number is busy.
• If you have set call forwarding when busy, the call will be forwarded to the phone number set as
target.
Active calls
The handset supports two simultaneous connections. When you are in a call, you can:
• transfer the call to a third party;
• put the call on hold and call a third party to make inquiries or to initiate a conference with both
parties;
• accept or reject a second call (see "Call waiting" on page 67);
• switch between two calls (see "Swapping calls" on page 69).
Connected
Hold
When you are in a call, press the function key underneath Hold to put the call on hold (Fig. 1). Press
the function key underneath Retrieve to resume the call (Fig. 2).
With the call on hold you can call another number to confer with that party (Fig. 3), for example, if you
want to transfer the held call or if you want to initiate a conference with both parties.
Connected
Hold
Fig. 1 Fig. 2 Fig. 3 Fig. 4
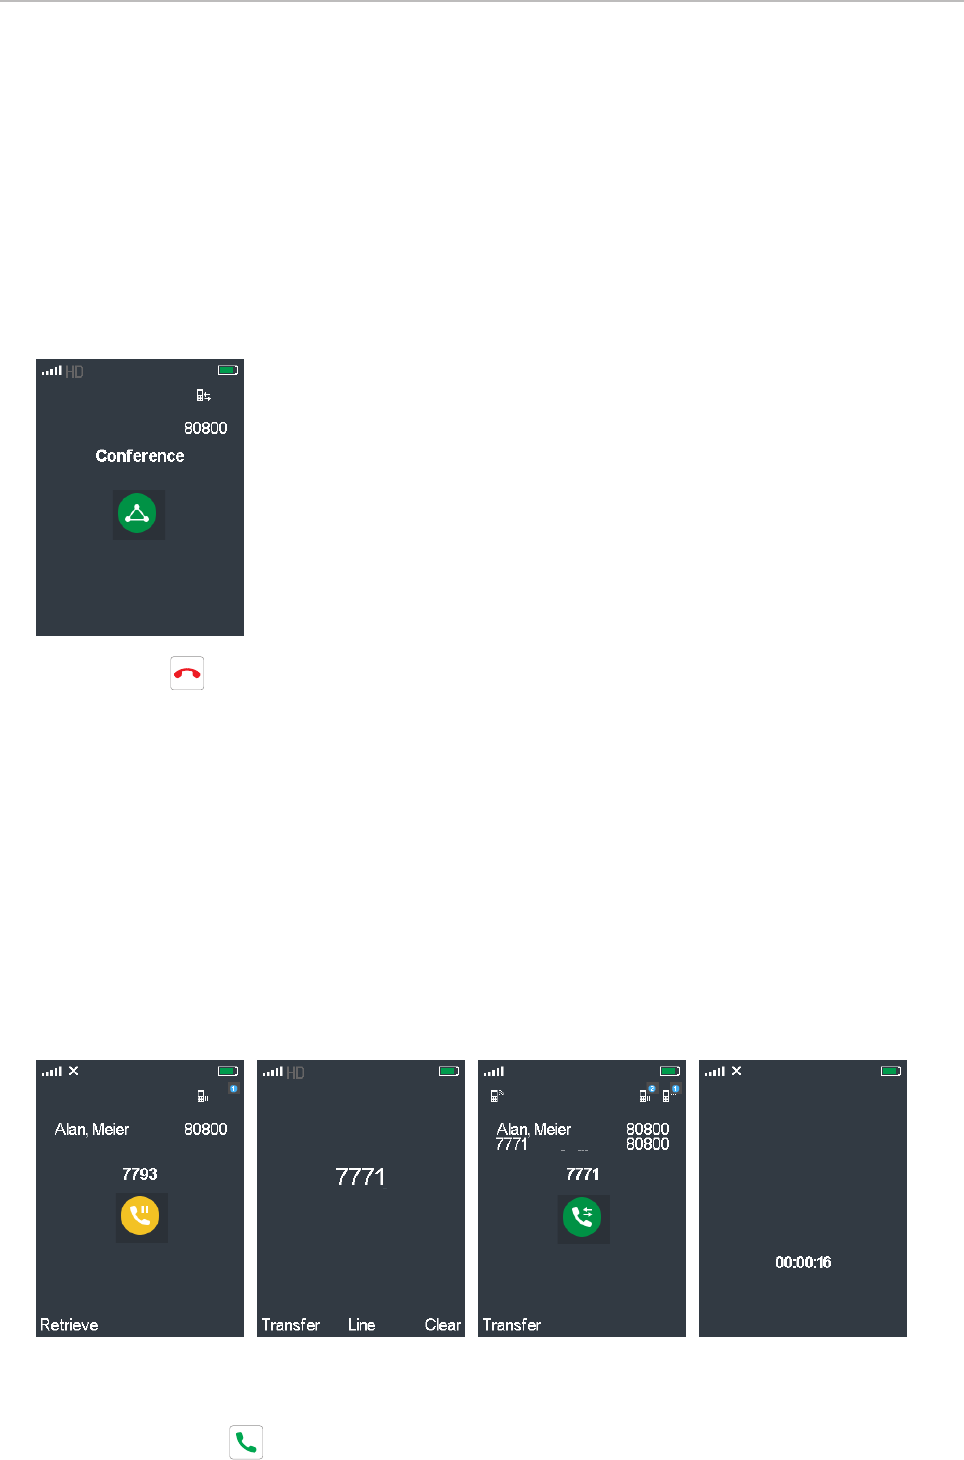
69
User Manual M70 / M80 / M90 Using the handset
Swapping calls
When you have one call on hold and you are connected to a second call, press the function key
underneath Swap to connect to the held call and put the connected call on hold (Fig. 4, above).
Conference
When you are connected to two parties, one on hold and one on the line, press the function key
underneath Conf. (Fig. 3 and 4, above) to start the conference.
Press the red key to terminate the conference and the connection to both parties.
Transferring calls
Active calls can be transferred manually to a third party either with prior announcement (attended
transfer) or without prior announcement (blind/unattended transfer). Ringing calls can be transferred
manually to a third party without prior announcement (blind transfer).
For automatic call forwarding, see "Call forwarding" on page 56.
Attended transfer
1. With a call on the line, press the function key underneath Hold to put the call on hold (Fig. 1).
Hold
Connected
Call ended
Fig. 1 Fig. 2 Fig. 3 Fig. 4
2. Enter the number of the party to whom you want to transfer the call (Fig. 2).
3. Press the green key to dial the number.
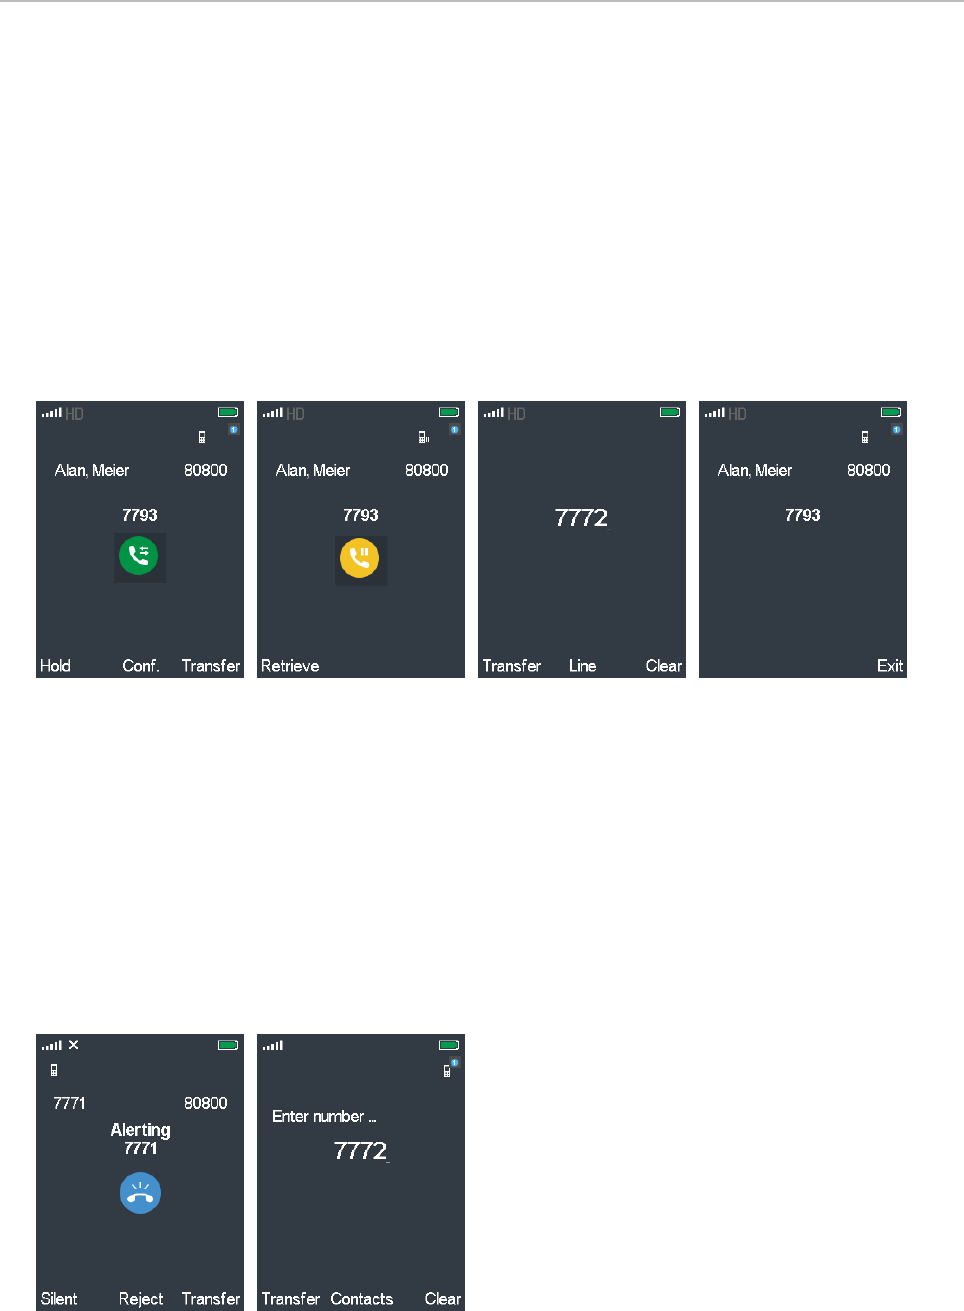
70
User Manual M70 / M80 / M90 Using the handset
4. If the party agrees to accept the call, press the function key underneath Transfer (Fig. 3). The
two parties are instantly connected, and your handset briefly displays the message "Call ended"
before returning to the idle screen.
Blind transfer (unattended transfer)
• Blind transfer of active call.
1. With a call on the line, press the function key underneath Transfer (Fig. 5). The call is placed
on hold (Fig. 6).
2. Enter the number of the party to whom you want to transfer the call on the keypad. The Hold
screen is replaced by the dial screen (Fig. 7).
Connected
Hold
Transfer
Fig. 5 Fig. 6 Fig. 7 Fig. 8
3. Press the function key underneath Transfer to dial the number. The call is transferred
immediately and starts ringing on the third party phone (Fig. 8).
4. Press the function key underneath Exit to return your handset to the idle screen. Do not
press Exit if you want to know whether the call has been answered. If it has, your display will
announce that your call has ended; if not it will be returned to your phone and automatically
placed back on hold (Fig. 6).
• Blind transfer of ringing call.
1. With a call ringing, press the function key underneath Transfer (Fig. 9). The dial screen
appears (Fig. 10).
Fig. 9 Fig. 10
2. Enter the number of the party to whom you want to transfer the call.
3. Press the function key underneath Transfer. The phone of the third party begins to ring, and
your handset briefly displays the message "Call ended" before returning to the idle screen
(Fig. 4).
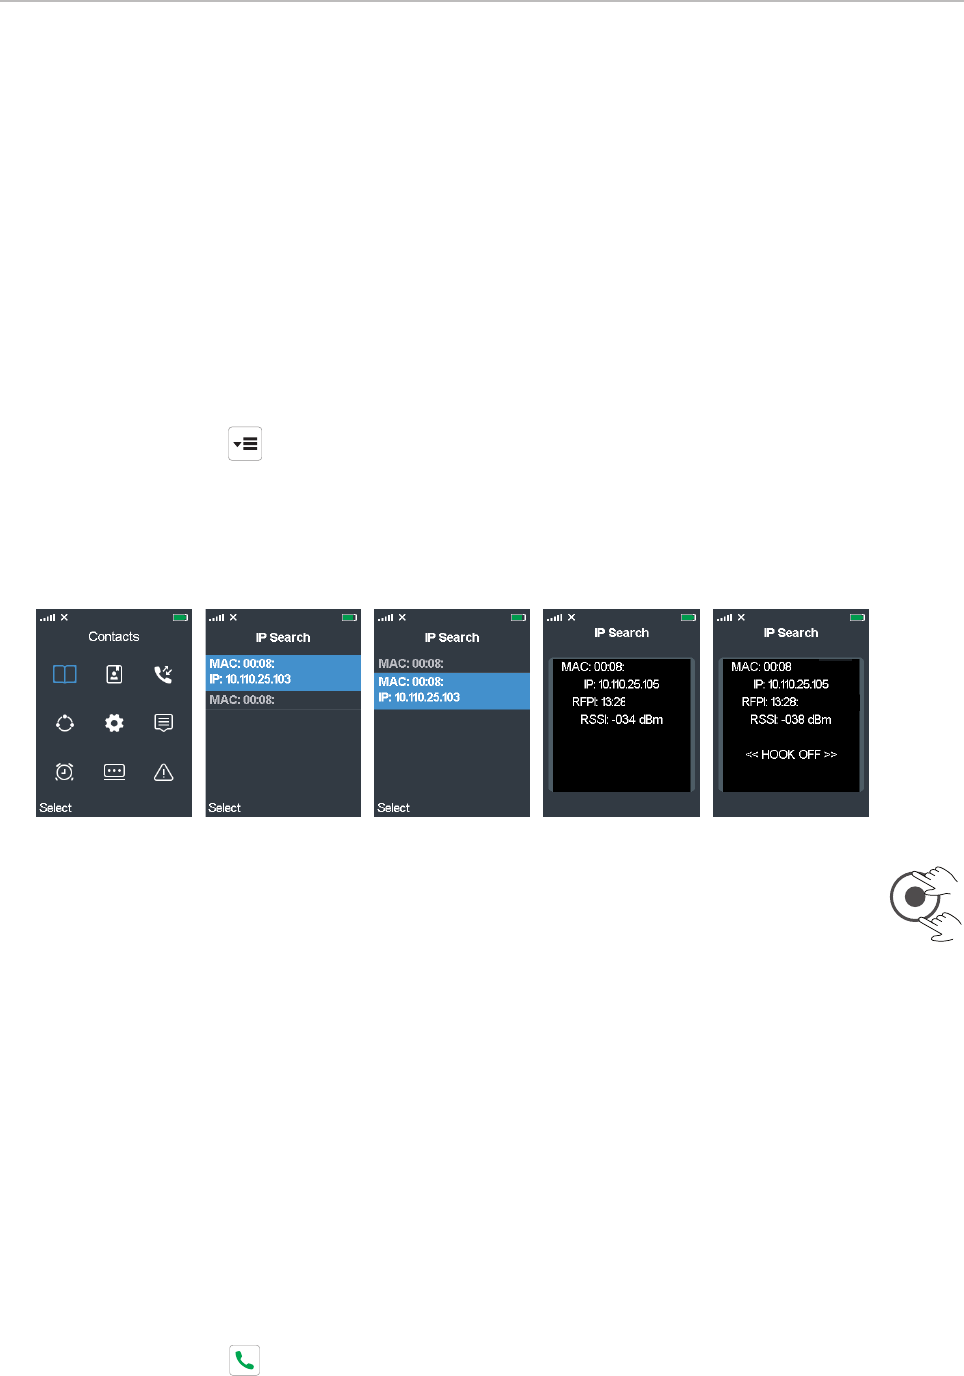
71
User Manual M70 / M80 / M90 Appendix 1 - Using the handset to set up the base
Appendix 1 - Using the handset to set up the base
In many cases, expensive tools and expert help will not be necessary to set up the M-series DECT
system. The handset has a built-in RSSI meter that indicates the strength of the signal received from
the base; this feature can be used to determine the ideal and/or necessary locations for base stations
in single-cell or multicell installations. For more information, see the respective base station admin
guides and the multicell set-up guide.
Finding the IP address of the base
1. Press the menu key on the handset. The main menu is shown on-screen (Fig. 1).
2. Type *47* on the handset's keypad.
3. The handset will detect all base stations within range and show their MAC addresses on the
display (Fig. 2). If the handset has detected more than one base, compare them with the MAC
address on the type label of your base station to identify and select the right one.
Fig. 1 Fig. 2 Fig. 3 Fig. 4 Fig. 5
4. If necessary, scroll to the MAC address of your base station. The selected item is
highlighted in blue and expands to also show the IP address of the base station (Fig. 2
and 3).
Finding RSSI and RFPI
5. Press the function key underneath "Select" (Fig. 2 and 3). The selected base station's RFPI and
RSSI are shown on the display (Fig. 4).
◦ RFPI: The Radio Fixed Part Identity is a unique identifier frequently transmitted by the base
station.
◦ RSSI: The Radio Signal Strength Indicator measures the received signal strength in dBm
(decibel milliwatts)
Testing the audio signal
6. Press the green key to establish an audio loopback connection to the base station, as indicated
by the message <<HOOK OFF>> (Fig. 5). You can now speak into the microphone of the handset to
hear the echo of your voice in the front loudspeaker.
