NON WIRELESS
BEHIND-THE-EAR (BTE)
RECEIVER-IN-THE-EAR (RIE)
USER GUIDE
ReSound Vea
TM
ReSound Magna
TM
2
Introduction
Congratulations on the purchase of your new hearing instruments. ReSound’s innovative sound
technology and design, combined with the customised set-up selected by your hearing care
professional, will make hearing a more enjoyable experience. Hearing instruments will enable
you to hear sounds that you may not have heard in years because of your hearing loss. Practice
and a positive attitude are important in learning to use hearing instruments. Your ReSound instru-
ments have been adjusted according to your individual hearing loss and needs. Some people
adjust quickly to wearing hearing instruments in their ears and hearing new sounds; other
people may need more time.
Please read this manual carefully in order to wholly benefit from the use of your hearing instru-
ments. With proper care, maintenance, and usage, your hearing instruments will aid you in bet-
ter communication for many years. Ask your hearing care professional if you have any questions.
ReSound is a registred trade mark of GN ReSound A/S
Intended use
Generic air-conduction hearing instruments are wearable sound-amplifying devices intended to
compensate for impaired hearing. The fundamental operating principle of hearing instruments
is to receive, amplify, and transfer sound to the ear drum of a hearing impaired person.
3
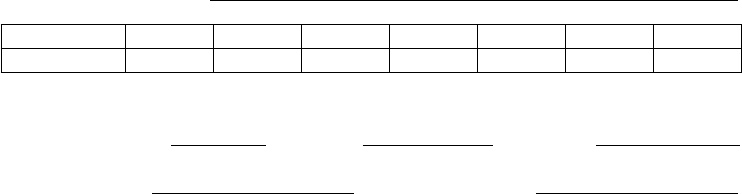
Hearing instrument model:
Left serial number:
Receiver tube length:
Right serial number:
Tube type: Dome size:
Model VE60 VE62 VE70 VE77 VE80 VE88 MG90
Battery size 312 312 13 13 13 13 675
SYMBOLS
WARNING points out a situation that could lead to serious injuries,
i CAUTION indicates a situation that could lead to minor and moderate injuries.
i
Advice and tips on how to handle your hearing instrument better.
4
CONTENTS
Introduction ............................2
Description of the BTE
hearing instruments ......................6
Description of the RIE hearing instruments ....10
Getting started.........................12
SmartStart............................12
Battery door lock .......................13
Inserting/Replacing the battery.............13
Low battery indicator ....................14
Inserting/Removing hearing instruments ......14
Removal (custom earmolds) ...............16
Removal (domes) .......................16
Operation of the hearing instrument .........17
Telephone use .........................21
Telecoil (optional) .......................21
PhoneNow............................22
Tele-loop systems ......................24
Direct audio input (optional) ...............24
Connecting/Disconnecting audio boots ......25
Care and maintenance...................26
Daily maintenance ......................27
Maintenance for BTE hearing instruments ....27
Cleaning earmoulds.....................28
Cleaning thin tubes and domes ............28
How to apply domes ....................29
Standard domes .......................29
Tulip domes ...........................29
Maintenance for the RIE hearing instruments ..30
The receiver tube.......................30
Cleaning the receiver tubes and domes ......31
Cleaning RIE or moulds ..................31
Changing wax guard for receiver tube .......32
5
How to apply domes ....................33
Temperature test, transport and
storage information .....................35
General precautions.....................35
General warnings.......................36
Battery warning information ...............37
Troubleshooting Guide ..................38
Troubleshooting Guide ..................40
Technical Data .........................42
Warranty and repairs ....................43
6
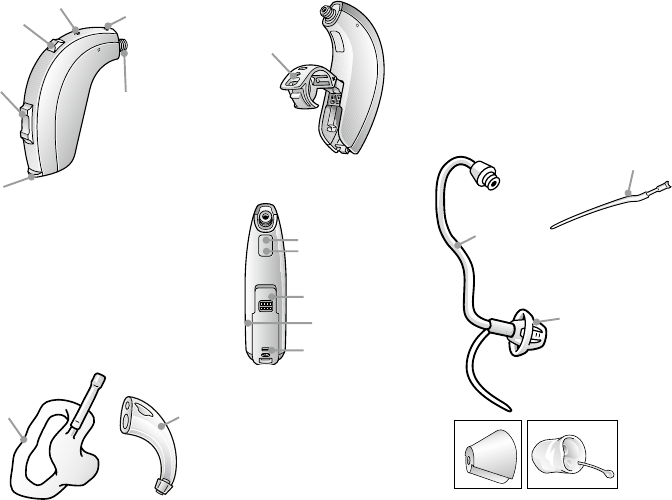
Description of the BTE
hearing instruments
VE360-DI
VE370-DVI, VE270-DVI, VE170-VI
VE380-DVI, VE280-DVI, VE180-VI
MG490-DVI, MG290-DVI
1. Programme button
2. Battery compartment & On/Off switch
3. Sound outlet
4. Front microphone inlet
5. Back microphone inlet
6. Volume control (optional)
7. Direct audio input
8. Left/Right indicator
(Left=Blue/Right=Red)
9. Battery door lock
10. Model
11. Product name
12. Serial number
13. Battery door

6
1
5
4
3
2
10
7
8/9
11
12
13
4
7
8
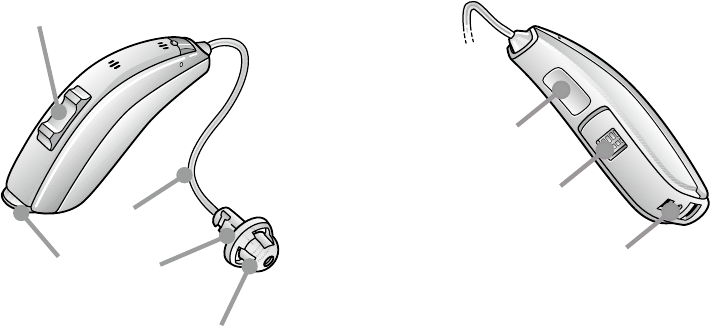
Description of the BTE
hearing instruments
VE377-DVI, VE377-DVIO,VE388-DVI
1. Programme button
2. Battery compartment & On/Off switch
3. Sound outlet
4. Front microphone inlet
5. Back microphone inlet
6. Volume control (optional)
7. Direct audio input
8. Left/Right indicator (Left=Blue/
Right=Red)
9. Battery lock (optional)
10. Model
11. Manufacturer
12. Serial number
13. Earhook
14. Earmold and tubing
15. Thin Tube
16. Domes/earmold
a. Open dome
b. Tulip-Dome
c. Custom earmold
17. Sports lock (optional)
6
1
5
4
3
2
8/9
10
7
8/9
11
12
15
16.a
14
13
16.c
16.b
17
9
Traditional fitting
(earmold and tube)
Open fitting
(Thin Tube and dome)
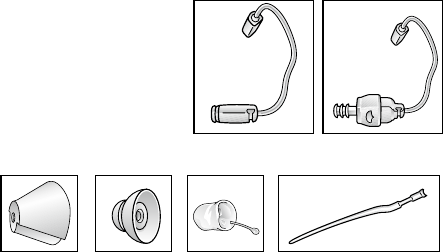
3
6
54
1211
10
Description of the RIE hearing instruments
VE362-DVIR
1. Receiver tube
2. Receiver Open Dome
3. Receiver Tulip Dome
4. Receiver Power Dome
5. RIE mould
6. Sports lock
7. Battery compartment
8. Receiver
9. Push button
10. Volume Control (optional)
11. NP receiver tube
12. HP receiver tube
13. Left/right indicator
14. Model, and serial number
15. Direct audio input
14
15
13
9, 10
1
8
2
7
11
62 model
(type MRIE)
12
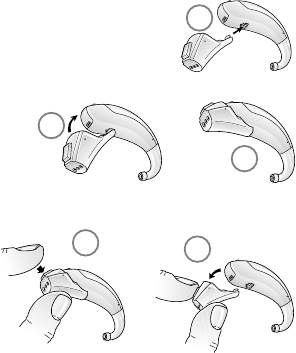
Getting started
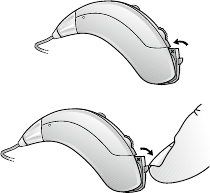
On/Off function
1. When the battery door is closed, the hearing instrument turns on,
and the default program will be activ ated.
2. To turn off the hearing instrument, open the battery door. Many
individuals can use their fingernail to pull it open.
i
Tip: Whenever the hearing instruments are not in use,
remember to turn them off to avoid unnecessary battery
consumption.
SmartStart
Hearing instruments can be turned on once you have placed them on your ears. If you prefer to
turn them on just prior to placing them on your ear, your hearing care professional can activate a
function called SmartStart.
This function will delay the time in which the hearing instruments turn on by ten seconds after the
battery compartment is closed. This reduces the risk that the hearing instruments will whistle while
you put them on. With SmartStart, a beep will be heard for each second of the delay period.
13
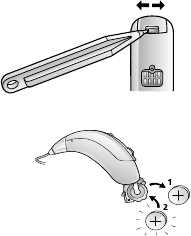
Battery door lock
Your hearing care professional can install a Left/Right side indicator (Blue=Left,
Red=Right), which can be used to lock the battery door. Once locked, the
instrument can only be turned off once the instrument is unlocked.
To lock the battery door:
1. Close the battery door
2. Using the battery door locking tool, slide the color marker to the right.
To unlock the battery door: Slide the color marker to the left.
Inserting/Replacing the battery
1. Open the battery door completely by using your fingernail.
2. Remove the used battery if present. Insert the new battery with the positive side
in the correct position. The battery door has a ‘+’ indicator to help determine the correct
insertion.
3. Always use new Zinc-Air batteries that have a minimum remaining shelf-life of 1 year.
4. Gently close the battery door.
i
Tip: When the hearing instruments are not in use for an extended period of time, remov-
ing the batteries may help prevent corrosion of the battery compartment, and ensure
that battery life is not shortened.
Unlock Lock
14
Low battery indicator
Your hearing care professional can set your hearing instrument to give an acoustical indica-
tion when the battery is reaching its end of life. The hearing instrument will reduce amplifica-
tion and emit a melody if battery power gets too low. This signal will recur every 5 minutes for
VE60/62/70/77/80/88 models, and every 15 minutes for MG90, until the hearing instrument
automatically switches off. It is recommended that you keep spare batteries on hand.
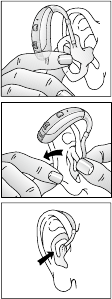
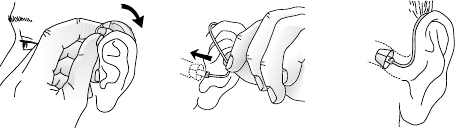
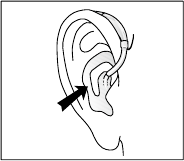
Inserting/Removing hearing instruments
Insertion (custom earmoulds)
1. Hold the earmould between your thumb and index finger and position its
sound outlet in your ear canal.
2. Slide the earmould all the way into your ear with a gentle, twisting movement.
3. Turn the top part of the earmould gently backwards and forwards so that it
tucks behind the fold of skin above your ear canal.
4. Move the earmould up and down and gently press to ensure it is positioned
correctly in the ear. Opening and closing your mouth can ease insertion.
5. Make sure the hearing instrument is seated behind the ear.
15
By experimenting, an easier method may be discovered. With proper insertion, hearing instru-
ments should fit snugly but comfortably. If hearing instruments cause irritation of the ears, con-
tact your hearing care professional. Never attempt to modify the shape of the hearing instru-
ment, earmoulds, or tubing yourself.
i
Tip: It may be helpful to pull your ear up and outward with your opposite hand during
insertion.
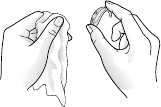
Insertion (domes)
1. Hold the thin tube where it bends, and gently push the dome into the ear canal. Push the
dome far enough into the ear canal so that the thin tube lies flush with the head.
2. It is important that the tube and the dome fit correctly into your ear.
3. When the dome is placed correctly, you should not be able to see the thin tube sticking out
when facing a mirror.
Note: You should never
attempt to bend or modify
the shape of the thin tube.
16
Removal (custom earmolds)
1. Hold a portion of your earmould towards the back of the ear.
2. Pull the earmould outward and simultaneously rotate the earmould forward.
3. Consult your hearing care professional if you have difficulties removing the hearing instru-
ment.
Removal (domes)
1. Hold the thin tube with your thumb and forefinger and pull the
tube outward.
2. Consult your hearing care professional if you have difficulties
removing the hearing instrument.
17
Operation of the hearing instrument
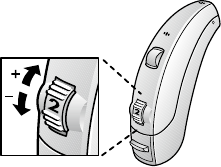
Volume control (in 70, 80, and 90 models)
The volume wheel has numbers on it from 1 to 4, with 4 being
the maximum volume setting. During the fitting of the hear-
ing instrument, your hearing care practitioner will select an
optimal volume setting for you. Please note the setting of that
particular level. To increase the volume with the instrument fit
to your ear, turn the volume control wheel up. To reduce the
volume, turn the wheel down.
Please note that your instrument has been fit by your hearing care professional and that your
hearing loss requires a certain amount of amplification. This will also affect how much you are
able to increase the volume on your instrument. If you want to go back to the default volume
setting, the volume control has to be set at 2,5 (between 2 and 3). If you prefer not to use the
volume wheel your hearing care practitioner can disable the volume control.
18
Sports lock
The Sports lock will be applied or adjusted by your hearing care professional.
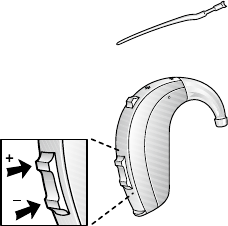
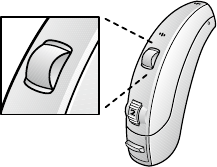
Volume control (in 62, 77, 88 models)
The volume control will allow the volume of hearing instruments
to be increased or decreased.
1. To increase the volume, push the volume control up.
2. To decrease the volume, push the volume control down.
When volume is increased or decreased, a beep signal will be
heard for each incremental change. When the upper or lower
limits of the volume range are reached, a beep signal with a
longer duration will be heard.
Your hearing care professional can disable the volume control function if it is not desired. The
volume control can also be replaced with a non-functional cover.
19
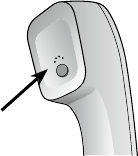
Programme button
Depending on your experience level with hearing instruments, in-
dividual hearing needs, and the type of listening environments you
experience, your hearing care professional may activate additional
programmes. If additional programmes have been activated, the
following list explains how they work.
1. You can switch between programmes by pushing the programme button once.
2. You will then hear one or more beeps. The number of beeps indicates which programme
you have selected (one beep = programme one, two beeps = programme two, etc.).
3. When the hearing instruments are turned off and then back on, the hearing instrument
always returns to the default setting (programme one).
The multifunction button (62 models only) is designed to change the volume or listening pro-
grams of the hearing instrument, based on different ways it is pressed.
20
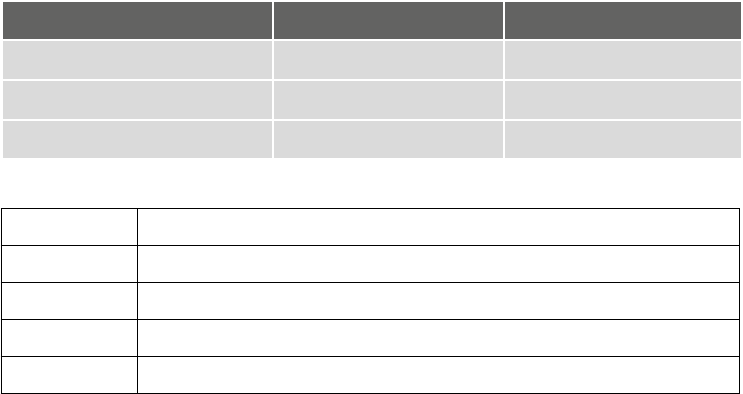
If necessary, your hearing care practitioner can change these settings and fill in the following
table to indicate new settings
Multi-function button action Default setting New setting
Short press up Increases volume
Short press down Decreases volume
Long press up (3 seconds) Changes programs
Programme Description of when to use
1
2
3
4
21
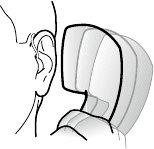
Telephone use
Finding the optimal position for holding a telephone may require practice
for some individuals, and one or more of the following suggestions may
be helpful.
1. Hold the telephone as you would normally.
2. Hold the telephone towards the top of the ear (closer to where the
microphones are).
3. If whistling occurs, it may take a few seconds of holding the telephone
in the same position before the hearing instrument adapts.
4. Any whistling may also be decreased by holding the telephone slightly away from the ear.
5. Depending on your individual needs, your hearing care professional may activate a pro-
gramme specifically for telephone use.
Telecoil (optional)
If needed, a telecoil can be activated by your hearing care professional and accessed through
one of the additional programmes. A telecoil picks up a telephone’s magnetic signal and con-
verts it to sound. When using a telecoil programme, the receiver of the telephone may need to
be held closer to the hearing instrument. The handset of the telephone may need to be moved
to slightly different positions in order to find the best reception.
22
PhoneNow
The PhoneNow function, available on some hearing instrument models, allows your hearing
instrument to automatically switch to your telephone program when a telephone receiver is
raised to the ear. When the telephone receiver is removed from the ear, the hearing instrument
automatically returns to the previous listening program.
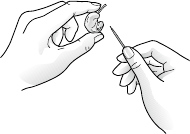
Placement of PhoneNow magnets
While some telephone receivers produce a magnetic field strong enough
to activate the Phone Now function, other telephone receivers require an
additional magnet to be placed on the tele phone receiver. In order to place
the PhoneNow magnet properly:
1. Clean the telephone receiver thoroughly.
2. Hold the telephone vertically, in a position similar to when making a
telephone call.
3. Place the magnet just below the telephone receiver. If necessary,
move the magnet to another position to improve ease of use and
comfort while speaking.
i
Tip: Use only recommended cleaning agent to clean the telephone prior to placing the
magnet on the phone in order to obtain best possible adherence.
23
PhoneNow usage
Telephones can be used in a normal manner. A beep signal will indicate that the PhoneNow fea-
ture has automatically switched the hearing instrument to your telephone program. Initially, you
may need to move the telephone receiver slightly to find the best position for reliable PhoneNow
activation and good hearing on the telephone.
i PhoneNow warnings
1. Keep magnets out of reach of pets, children and mentally challenged persons. If a magnet
is swallowed, please seek advice from a medical practitioner.
2. The magnet used to supplement the magnetic field of a telephone receiver may affect
some medical devices or electronic systems. The manufacturer of any magnetically sensi-
tive devices (e.g. pacemakers) should advise you regarding appropriate safety precautions
when using your hearing instrument and magnet in close proximity to the medical device or
electronic system in question.
If the manufacturer cannot issue a statement, we recommend keeping the magnet or a
telephone equipped with the magnet 30 cm (12”) away from magnetically sensitive devices
(e.g. pacemakers).
24
i
PhoneNow Precautions
1. High distortion during dialing or phoning may mean that the magnet is not in the optimal
position relative to the telephone receiver. To avoid the issue, please move the magnet to
another place on the telephone receiver.
2. Only use magnets supplied by GN ReSound.
Tele-loop systems
Many places, such as theatres, houses of worship, and schools are equipped with tele-loop
systems. When using a telecoil programme with tele-loop systems, sound is picked up direct-
ly. If there is no sound from the hearing instruments in a tele-loop system and with a telecoil
programme activated, the tele-loop system may not be turned on or is not operating correctly.
If a facility is not equipped with a tele-loop system, sitting as close as possible to the front may
be helpful.
Direct audio input (optional)
Use of direct audio input (DAI), which enables a direct connection of the hearing instruments to
items such as television, radio, and remote microphones, may increase speech understanding
for some individuals. The sound source is connected to the hearing instruments by a cable or a
wireless FM system to the audio boot. This accessory connects to the bottom of the hearing instru-
ments, and once properly clicked into place, the hearing instruments switch to DAI automatically.
1
3
2
2
1
25
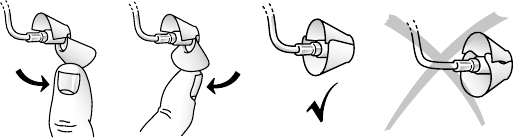
Connecting/Disconnecting audio boots
Connecting audio boots
1. Align the tip of the audio boot with the groove just above the battery com-
partment and below the model number.
2. Once in place, move the boot in the direction of the bat-
tery compartment.
3. Gently click the audio boot onto the hearing instrument.
Disconnecting audio boots
1. Press and hold the button on the front side of the
audio booth.
2. Gently remove the audio boot from the hearing instru-
ment.
26
Care and maintenance
Please follow the following instructions to prolong the durability of your hearing instruments:
1. Keep your hearing instrument clean and dry. Wipe the case with a soft cloth or tissue after
use to remove grease or moisture. Do not use water or solvents, as these can damage the
hearing instrument(s).
2. Never immerse hearing instruments in water or other liquids, as liquids may cause perma-
nent damage to the hearing instruments.
3. Avoid rough handling of hearing instruments or dropping them on hard surfaces or floors.
4. Do not leave hearing instruments in or near direct heat or sunlight, such as in a hot, parked
car, as excessive heat can cause damage or deform the casing.
5. Do not wear your instrument while showering, swimming, in heavy rain or in a moist atmos-
phere such as a steam bath or sauna.
6. If your instrument does get wet, or if it has been exposed to high
humidity or perspiration, it should be left to dry out overnight with
the battery out and the battery compartment open. It is also a good
idea to put the instrument and battery in a sealed container together
with a drying agent (desiccator) overnight. Do not use the instrument
until it is completely dry. Consult your hearing care professional as to
which drying agent to use.

27
7. Remove your hearing instrument when applying such things as cosmetics, perfume,
aftershave, hair spray, and suntan lotion. These might get into the instrument and cause
damage.
Daily maintenance
It is important to keep your hearing instrument clean and dry. On a
daily basis, clean the hearing instruments using a soft cloth or tissue.
In order to avoid damage due to humidity or excessive perspiration, the
use of a drying kit is recommended. Some drying kits are electric, and
in addition to thoroughly drying out hearing instruments, they help sanitize.
Maintenance for BTE hearing instruments
(in 60, 70, 77, 80, 88 and 90 models)
28
i
Cleaning earmoulds
1. Remove the earmould and attached tubing from the hearing instruments
prior to cleaning.
2. Clean the earmould using a mild soap, and rinse with lukewarm water.
3. After cleaning, dry earmoulds thoroughly and remove any residual water
and debris from the tubing utilising an air bulb and wire loop.
Note: Earmould tubing may become stiff, brittle, or discoloured over time. Con-
tact your hearing care professional regarding tube changes.
i
Cleaning thin tubes and domes
1. Remove thin tubes from hearing instruments before cleaning by un-
screwing them counter clockwise.
2. Wipe down thin tubes and domes with a damp cloth.
3. In order to clear the thin tube of moisture and debris, push the black
cleaning rod through the thin tube, beginning at the end opposite the
dome.
Note: Thin tube and dome systems should be changed every three months
or sooner, should the components become stiff or brittle.
1
2
29
How to apply domes
It is recommended that your hearing care professional change domes, as incorrect dome re-
placement could result in injury.
Standard domes
1. Push the new dome over the flanges on the
thin tube.
2. Make sure that the new dome is properlyly
and securely mounted.
Tulip domes
Tulip domes are mounted in a similar manner to standard domes, but a few extra steps are
required. Tulip domes consist of two “petals”. It is important to note that the largest petal is the
outermost petal. To ensure this:
1. Push the largest petal away from
the thin tube using a finger. This
bends the petal forward.
2. Then push the largest “petal” back,
and it will be placed on top of the
smaller petal.
30
Maintenance for the RIE hearing instruments
(in 62 models)
The receiver tube
The receiver tube contains the wiring to the receiver which delivers the sound to the ear canal.
It is important that the receiver tube and the receiver dome/RIE mold fits correctly in your ear.
If the receiver tube or the receiver dome/RIE mould irritates your ear in any way and prevents
you from wearing your hear ing instrument, please contact your hearing care pro fessional. You
should never attempt to modify the shape of the receiver tube yourself. The receiver tube and
the receiver dome/RIE mould should be cleaned regularly. Please see instructions in the next
section.
31
i
Cleaning the receiver tubes and domes
The receiver tube and the receiver dome should be cleaned regularly. Use a damp cloth to clean
the receiver tube and receiver dome on the outside. Do not use water when you are cleaning the
receiver tubes or the receiver domes. This process is also used to clean the UP receiver mould.
Please see instruction on page 30 or 31 for how to change the wax guard filter.
i
Cleaning RIE or moulds
1. Separate the mould from the receiver tube.
2. Clean the RIE mould using a mild soap, and rinse with lukewarm
water.
3. After cleaning, dry RIE moulds thoroughly and remove any
residual water and debris from the tubing utilising an air bulb and
wire loop.

1
2
3 4
5
10
9
8
7
6
32
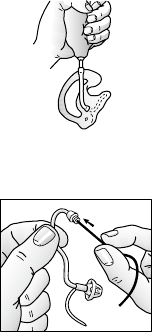
Changing wax guard for receiver tube
For NP receivers:
1. Clean any debris from the old waxguard.
2. Insert the wand into the old waxguard.
3. Twist the wand with the waxguard in a clockwise direction to ensure it is attached to the
wand.
4. Pull the wand and waxguard away from the tube/mould.
5. Insert the old waxguard into the center of the HF3 wheel.
6. Dispose of the old waxguard by drawing the wand to the narrow end of the center disposal
area.
7. Insert the empty wand into a new waxguard on the HF3 wheel.
8. Pull the new waxguard attached to the wand away from the HF3 wheel.
9. Insert the wand into the receiver tube/mould.
10. Twist the wand to release the new waxguard onto the receiver tube/mould.

1
2
33
HP receivers:
1. To remove the old wax guard, insert the removal side of the wax guard tool into the used
wax guard so that the shaft of the tool is touching the rim of the wax guard. Slowly pull the
wax guard straight out.
2. To insert the ne w wax guard, gently press the replacement side of the wax guard tool
straight into the hole of the sound outlet until the outer ring lies flush with the outside of the
receiver. Pull the tool straight out -the new wax guard will remain in place.
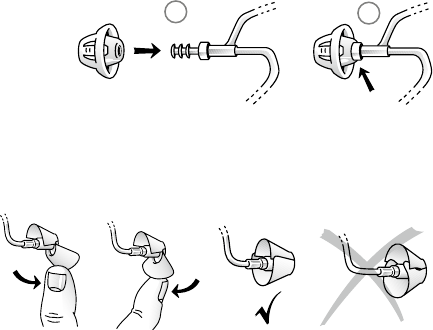
How to apply domes
It is recommended that your hearing care professional change domes, as incorrect dome re-
placement could result in injury.
ReSound standard domes
1. Push the new dome over the receiver.
2. Make sure that the new dome is properly and securely mounted.
34
ReSound tulip domes
Tulip domes are mounted in a similar manner to standard domes, but a few extra steps are
required. Tulip domes consist of two “petals”. It is important to note that the largest petal is the
outermost petal. To ensure this:
1. Push the largest petal away from the receiver tube using a finger. This bends the petal
forward.
2. Then push the largest “petal” back, and it will be placed on top of the smaller petal.
35
i General precautions
1. Do not leave hearing instruments in the sun, near an open fire, or in a hot, parked car.
2. Do not wear hearing instruments while showering, swimming, in heavy rain, or in a moist
atmosphere such as a steam bath or sauna.
3. Should the hearing instrument become moist, remove the battery and place the hearing
instrument in a closed container with a drying agent. Your hearing care professional can
provide options for drying containers or kits.
4. Remove the hearing instruments when applying items such as cosmetics, perfume, after-
shave, hair spray, and suntan lotion.
5. Use only original ReSound consumables e.g. tubes and domes.
6. Only connect ReSound hearing instruments to ReSound accessories intended and
qualified to be used with ReSound hearing instruments.
7. Never attempt to modify the shape of the hearing instrument, ear-moulds, or tubing yourself.
Temperature test, transport and storage information
GN ReSound Hearing Instruments are subjected to various tests in temperature and damp
heating cycling between -25º C (-13º F) and +70º C (+158º F) according to internal and industry
standards. During transport or storage, the temperature should not exceed the limit values of
-20º C (-4º F) to +60º C (+140º F) and relative humidity of 90% RH, non-condensing (for limited
time). The air pressure between 500 and 1100 hPa is appropriate.
36
i General warnings
1. If the device is broken, do not use.
2. Consult a hearing care professional if you discover a foreign object in your ear canal, if you
experience skin irritation, or if excessive ear wax accumulates with the use of the hearing
instrument.
3. Different types of radiation, from e.g. NMR, MRI, or CT scanners, may damage hearing in-
struments. It is recommended not to wear hearing instruments during these or other similar
procedures. Other types of radiation, such as burglar alarms, room surveillance systems,
radio equipment, mobile telephones, contain less energy and will not damage hearing
instruments. However, they have the potential to momentarily affect the sound quality or
temporarily create strange sounds from hearing instruments.
4. Do not wear hearing instruments in mines, oil fields, or other explosive areas unless those
areas are certified for hearing instrument use.
5. Do not allow others to use your hearing instruments. This may cause damage to the
hearing instruments or to the hearing of the other individual.
6. Instrument usage by children or mentally challenged persons should be supervised at
all times to ensure their safety. The hearing instrument contains small parts that could
be swallowed by children. Please be mindful not to leave children unsupervised with this
hearing instrument.
7. Hearing instruments should be used only as prescribed by your hearing care professional.
Incorrect use may result in hearing loss.
37
8. Warning to hearing care professionals: Special care should be exercised in selecting and
fitting hearing instruments with maximum sound pressure level that exceeds 132dB SPL
with an IEC 60711:1981 occluded ear simulator. There may be a risk of impairment of the
remaining hearing.
9. External devices connected to the electrical input must be safe according to the
requirements of IEC 60601-1-1, IEC 60065, or IEC 60950-1, as appropriate.
i Battery warning information
1. Do not put batteries in your mouth, as they can be harmful if swallowed. If swallowed, seek
medical help immediately.
2. Keep batteries away from children and mentally challenged persons.
3. Remove the batteries to prevent leakage when the hearing instruments are not in use for an
extended period of time.
4. Do not attempt to recharge batteries (Zinc Air) which are not specifically designated as
rechargeable because they may leak or explode.
5. Do not attempt to dispose of batteries by burning them.
6. Used batteries are harmful to the environment. Please dispose of them according to local
regulations or return them to your hearing care practitioner.

38
Troubleshooting Guide
SYMPTOM CAUSE
No sound
• Not turned on
• Dead battery
• Battery door will not close
• Blocked earmould or tube
Not loud
• Incorrect earmould placement
enough
• Blocked earmould or dome
• Blocked sound outlet filter
• Change in hearing sensitivity
• Excessive ear wax
• Volume set too low

39
POSSIBLE REMEDY
• Turn on by closing the battery door
• Replace battery
• Insert battery properly
• Clean earmould or tube
• Reinsert earmould
• Clean earmould, replace dome, replace filter
• Change filter or consult your hearing care professional
• Consult your hearing care professional
• Consult your physician
• Increase the volume control if available or consult your hearing care professional

40
Troubleshooting Guide
SYMPTOM
CAUSE
Excessive
• Incorrect earmould placement
whistling / feedback
• Incorrect dome placement
• Excessive ear wax
• Feedback control may need adjustment
• Earmould tubing worn or damaged
• Thin tube connection loose
• Hearing instrument settings not optimal
Sound
• Weak battery
distorted /
• Improper earmould or dome fit
not clear
• Hearing instrument damaged
• Hearing instrument settings not optimal

41
If there are any other problems not mentioned in this guide, please contact your hearing care
professional.
POSSIBLE REMEDY
• Re-insert earmould carefully
• Re-insert dome
• Consult your hearing care professional
• Consult your hearing care professional
• Consult your hearing care professional
• Change thin tube or consult your hearing care professional
• Consult your hearing care professional
• Replace battery
• Consult your hearing care professional
• Consult your hearing care professional
• Consult your hearing care professional

42
Technical Data
Hearing Instrument Maximum output
Model (2ccCoupler / IEC 60118-7)
RIE
VE362-DVIR NP 114 dB SPL
VE362-DVIR HP 117 dB SPL
BTE Standard tube
VE360-DI 123 dB SPL
VE370-DVI, VE270-DVI, VE170-VI 128 dB SPL
VE377-DVI 127 dB SPL
VE380-DVI, VE280-DVI, VE180-VI 136 dB SPL
MG490-DVI, MG290-DVI 139 dB SPL
VE388-DVI 130 dB SPL
BTE thin tube
VE360-DI 125 dB SPL
VE370-DVI, VE270-DVI, VE170-VI 126 dB SPL
VE377-DVI 123dB SPL
43
Warranty and repairs
ReSound provides a warranty on hearing instruments in the event of defects in workmanship
or materials, as described in applicable warranty documentation. In its service policy, ReSound
pledges to secure functionality at least equivalent to the original hearing instrument. As a signatory
to the United Nations Global Compact initiative, ReSound is committed to doing this in line with
environment-friendly best practices. Hearing instruments therefore, at ReSound discretion, may
be replaced by new products or products manufactured from new or serviceable used parts, or
repaired using new or refurbished replacement parts. The warranty period of hearing instruments
is designated on your warranty card, which is provided by your hearing care professional.
For hearing instruments that require service, please contact your hearing care professional for
assistance. ReSound hearing instruments that malfunction must be repaired by a ReSound
qualified technician. Do not attempt to open the case of hearing instruments, as this will invalidate
the warranty.
Please ask your local hearing care professional
concerning disposal of your hearing instrument
400266000-GB-15.12-Rev.D
Any issues relating to the EU Medical Device Directive
93/42/EEC should be directed to ReSound A/S.
Worldwide Headquarters
ReSound A/S
Lautrupbjerg 7
DK-2750 Ballerup, Denmark
Tel.: +45 45 75 11 11
Fax: +45 45 75 11 19
www.resound.com
CVR no. 55082715
United Kingdom
GN ReSound Ltd.
Kirtlington Business Centre
Portway
Kirtlington
Oxon OX5 3JA
Tel.: +44 1869 352 800
Fax: +44 1869 343 466
www.gnresound.co.uk
Australia
GN ReSound Pty. Ltd.
Gate C, 19-25 Khartoum Road
Macquarie Technology Park
Macquarie Park NSW 2113
Tel.: (free) 1800 658 955
Fax: +61 2 9743 7472
www.gnresound.com.au
New Zealand
GN ReSound (NZ) Ltd.
Ground Floor, North Entrance
4 Fred Thomas Drive
Takapuna
Auckland, 0622
Tel.: (free) 0800 900 126
Fax: (free) 0800 007 695
www.gnresound.co.nz
