Installation, Wiring and Operating Instructions for
Series 900 Switch
Series 900
FOR NEW INSTALLATIONS & MAJOR CONVERSIONS REQUIRING A FLASHER AND FUSE IN LINE, ORDER SIGNAL-
STAT NO. 9186 UNIVERSAL CONNECTOR ASSEMBLY & 3 TERMINAL FLASHER
Model 905
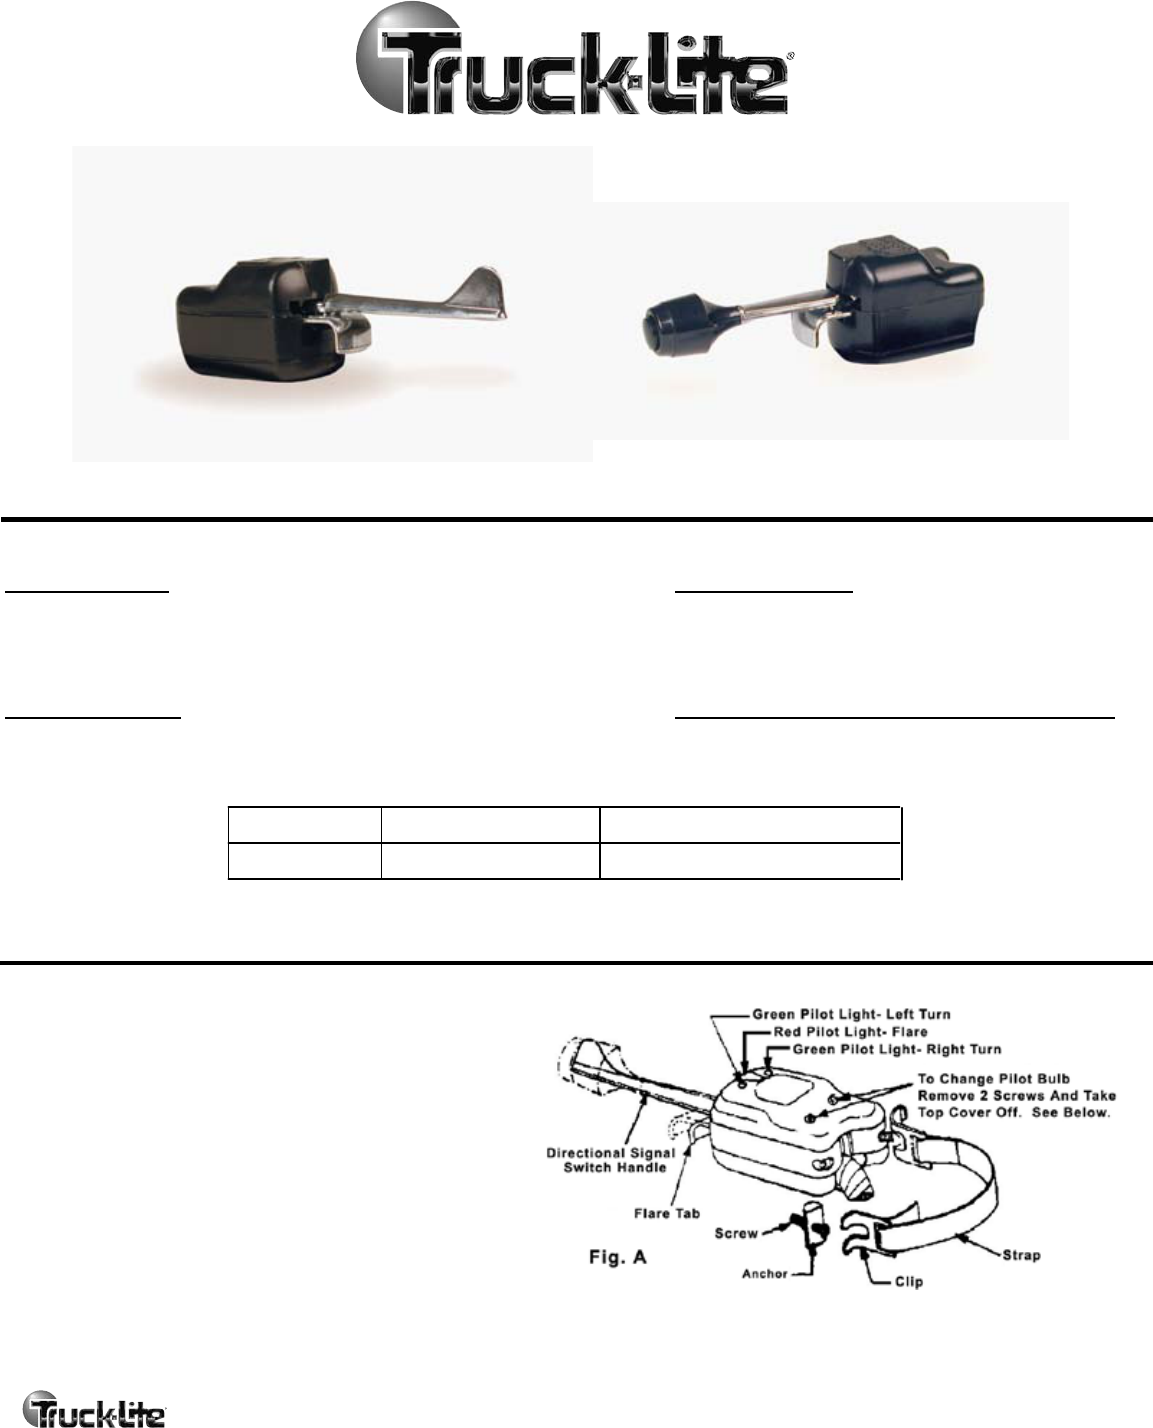
How to operate Series 900 Switch
To Signal Turns:
Move switch handle in direction of turn. Green pilot light will flash
to indicate proper functioning. If pilot light does not flash, check
for defective lamp or pilot bulbs before checking flasher.
To Release Flare:
Move switch handle left or right. Tab flare will release
automatically. Return switch handle to neutral position.
To Operate Flare:
With switch handle in neutral position, pull flare tab out. All signal
lamps & red pilot light will flash for all-around vehicle protection.
To Operate Hi/Lo Beams (Model 905 Only):
Push handle button in to activate Hi/Lo beams. RE-push
buttons to return to regular headlights.
ïSystem Voltage ïLamps To Be Flashed ïSignal-Stat Flasher To Be Used
6* 263
* Exclusive of pilot lights
12V
1. Insert screws into anchors.
2. Insert assembled anchor screws into slots in switch. Do
not tighten.
3. Bend strap end through and around clip. Engage clip
between anchor and switch housing.
4. Hold switch against steering column in desired position
and bend strip around column. Scrape paint from column
under strap to make a really good ground contact.
5. Estimate strap length required and cut it as necessary.
Insert unbent portion of strap through other clip and assemble
as in Step 3.
6. Catch clip under anchor and tighten screws equally until
switch is affixed firmly to steering column.
* When cover is removed, pull Spring Clip away from handle to disengage socket & pilot
bulb assembly from handle. Replace pilot bulb with #51 for 6 volt, #53 for 12 volt, or
#356 for 24 volt service. Re-engage pilot bulb assembly back into handle. Do not try to
test pilot bulb until after switch is reassembled and grounded.
* Replace flashers as follows: for 12V, 263; for 24V, 263-4.
CAUTION: Power lead must be connected to a line which is ìhotî when ignition switch is off for hazard warning signal to operate when motor is not running!.
How to mount Series 900 Switch
310 E. Elmwood Ave.
Falconer, NY 14733
Visit us on the web
www.truck-lite.com
Customer Service
(800) 562-5012
corporate@truck-lite.com
Technical Support
(888) 562-5012
tltech@truck-lite.com
Pg 1
Part 30493
Dwg 46361a0

310 E. Elmwood Ave.
Falconer, NY 14733
Visit us on the web
www.truck-lite.com
Customer Service
(800) 562-5012
corporate@truck-lite.com
Technical Support
(888) 562-5012
tltech@truck-lite.com
Pg 2
Part 30493
Dwg 46361a0
NOTE: Flasher connector are not included with switches Use 3 Terminal Flasher No. 263 connector assembly when required.
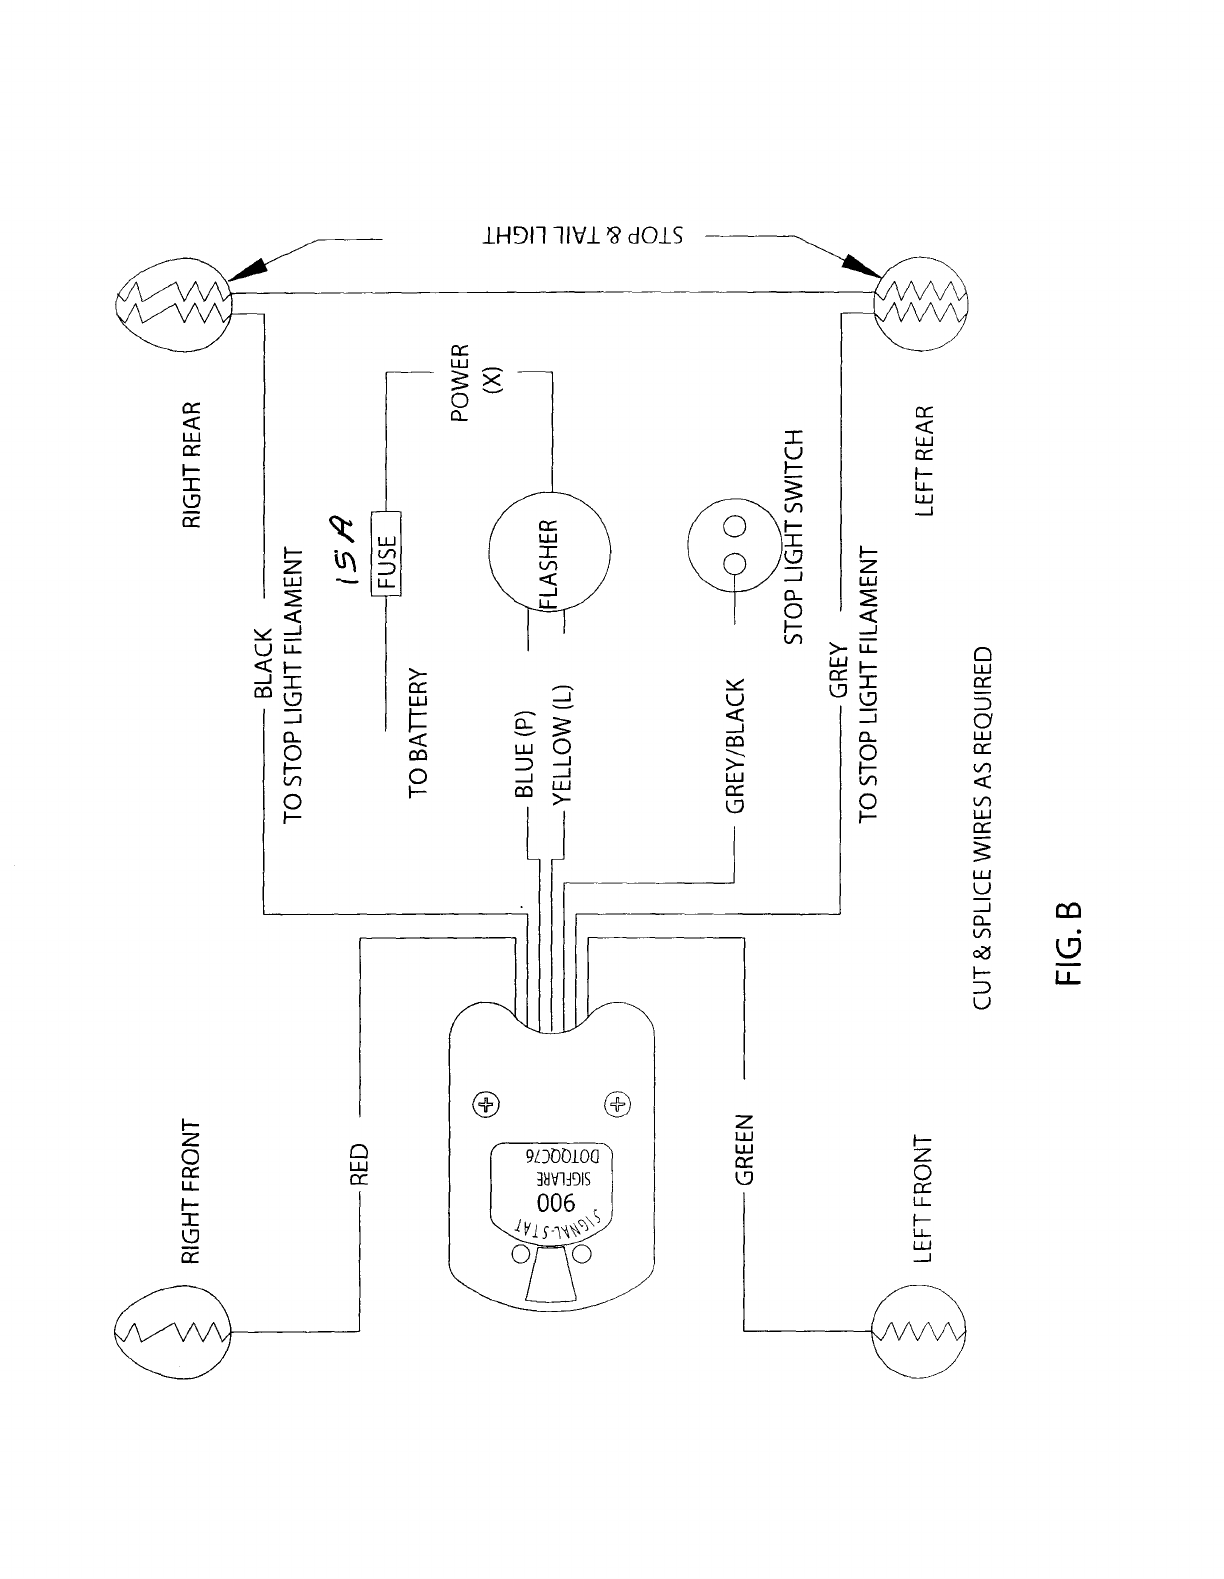
How to wire Model 900, 901 & 910 switch
:
1. Mount switch on steering column, making sure to have very
good ground (metal to metal) under mounting strap, as shown in Fig. A
2. Remove flasher during wiring. Replace flasher only after
wiring is completed & checked.
3. Wire as indicated in Fig. B.
4. Tape ends of unused wires to prevent shorts.
5. Replace flasher to complete installation.
How to wire Model 902 & 903 switch
:
1. Mount switch on steering column, making sure to have very
good ground (metal to metal) under mounting strap, as shown in Fig. A.
2. Remove flasher from harness during wiring. Replace after
wiring has been completed and checked.
3. Wire as indicated in Fig. C.
4. Replace flasher to complete installation.
How to wire Model 905 switch
:
1. Mount switch on steering column, making sure to have very
good ground (metal to metal) under mounting strap, as shown in Fig. A
2. Wire turn signal & hazard warning functions as
indicated for 900 switch in Fig. B.
3. Disconnect ground cable from battery.
4. Wire headlight Hi/Lo beam circuit as indicated in
Fig. D.
5. Replace ground cable to complete installation.
NOTE: Use No. 9191 for replacement handle
& Hi-Lo beam switch
Signal-Stat Series 900 switches are protected by one or more U.S. patent numbers: 2,812,396; 2,886,743; 2,607,840;
2,607,864; 2,652,553; 2,667,603; 2,692,961; 2,825,045.
Serviceman: Give this instruction sheet to the vehicle owner
SIGFLARE
N
S
I
G
900
T
A
L
-
S
A
T
DOTQQC76
RED
GREEN
GREY
BLACK
GREY/BLACK
BLUE (P)
YELLOW (L)
FUSE
FLASHER
(X)
STOP LIGHT SWITCH
RIGHT FRONT
LEFT FRONT
RIGHT REAR
LEFT REAR
TO STOP LIGHT FILAMENT
TO STOP LIGHT FILAMENT
STOP & TAIL LIGHT
CUT & SPLICE WIRES AS REQUIRED
POWER
TO BATTERY
FIG. B
CUT & SPLICE WIRES AS REQUIRED
900
SIGFLARE
DOTQQC76
S
LEFT REAR
-
L
G
N
A
I
S
FIG. C
GREEN
LEFT FRONT
T
T
A
FLASHER
RIGHT REAR
YELLOW (L)
RIGHT FRONT
RED
TO BATTERY
BLUE (P)
FUSE
POWER
(X)
S
900
L
I
A
N
G
A
T
T
S
-
DOTQQC76
SIGFLARE
WHITE/GREEN
LOW BEAMS
YELLOW/BLACK
HIGH BEAMS
PURPLE
POWER
WHITE - MOUNT TO
CHASSIS FOR GROUND
129
FOR TURN SIGNAL & HAZARD
WARNING WIRING SEE FIG B ABOVE
WHITE
FIG. D
(85)
(30)
(87A)
(87)
RELAY

CORPORATE OFFICE
Truck-Lite Co., Inc.
310 East Elmwood Avenue
Falconer, NY 14733
Phone: 716-665-6214
Fax: 716-665-6403
Email: [email protected]
Web: www.truck-lite.com
A QS9000/ISO9001 Company
Signal-Stat 900 Series Trouble Shooting Guide
1. If nothing is working, please check for the following:
• Make sure there is a really good ground to the steering column (metal to metal) or run
separate ground wire under anchor clip to chassis
• Re-check the wire colors / locations
• Check for shorts where wires are spliced
• Use a (3) terminal flasher; “P” = Pilot (Blue), “L” = Load (Yellow), “X” = Power from
battery
2. The pilot light not working is usually a good indication of insufficient ground, the flasher is bad
or the bulb could have burned out.
3. The pilot light is staying on usually means the Blue and Yellow wires are connected together on
a two terminal flasher, (see note 8).
4. The hazard lights flash but the turn signals don’t. Make sure there is a really good ground
(metal to metal) contact between the strap and steering column. The quality of 6V flashers is
poor. They have small parts that break during shipping. Some customers have to try 2 or 3 of
them before they find a good flasher, (see note 1).
5. Positive ground vehicles do not affect the switch, installation is the same.
6. If customer has separate hazard and turn signal flashers, 2 possible methods:
Method 1 - try hooking up a jumper wire between the 2 flasher power terminals. This terminal is
usually marked with "L" adjacent to the terminal. You would also run the YELLOW wire from
the turn signal switch to one of the 2 "L" terminals. This is the power for the switch. With this
method, you will continue to use BOTH flashers. If you want the green and red indicator lights
on the turn signal switch to work, you would also have to run the BLUE wire from the switch to
the "P" terminal of BOTH flashers.
Method 2 - is to run the wires from your hood indicators from the hazard flasher to the "P"
terminal of the turn signal flasher. With this method, you will only use ONE flasher to do both
functions. Again, if you want the green and red indicator lights on the turn signal switch to work,
you would also have to run the BLUE wire from the switch to the "P" terminal of the flasher.
7. If customer has a Painless Wiring Harness with separate turn and hazard flashers:
• Disconnect the Painless Flasher
• Add a jumper wire between the two slots
• Install a 263 (3) terminal flasher; P = Blue for Pilot or indicator light, L = Yellow for
load, X = Purple, wire # 952 from harness for Power

CORPORATE OFFICE
Truck-Lite Co., Inc.
310 East Elmwood Avenue
Falconer, NY 14733
Phone: 716-665-6214
Fax: 716-665-6403
Email: [email protected]
Web: www.truck-lite.com
A QS9000/ISO9001 Company
8. If customer only has a 2 terminal flasher instead of 3 terminals: “L” terminal = Yellow and
don’t connect the Blue wire. However, the green and red indicator lights on the turn signal
switch will not function, (see note 3).
9. Wagner and Tridon flasher terminals are labeled different then stated above:
B = Battery, L = Load (Yellow), E = Pilot (Blue)
10. Installing a stop light switch: a normal stop light switch will have two poles on the bottom,
apply power to one side and the gray wire with a black stripe (from the 900 switch) to the other
(negative) side if marked.
11. If the rear brakes lamps are coming on together: make sure the brakes lamps in the rear are not
tied together. Meaning the RH & LH lamps have to be on different circuits. The line shown in
Figure B of the instruction sheet is for the Tail lamp circuit only.
12. If customer is using LED brake lamps on the vehicle: an electronic flasher 275 would be
needed instead of the 263 listed on the instruction sheet.
Wire the 275 flasher as follows:
Red = Power (X terminal)
White = Output (Yellow wire from switch)
Black = Ground
Green = Indicator/Pilot (Blue wire from switch)
